
Microsoft Corporation
March 1999
Summary: The Microsoft® Outlook® object model allows you to customize Outlook to your organization's specific needs. This guide includes examples and exercises on how to develop applications using the model, find the right tools in the model to solve a given problem, understand key programming concepts, and gain a working knowledge of the Microsoft Visual Basic® programming language. (34 printed pages)
Introduction
Lesson 1: Getting Started
Lesson 2: Programming Concepts: Sub…End Sub and Procedures
Lesson 3: Programming Concepts: Objects, Methods, and Properties
Lesson 4: Real-World Example #1
Lesson 5: Creating Your Own Dialog Boxes
Lesson 6: Programming Concept: Collections
Lesson 7: Programming Concept: If This, Then That
Lesson 8: Real-World Example #2
Where To Go From Here
Appendix: Hands-on Challenges Answers and Explanations
For the latest information, please see www.microsoft.com/office/.
Customizing Outlook with the Microsoft® Outlook® object model is easy—really easy. You don't need a Ph.D. in Computer Science. You don't need to know C or C++ or any programming language. You don't need to know anything about object models. You don't even have to know how to program your VCR.
But don't take my word for it. Let me show you how easy it is. Take a look at these four lines of Outlook object model code:
Set NewMail = Outlook2000.CreateItem(olMailItem)
Set receiverOfMyMail = newMail.Recipients.Add("everybody@thewholeworld.com")
NewMail.Subject = "The Outlook object model is Easy!"
NewMail.Send
Can you figure out what this code does in Outlook?
The Outlook object model uses language that for the most part is already familiar to you. For instance, CreateItem creates a new item in Outlook. Add adds something to an item in Outlook. Subject refers to the subject of an item. Send tells Outlook to send the item.
In these four lines of code, we create a new mail item, address it to "everybody@thewholeworld.com," set the subject to "The Outlook object model is Easy!," and send it.
I told you it was easy. In just these four lines, you used Microsoft's messaging program to send an e-mail to the whole world declaring the benefits of the Outlook object model.
The Outlook object model allows you to customize Outlook to suit your organization's specific needs. The Outlook object model is great when someone in your organization demands (or if they're polite, requests) additional functionality in Outlook—and they need it right away.
For example: A vice president of your company storms into your office and says, "Every time I send a meeting request, I also need to inform certain people about the meeting without inviting them. Outlook won't let me do this!"
You know, however, that with just a little customization, Outlook will let your vice president do this. Next week, you walk into the vice president's office and hand him a solution to the problem, which you created yourself in a few hours using the Outlook object model. See Figure 1. Of course, he doesn't have to know how easy it was.
Figure 1. This could be you! (individual results may vary)
This guide is organized into eight lessons. Each lesson is hands-on—you will use the lessons with Outlook as you go. The guide is best used not as bedtime reading but as be-in-front-of-your-computer-and-try-it reading.
At the end of each lesson will be a "Hands-on Challenge." You should try to complete each challenge—not only are they fun, but they will help you measure your understanding of the lessons. Answers and explanations are provided in the appendix.
All you need is a working knowledge of Microsoft Windows and a familiarity with Microsoft Outlook. That's it.
If you already have programming experience, you can probably just glance at the "Programming Technique" sections; but the rest of the material may still be useful to you.
After going through this guide and doing all the examples and exercises, you will be able to develop applications using the Outlook object model. You will also be able to discover on your own how to find the right tools in the Outlook object model to solve a given problem. You will understand some key programming concepts and gain a working knowledge of the Microsoft Visual Basic® programming language.
In a nutshell, with the help of this guide, you will be able to apply the Outlook object model to meet your organization's needs.
To use this guide and go through the included examples, you need to have Outlook 2000. Because this guide uses Visual Basic for Applications (VBA), a new feature in Outlook 2000, the examples and lessons will not work with earlier versions of Outlook.
You do not need any special development tools to use the Outlook object model.
We'll be using Visual Basic for Applications (VBA) for all the lessons in this guide. VBA is a version of Microsoft Visual Basic integrated into Microsoft Office applications, including Microsoft Outlook. Solutions you create in VBA are called macros. A macro is a series of instructions in Visual Basic that perform something useful. When you write macros to perform tasks in Outlook, you write Visual Basic instructions that use the Outlook object model.
Outlook will now automatically start the Visual Basic Editor, as shown in the illustration below in Figure 2:
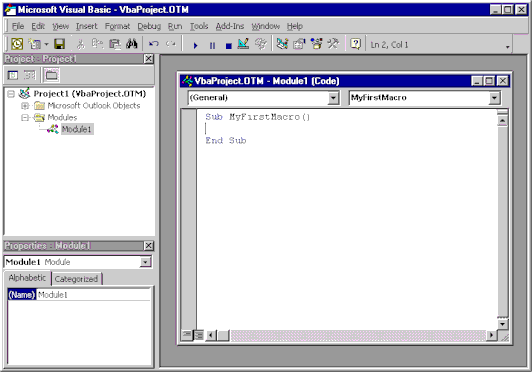
Figure 2. The Microsoft Visual Basic Editor
By default, the Visual Basic Editor displays three windows:
Now let's use each of these three windows:
Sub MyFirstMacro()
Set NewMail = ThisOutlookSession.CreateItem(olMailItem)
NewMail.Subject = "(your name here) says: This really is easy! :)"
NewMail.Display
End Sub
You don't have to know how or why this code works. You'll learn that in future lessons.
Did a mail message pop up with the subject you set using the Outlook object model? Congratulations! You're now an official Outlook object model programmer.
If an error dialog box came up, no big deal. Click the Debug button. Make sure the code looks exactly as shown above, and do steps 2-4 again.
Outlook will check whether or not you have any macros when you start Outlook. That is why you may see the dialog box in Figure 3 when you start Outlook:
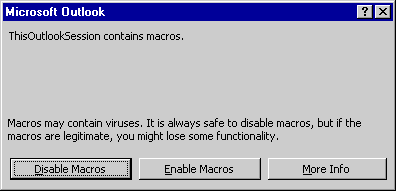
Figure 3. Microsoft Outlook macro dialog box
When you see this dialog box, click the Enable Macros button. This will allow Outlook to run the macros you create. You can also choose to avoid this dialog box by reducing the level of security on your macros. To do so, point to Macro on the Tools menu and then click Security. Select the Low security option, and click OK.
Try adding one line to the code to set the body of the message to "This is where the content of the message goes." (or any message you like). Hint: You will be using your "NewMail" message and the key word Body.
So now that you've gotten your feet wet in this stuff, it's time to learn a bit about the water you're standing in. Let's take a close look at the code you just wrote:
Sub MyFirstMacro()
  Set NewMail = ThisOutlookSession.CreateItem(olMailItem)
  NewMail.Subject = "(your name here) says: This really is easy! :)"
  NewMail.Display
End Sub
Let's first look at the Visual Basic key words Sub and End Sub. Sub…End Sub are used to begin and end a macro, following the pattern shown below:
Sub AnyNameHere()
  Some of that cool refreshing Object Model code here
End Sub
AnyNameHere is the name of the name of a macro or procedure. A procedure is a small set of code that you create that does something. MyFirstMacro is an example of a procedure. A procedure doesn't have to be a macro, however. You can create a procedure and then "call" that same procedure from another procedure, as in the following example:
Sub MyFirstMacro()
MakingMail
End Sub

Sub MakingMail()
Set NewMail = ThisOutlookSession.CreateItem(olMailItem)
NewMail.Subject = "Hey, this Sub/End Sub thing is easy too!"
NewMail.Display
End Sub
If you run MyFirstMacro, the procedure MakingMail will run and you will see a mail message with the subject, "Hey, this Sub/End Sub thing is easy too!"
So why would you want to do this? Creating separate procedures allows you to organize your code in a nice, clean way, and it allows you to do common procedures easily. For example, if we needed to create and display three different mail items with the subject, "Hey, this Sub/End Sub is easy too!," you could do that by changing the code in MyFirstMacro as follows:
Sub MyFirstMacro()
MakingMail
MakingMail
MakingMail
End Sub
Edit your MyFirstMacro macro in the Visual Basic Editor, and change the code to use a new procedure, such as the MakingMail procedure, to create a new piece of mail five times.
At some point, you may have heard all the hoopla over "object-oriented" programming. Object-oriented programming is the key concept behind C++ and Java, the most widely used programming languages today. What you probably didn't know, however, is that just by finishing Lessons 1 and 2, you can now call yourself an object-oriented programmer!
That's right. The Outlook object model uses object-oriented programming. Fortunately, to use and understand the Outlook object model, you don't need to take a class in the subject or write a thesis on it. To gain a working knowledge of the Outlook object model, you only need to know three concepts:
| Concept | Description | Example |
| Object | A "thing" | Mail item |
| Method | Something a "thing" can do | Show itself to the user |
| Property | A characteristic of a "thing" | Subject |
Everyday things can be thought of as objects, methods, and properties. For instance, consider a car as an object, such as that in Figure 4. A car object has methods, which are various things it can do, such as Drive, Start, Turn Left, Turn Right. A car also has properties that describe it: the color is beige, and the number of headlights is two.

Figure 4. Car object with methods and properties
The car object might say, "I am an object. As a car object, I have methods that are things I can do: Drive, Start, Turn Left, Turn Right. I also have properties that are characteristics and describe me: My color is beige, and the number of headlights I have is two."
Take a closer look at the code you've already written and see where the objects, methods, and properties are:
Set NewMail = ThisOutlookSession.CreateItem(olMailItem)
NewMail.Subject = "Hey, this Sub/End Sub thing is easy too!"
NewMail.Display
There are two objects in this code: the first is NewMail, and the second is ThisOutlookSession. It's easy to visualize both a mail item and a session of Outlook as "things." Incidentally, the Outlook object model is simply a list of the objects that we can use to program Outlook.
Whenever you first use an object, you have to use the Set key word. Objects take up memory in the computer; the Set key word allocates the memory required for an object.
You can give objects any name you want. In the above example, I gave the mail item object the name, NewMail, but you can change the name to suit your mood. The object, ThisOutlookSession, was created for us—you can see it in the Project Window under Microsoft Outlook Objects.
The MyFirstMacro code contains two methods: the first is CreateItem, and the second is Display. A method is always associated with an object. In this case, CreateItem is associated with the object, ThisOutlookSession. To use a method, you simply place a period in between the object and the method. For example, NewMail.Display.
As described above, a method is "Something a thing can do." In the example you've written, an Outlook Session can create a piece of mail—CreateItem. And a piece of mail can display itself to the user—Display.
Sometimes methods need additional information. For example, the CreateItem method needs to know what type of item to create. We tell it to create a mail item by including that information, olMailItem, in parentheses after the name of the method. Some methods require more than one piece of information, while others, such as Display, require none.
The MyFirstMacro code contains one property—Subject. Like a method, a property is always associated with an object. In this case, Subject is associated with the object, NewMail. To use a property, you simply place a period between the object and the property. For example, NewMail.Subject.
Once again, think of a property as "a characteristic of a thing." For instance, the subject is a characteristic of a mail item. Another example: The start time is a characteristic of an appointment item.
One last thing to know: Every object is of a specific type. Each type of object has its own set of methods and properties. In the above example, NewMail is a "mail item" object. Mail items have methods, such as Display, and properties, such as Subject, that other types of objects do not have. For example, the following instruction:
ThisOutlookSession.Subject = "Hello"
would not work because objects of type "Outlook Session" do not have properties called Subject.
Look at the following make-believe Object model code, and determine which parts are objects, methods, and properties (there are three of each):
Set PetStore = ShoppingMall.GetStore(aPetStore)
PetStore.OpeningTime = 9 AM
Set Dog = PetStore.GetPet(aDog)
Dog.Breed = "Cocker Spaniel"
Dog.Color = "Blond"
Dog.WagTail
Suppose that each day, you need to order lunch for the people in your group. There are a few restaurants to order from, but you only want to order from one. The best way to choose the restaurant is to take a vote. Let's consider how you would do this as a user in Outlook:
The good news is that Outlook provides a good way to poll many people. Your co-workers will be able to choose by simply clicking on a button with the name of the restaurant they want.
The bad news is that you'll have to do the same above eight steps every morning at work. This is where the Outlook object model can help—we'll create a macro to turn those eight steps into zero steps.
Let's jump right in and create this macro:
        Sub PollRestaurant()
            Set NewMail = ThisOutlookSession.CreateItem(olMailItem)
            NewMail.Subject = "Please open and make your vote for lunch!"
            NewMail.Body = "Click one of the buttons above to make your" &_
                    "vote. I'll be tallying at 11 AM. " &_
                    "Lunch will be in the break room at noon."
        NewMail.VotingOptions = "Taco Temple; Burger Palace; " &_
                "Chicken Chums; Pasta Hut"
        Set receiverOfMyMail = NewMail.Recipients.Add("hungrypeople@mycompany.com")
            NewMail.Send
        End Sub
Note hungrypeople@mycompany.com is a distribution list of people who will be having lunch.
Note Because you are not displaying the item, you will not see anything. Check to see if the message got sent by looking in your Sent Items folder.
That's it! You're done! And to do this, we only introduced one new line of code:
NewMail.VotingOptions = "Taco Temple; Burger Palace; " &_
            "Chicken Chums; Pasta Hut"
VotingOptions is a property of the NewMail object. We set the VotingOptions to be a series of restaurants separated by a semi-colon. (The same thing you would do if you added the voting options to the message manually.)
Now you have a nice little macro that sends out a piece of mail asking your employees their lunch choice. But you still have to actually run the macro for it to work. Now say, for example, the first thing you do when you get to work in the morning is to start up Outlook. And let's say that the last thing you do before you leave work is to quit Outlook. Wouldn't it be nice to have Outlook automatically run your macro every time Outlook starts up? Then you could send out the lunch polling mail every morning without doing any work at all!
You can do that by using an object event. An event occurs when something happens to an object. For example, when you receive mail, a NewMail event happens to the ThisOutlookSession object. When you start up Outlook, a StartUp event happens to the ThisOutlookSession object.
To illustrate further, think back to the car analogy. You might want the car object, Figure 5, to do something when someone puts a key in the ignition. In this case, you would use a car event called something like DriverPutKeyInIgnition. When that event gets called, you would want to start up the car's engine and get ready to go.

Figure 5. Calling the car event
Again, the car object might say, "There are several events I respond to. These include turning the key in my ignition, shifting to a different gear, pressing on the gas pedal, and pressing on the break pedal. I have to do the right thing whenever a driver does one of these events."
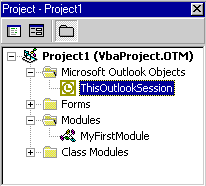
Figure 6. Code window called ThisOutlookSession
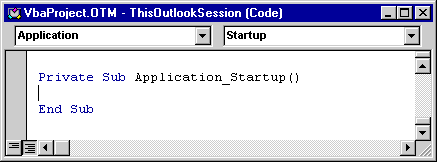
Figure 7. Two drop-down lists under code window title bar
Private Sub Application_Startup()
PollRestaurant
End Sub
That's it! You're done! Quit Outlook, and start it up again to see if it worked.
Create a new macro that polls your co-workers for their breakfast food choice. Because you'll want people to vote at the end of the day (so you can order breakfast first thing in the morning), have the macro called every time you quit Outlook.
Now for one of the coolest parts of VBA—forms. A form is a dialog box-like object that you can create and design in VBA. You can add check boxes, text, pictures, and all sorts of Windows features to your form without writing a single line of code.
Why do you need forms? Sometimes your macro will need to communicate information to users or get information from users. For example, you may want to show a progress dialog box while your macro is running, or you may want to let users set some options before your macro does its magic.
To demonstrate, let's go back to the PollRestaurant macro you created in Lesson 4. The PollRestaurant macro sends out a piece of mail with voting options every time you start up Outlook. But what if you start up Outlook at different points throughout the day? What if you go to the office on the weekend and start up Outlook? You certainly wouldn't want to flood your co-workers e-mail boxes with "What do you want for lunch?" e-mail five times a day. The solution is to present yourself with the option to send out the mail every time you start Outlook.

Figure 8. Designing a dialog box of user controls with UserForm
Before we continue, consider for a moment what we'll need for our PollRestaurantPrompt macro. We want to give the user a choice to send or not to send the mail with the restaurant voting options. A simple way to do this is to add some explanatory text, and then add two buttons, Send Lunch Mail and Don't Send Lunch Mail.
Note The label you just created is an object. It has methods and properties just like a mail item or an Outlook session.
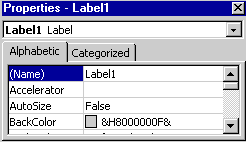
Figure 9. Properties window
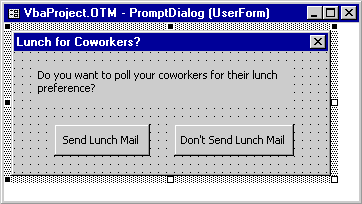
Figure 10. Creating buttons and captions
So now you have this cool dialog box, but it doesn't do anything. To make it work, you only need four lines of Outlook object model code. The tricky thing is that you need these lines in three places. Here's how you do it:
Private Sub Application_Startup()
PromptDialog.Show
End Sub
Note PromptDialog is an object. Show is a method of that object.
Private Sub Yes_Click()
PollRestaurant
PromptDialog.Hide
End Sub
Note PromptDialog is an object (PromptDialog is the name you set in the Properties window for the dialog box.). Hide is a method of that object.
Private Sub No_Click()
    PromptDialog.Hide
End Sub
That's it! You're done! Close the Visual Basic editor, close Outlook, and restart to see your macro and your dialog box in action.
Create a third button on your dialog box that gives the user the option to send out mail asking for your co-workers' breakfast choices. Use the macro you created from Hands-on Challenge #4. Have this dialog box appear both when you start and when you quit Outlook.
So far, you have learned about objects, properties, methods, and events. You need to understand one last category to fully use the Outlook object model: Collections.
A collection is a special type of object—an object that is a group of other objects. So, for example, if "car" is an object, "cars" is a collection, a collection of cars. Figure 11 shows a collection of cars.
A collection can also be a property of another object. Continuing with the car example, "doors" can be a property of a "car" object as well as a collection of "door" objects. Therefore, we can understand the relationship like this:
"Cars" is a collection of "car" objects. Each "car" object has a property called "doors." "Doors" is a collection of "door" objects.

Figure 11. Collection of cars
The cars might say, "We are a collection of car objects. Each of us has a property called doors. Each of these properties is a collection of door objects."
The Outlook object model has many types of collections, for instance, on the very first example of this guide:
Set receiverOfMyMail = newMail.Recipients.Add("everybody@thewholeworld.com")
Recipients is a collection of Recipient objects. Recipients is also a property of the NewMail object. It's easy to see the usefulness of collections. A piece of mail can be addressed to any number of names. The Recipients collection gives us an easy way to manage these names.
Other collection objects in Outlook include:
All collections have methods and properties that allow you to access the individual objects in the collections. Three of the most important methods and properties will be covered here.
Dim numberOfRecipients
numberOfRecipients = newMail.Recipients.Count
In this example, numberOfRecipients is a variable. A variable is something we define that allows us to record information and use it later. After this code runs, the numberOfRecipients variable will be equal to the number of recipients in the NewMail item.
Before we use a variable, we have to define it. We define it by using the key word Dim. We can call our variables anything we like. For instance, this code would work just the same:
Dim myDogBitMe
myDogBitMe = newMail.Recipients.Count
Note A collection can be empty, in which case, the Count property is zero.
Set aRecipient = newMail.Recipients.Item(2)
The number in the parenthesis indicates which recipient you want to access. For this example, the object aRecipient will become the second Recipient object in the Recipients collection.
You can also use a variable in the parenthesis. For example:
Dim numberOfRecipients
numberOfRecipients = newMail.Recipients.Count
Set theLastRecipient = newMail.Recipients.Item(numberOfRecipients)
Here, you are first setting the variable numberOfRecipients to be the number of Recipient objects in the Recipients collection. Then you are accessing the last recipient. So, if there are five recipients, the last item can be specified by the number 5. The last line will be the same as saying:
Set theLastRecipient = newMail.Recipients.Item(5)
Set receiverOfMyMail = newMail.Recipients.Add("mom@family.com")
How you use the Add method might vary depending on which collection you're adding to. In most cases, like the one above, you will at least have to specify a name for the new object (like mom@family.com).
One more note about variables: Because a variable records information, its value changes only when you change it. As an analogy, think of a variable as an audio tape:
Let's say we create an audio tape called "MyCurrentAge." On this audio tape, we record your current age. Now let's say we listen to the audio tape five years from now. What will you hear when you play back the audio tape? You will hear, not your current age, but your age five years ago. This is an important concept, and you can use it to correctly answer Hands-on Challenge #6.
Look at the following make-believe Visual Basic code and answer the questions that follow. Assume that at the start, Papers collection is empty (its Count property is equal to zero.) Hint: Step through the code line by line, and keep track of the numberOfPapers variable and the objects in the Papers collection.
Dim numberOfPapers
Set paper1 = MyDesk.Papers.Add("The Foofle Report")
Set paper2 = MyDesk.Papers.Add("The Mooble Report")
currentNumber = MyDesk.Papers.Count
Set paper3 = MyDesk.Papers.Add("The Garble Report")
Set paper4 = MyDesk.Papers.Item(currentNumber)
Set paper5 = MyDesk.Papers.Item(1)
Set paper6 = MyDesk.Papers.Item(currentNumber + 1)
currentNumber?paper3?paper4?paper5?paper6?Sometimes we need to control which code is used, based on the state of things. For instance, in the PollRestaurant macro, it would make sense to send out lunch mail, but only if the time is not past 1 PM. Or we may want to create a macro that runs only when the user sends out mail to certain people or even a specific number of people.
We can create procedures that respond to different conditions by using the If...Then control statement. The If...Then control statement is one of many Visual Basic tools that can direct the flow of your code. The format of the If...Then control statement is as follows:
If <expression> Then
<code here>
End If
In the above code, <expression> represents something that can be True or False. <code here> represents the code that will run if <expression> is determined to be True.
<expression> examples:
| Papers.Count = 3 | True if there are three Paper objects in the Papers collection. |
| numRecipients > 0 | True if the numRecipients variable is greater than 0. |
| numRecipients <> 5 | True if the numRecipients variable does not equal 5. |
The following two examples help demonstrate how the If...Then control statement can be used.
Dim numberOfRecipients
numberOfRecipients = myItem.Recipients.Count
If numberOfRecipients > 0 Then
Set myRecipient = myItem.Recipients.Item(numberOfRecipients)
MsgBox "The name of the last recipient is " &_
 myRecipient.Name & "."
End If
If numberOfRecipients = 0 Then
MsgBox "There are no recipients in this item."
End If
In this example, we display a dialog box that tells the user the name of the last recipient in the mail message. If the mail message has no recipients, we tell the user that.
Note MsgBox is a Visual Basic statement used to display simple messages. You can display a single string or any number of strings joined by a "&" sign. In the above example, if the name of the last person the mail is addressed to is "Sean Purcell," the user would see a dialog box like the one in Figure 12:

Figure 12. Dialog box showing name of last recipient in mail message
If we present the user with a dialog box like the one in Figure 13:
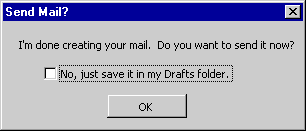
Figure 13. Dialog box giving option to send or save message
When the user clicks the OK button, we have to run different code depending on whether the user checked the check box labeled "Just save it in my Drafts folder." If it's not checked, we'll send the message. If it is checked, we'll just save it so the user can send it later.
To understand how this would work, first you need to know that a check box is an object you can draw right onto a form—just like a button or a label like you created in Lesson #5. Because it is an object, it has properties. One of those properties is called "Value." The Value property can either be True (it's checked) or False (it's not checked.)
The code needs to run when the user clicks the OK button. So we add the following code to Click event of the OK button. In this example, we'll assume that the name of the form is PromptDialog, the name of the button is OK, and the name of the check box is justSendDraft.
Private Sub OK_Click()
If PromptDialog.justSendDraft.Value = True Then
   MyItem.Save
End If
If PromptDialog.justSendDraft.Value = False Then
   MyItem.Send
End If
PromptDialog.Hide
End Sub
If the user selects the check box, Outlook now saves the message to the user's Drafts folder. If the user does not select the check box, Outlook sends the message.
Make one addition to the PollRestaurant macro you created in Lesson 4 and added a dialog box to in Lesson 5. In the dialog box, add a check box that allows the user to edit the polling mail before sending it. The check box can have a Caption like, "Edit the polling mail before sending." If this is checked, don't send the mail—just create the mail and display it to the user.
Hint: You may want to create another PollRestaurant macro (called PollRestaurant2) that displays the message by using the Display method of the Mail Item object. Then when the user clicks the "Send Lunch Mail" option, you would call one macro or the other depending on the user's choice.
Suppose you're an assistant to an executive in a large corporation. One part of your job is sending out important e-mail to groups in your company. There are about five different groups (distribution lists) you frequently have to send e-mail to. Sometimes you'll want to address an important e-mail to all 5 distribution lists. Sometimes you'll want to address an important e-mail to just one or two.
Because you send these e-mails out many times each week, you want to make it super-easy for you to select which of these distribution lists you (or your manager) want to send the mail to. You don't want to have to go through your company's Global Address List (which has too many names to count), and you don't want to have to type each name or find each name from a list individually.
How do you make this task super-easy? By using the Outlook object model to create a dialog box where you can just check which of these groups you want to send your mail to!
For the purpose of this example, we'll assume your company makes wacky musical instruments. The names of the distribution lists that interest you (with descriptions) are:
| Distribution List | Descriptions |
| Blue Horn Sales Division | All the sales personnel responsible for selling blue horns. |
| Gold Flute Sales Division | All the sales personnel responsible for selling gold flutes. |
| Flute And Horn Marketing | All the people responsible for marketing flutes and horns. |
| Blue Horn Design Team | All the engineers responsible for designing horns. |
| Gold Flute Design Team | All the engineers responsible for designing flutes. |
Before we begin, let's take a step back and imagine how you will use this name-select dialog box. A simple way would be to have the dialog box show up when you send your mail. At that point, you can check off which of the above distribution lists you want to send the mail to. When you click OK, Outlook will add the appropriate names and send the mail.
But wait. You don't always want to see this dialog box every time you send mail. You only want to see this dialog box when you need it. You can do this by first checking who the mail is addressed to. If the first address is a specific name, you will show the dialog box. If the first address is not that specific name, you will not show the dialog box.
So to get started, first you need to create that contact:
Now we need to create the actual dialog box the user will see when sending mail to the "Group Mail" contact:
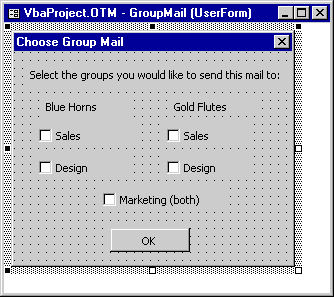
Figure 14. Group Mail dialog box
Remember that the Caption property sets the text the user sees in the dialog box.
| Control | Name |
| The form | GroupMail |
| OK Button | OK |
| Blue Horns Sales check box | BlueHornSales |
| Gold Flute Design check box | GoldFluteDesign |
To make the program work, you will need to write Outlook object model code for two events: when the user sends mail, and when the user clicks the OK button of your dialog box. Since we just created the dialog box, let's write the OK button code first:
Private Sub OK_Click()
GroupMail.Hide
End Sub
Note GroupMail is the name of the form, and OK is the name of the OK button.
Private Sub Application_ItemSend(ByVal Item As Object, Cancel As Boolean)
If (Item.Recipients.Count > 0) Then
Set firstRecipient = Item.Recipients.Item(1)
End If
Cancel = True
End Sub
The If statement tells us whether the number of recipients is greater than 0. If it is greater than zero, we will continue on with our code.
Note that, if the mail is not addressed to anyone, the next line,
Set firstRecipient = Item.Recipients.Item(1)
would not work because there would be no first recipient. That is why it is important to make sure the mail is addressed to at least one e-mail alias.
Before we finish, now is a good time to introduce you to the Visual Basic Editor Debugger. The Debugger is used to help you see how your code works and to fix any problems that might exist in your code.
To use the Debugger, you create a "Breakpoint" in your code by clicking on the light vertical bar to the left of your code. Here you can add and remove breakpoints (they look like little Stop signs.)
As an example, create a breakpoint at the first If statement, as shown in Figure 15:
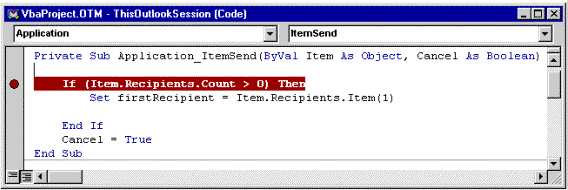
Figure 15. Creating breakpoint in code
Now when your code runs, your code will be stopped at this line. From there, you can "step" through your code by pressing the F8 key. When you want your code to continue running, press F5.
Try it! With your breakpoint at the first If statement, create a piece of mail in Outlook, and don't address it to anyone. Send the mail. VBA will open stopped to the line where you set the breakpoint. Hit F8. It should skip all the code within the If statement. Now create another piece of mail with recipients. Send the mail. Now VBA should go to the code within the If statement. Cool, huh?
Let's continue making this work:
Private Sub Application_ItemSend(ByVal Item As Object, Cancel As Boolean)
If (Item.Recipients.Count > 0) Then
Set firstRecipient = Item.Recipients.Item(1)
    If StrComp("Group Mail (E-mail)", firstRecipient.Name, vbBinaryCompare) = 0 Then
        Item.Recipients.Remove 1
        GroupMail.Show
    End If
    Cancel = True
End If
End Sub
After we set the firstRecipient object to be the first recipient in the mail message, we use a Visual Basic function, StrComp, to see if that recipient is the same as the placeholder contact we created at the beginning of this lesson.
Note Outlook appends the names of personal contacts with "(E-mail)."
If StrComp(string1, string2, type of comparison) = 0, that tells us that string1 and string2 are identical.
If the first recipient is our "Group Mail (E-mail)" contact, we then remove that contact from the mail. We do that via the Remove method, which is common to all collections. The "1" tells VBA to remove the first recipient in the collection.
Then we show the user the GroupMail dialog box.
Use the Visual Basic Editor Debugger to make sure this works properly with mail addressed and not addressed to the Group Mail contact.
We put the line, Cancel = True, so that we don't actually send the mail message when this procedure is done. At the end, you may want to take this line out, but it helps to be able to use the same mail (and not send out a bunch of bogus mail) until we're done.
Private Sub Application_ItemSend(ByVal Item As Object, Cancel As Boolean)
If (Item.Recipients.Count > 0) Then
    Set firstRecipient = Item.Recipients.Item(1)
    If StrComp("Group Mail (E-mail)", firstRecipient.Name, vbBinaryCompare) = 0 Then
        GroupMail.Show
        Item.Recipients.Remove 1
        If GroupMail.GoldFluteDesign.Value = True Then
            Set newRecipient = Item.Recipients.Add("Gold Flute Design Team")
            newRecipient.Resolve
        End If
        If GroupMail.GoldFluteSales.Value = True Then
            Set newRecipient = Item.Recipients.Add("Gold Flute Sales Team")
            newRecipient.Resolve
        End If
        If GroupMail.BlueHornDesign.Value = True Then
            Set newRecipient = Item.Recipients.Add("Blue Horn Design Team")
            newRecipient.Resolve
        End If
        If GroupMail.BlueHornSales.Value = True Then
            Set newRecipient = Item.Recipients.Add("Blue Horn Sales Team")
            newRecipient.Resolve
        End If
        If GroupMail.Marketing.Value = True Then
            Set newRecipient = Item.Recipients.Add("Flute and Horn Marketing")
            newRecipient.Resolve
        End If
        Cancel = True
    End If
End If
End Sub
This may seem like a lot of code, but it's actually just four lines repeated five times, once for each of the check boxes in the dialog box.
For each check box, we check to see if the user checked it. If the user did check it, we add the appropriate recipient to the mail message. We then resolve the name of recipient (have Outlook associate it with a real name) using the Resolve method of the Recipient object.
If you want to actually send the mail automatically, remove the line, "Cancel = True."
Note The program will fail if it tries to send mail after resolving names that don't exist. To make it work, create a distribution list (File.New.Distribution List) in Outlook with names identical to the recipients you specified ("Gold Flute Sales Team," "Blue Horn Design Team," etc.) in the code written in this step. Add at least one address to each distribution list you create.
Make this lesson work for you! Think of how you could apply this program to your work. Change the code and the dialog box to work with five (or more) distribution lists that you often have to send important mail to.
Now you have been introduced to the Outlook object model. You can now create custom Outlook solutions.
Of course, this guide only scratched the surface of all the powerful things the Outlook object model can do. Use the online Help to explore the many collections, objects, methods, and events at your disposal.
To use the online Help, from VBA, select Object Browser from View menu. You will see a dialog box in Figure 16 that allows you to find all the tools available to you.
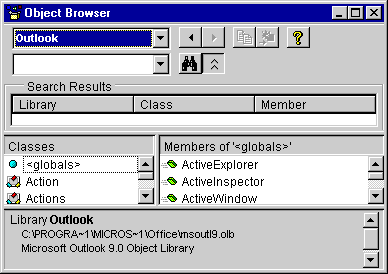
Figure 16. Object Browser dialog box
To see the Outlook-specific tools, select Outlook from the top left dropdown list in the Object Browser. After Outlook is selected, click on the Help icon (the "?" graphic on the top right of the window) to view the online Help associated with the Outlook object model.
A window will show up on the right of the screen. The boxes you see in this window represent objects and collections of objects in the Outlook object model. (You can tell which is which by the key at the bottom of the window.)
Look at the top box labeled "Application." Every time you used ThisOutlookSession in your code, you've been using an Application object. Try clicking on the Application box. Here, you get all sorts of information about this object. Many links can also take you to related topics.
Try clicking on the "Methods" link in blue near the top of the window. The window that pops up shows you all the methods that are associated with the Application object. For instance, you'll see the CreateItem method, which we used in the very first example in this guide. Double-click on that method (or any method) to learn more about it.
You can also use the Contents in Help to get help on a specific area of the Outlook object model. From the help window, click on the Show icon (the one with the yellow arrow pointing left) to see an expanded view of the Help. See Figure 17.
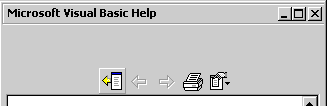
Figure 17. Help window Show icon
From here, you can explore all the different capabilities of the Outlook object model. For instance, let's say you wanted to work with appointments. Click on the Contents tab, and look for the Appointment object under Microsoft Outlook Visual Basic Reference. See Figure 18.
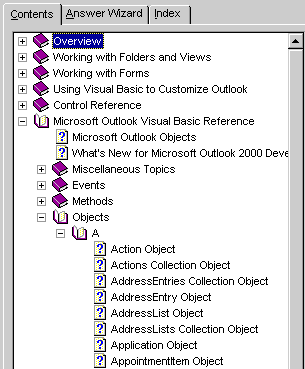
Figure 18. Contents tab in Help
All the information you need is here. And all the help files have hyperlinks in them so you can quickly navigate between related subjects, such as to see what elements or methods a certain object has. Many of the help files also have examples you can learn from and use in your own code.
Congratulations on becoming a real Outlook object model programmer! Now you can start using the Outlook object model to save your company time and money!
Try setting the body of the message to "This is where the content of the message goes."
To set the body, we follow the model of the line where we set the subject of the mail item:
Sub MyFirstMacro()
Set NewMail = ThisOutlookSession.CreateItem(olMailItem)
NewMail.Subject = "(your name here) says: This really is easy! :)"
NewMail.Body = "This is where the content of the message goes."
NewMail.Display
End Sub
Open up the MyFirstMacro macro in the Visual Basic Editor, and change the code to use a new procedure (i.e., MakingMail) to create a new piece of mail five times.
To create five pieces of mail, we need to call the procedure MakingMail from MyFirstMacro five times:
Sub MakingMail()
Set NewMail = ThisOutlookSession.CreateItem(olMailItem)
NewMail.Subject = "Hey, this Sub/End Sub thing is easy too!"
NewMail.Display
End Sub

Sub MyFirstMacro()
MakingMail
MakingMail
MakingMail
MakingMail
MakingMail
End Sub
Look at the following make-believe object model code and determine which parts are objects, methods, and properties (there are three of each):
Set PetStore = ShoppingMall.GetStore(aPetStore)
PetStore.OpeningTime = 9 AM
Set Dog = PetStore.GetPet(aDog)
Dog.Breed = "Cocker Spaniel"
Dog.Color = "Blond"
Dog.WagTail
| Objects | Methods | Properties |
| ShoppingMall | GetStore | OpeningTime |
| PetStore | GetPet | |
| Dog | WagTail | Color Breed |
GetStore is a method, something the object ShoppingMall can do. GetPet is a method, something the object PetStore can do. WagTail is a method, something the object Dog can do. OpeningTime is a characteristic of the object ShoppingMall. Breed is a characteristic of the object Dog. Color is another characteristic of the object Dog.
To create a new macro that polls your co-workers for their breakfast choice, create a macro like the PollRestaurant macro, and call it PollBreakfast:
Sub PollBreakfast()
Set NewMail = ThisOutlookSession.CreateItem(olMailItem)
NewMail.Subject = "Please open and make your vote for breakfast!"
NewMail.Body = "Click one of the buttons to make your vote." &_
"I'll be tallying first thing in the morning." &_
"Breakfast will be in the break room at 9 AM."
NewMail.VotingOptions = "Wake Up Land; Breakfast Blamos;" &_
"Eggs n'Stuff"
Set receiverOfMyMail = NewMail.Recipients.Add("hungrypeople@mycompany.com")
NewMail.Send
End Sub
Next, because you want this to run every time you quit Outlook, call the PollBreakfast macro on the ThisOutlookSession object's Quit event (in the ThisOutlookSession Module Window):
Private Sub Application_Quit()
   PollBreakfast
End Sub
First, we need to make some changes to the dialog box. Create a new button, and make other adjustments to make the dialog box look something like the one in Figure 19:

Figure 19. Dialog box that polls workers for breakfast choice
Double-click on the Send Breakfast Mail button, and make it so that you call your PollBreakfast module and hide the dialog box when the user clicks it (we assume the name of the button is Breakfast):
Private Sub Breakfast_Click()
PollBreakfast
PromptDialog.Hide
End Sub
Now you need to change ThisOutlookSession's Quit event (in the ThisOutlookSession Module Window) to show the PromptDialog dialog box when the user quits Outlook:
Private Sub Application_Quit()
   PromptDialog.Show
End Sub
Here is the code:
Dim numberOfPapers
Set paper1 = MyDesk.Papers.Add("The Foofle Report")
Set paper2 = MyDesk.Papers.Add("The Mooble Report")
currentNumber = MyDesk.Papers.Count
Set paper3 = MyDesk.Papers.Add("The Garble Report")
Set paper4 = MyDesk.Papers.Item(currentNumber)
Set paper5 = MyDesk.Papers.Item(1)
Set paper6 = MyDesk.Papers.Item(currentNumber + 1)
Here are the questions about the code with their answers.
currentNumber?
Answer: 2
Explanation: When we set the value of currentNumber, there are only two papers, paper1 and paper2, in the MyDesk.Papers collection.
paper3?
Answer: The Garble Report
paper4?
Answer: The Mooble Report
Explanation: Because currentNumber equals 2, this sets paper4 to the second paper in the collection, The Mooble Report.
paper5?
Answer: The Foofle Report
paper6?
Answer: The Garble Report
Explanation: Because (currentNumber + 1) equals 3, this sets paper6 to the third paper in the collection, The Garble Report.
First, we need to add a check box with the name "EditMail" to the PromptDialog form. See Figure 20:
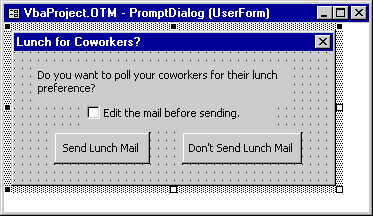
Figure 20. PromptDialog form
Next, we need to create an alternate PollRestaurant macro (called PollRestaurant2) that does not send the mail after creating it. In the same Module Window where PollRestuarant is, create PollRestaurant2. (Use copy and paste, add a "2" to the name of the procedure, and remove the last line that sends the mail.)
Sub PollRestaurant2()
      Set NewMail = ThisOutlookSession.CreateItem(olMailItem)
      NewMail.Subject = "Please open and make your vote for lunch!"
      NewMail.Body = "Click one of the buttons above to make " &_
            "your vote. I'll be tallying at 11 AM. " &_
            "Lunch will be in the break room at noon."
      NewMail.VotingOptions = "Taco Temple; Burger Palace; " &_
            "Chicken Chums; Pasta Hut"
      Set receiverOfMyMail = NewMail.Recipients.Add("hungrypeople@mycompany.com")
End Sub
Now, when the user clicks the Send Lunch Mail button, we need to call either PollRestaurant or PollRestaurant2, depending on whether EditMail is checked:
Private Sub Yes_Click()
   If PromptDialog.EditMail.Value = False Then
        PollRestaurant
   End If
   If PromptDialog.EditMail.Value = True Then
      PollRestaurant2
   End If
  PromptDialog.Hide
End Sub
There is no specific solution to Hands-on Challenge #8. You simply need to make adjustments to the code and to the dialog box to make the macro work for you.
--------------------------------------------
The information contained in this document represents the current view of Microsoft Corporation on the issues discussed as of the date of publication. Because Microsoft must respond to changing market conditions, it should not be interpreted to be a commitment on the part of Microsoft, and Microsoft cannot guarantee the accuracy of any information presented after the date of publication.
This document is for informational purposes only. MICROSOFT MAKES NO WARRANTIES, EXPRESS OR IMPLIED, IN THIS DOCUMENT.
Microsoft, the Office logo, Outlook, Windows and Windows NT are either registered trademarks or trademarks of Microsoft Corporation in the U.S.A. and/or other countries.
Other company and product names mentioned herein may be the trademarks of their respective owners.
The names of companies, products, people, characters, and/or data mentioned herein are fictitious and are in no way intended to represent any real individual, company, product, or event, unless otherwise noted.