Thomas Rizzo
Microsoft Corporation
May 1999
Applies To: Microsoft Office 2000; Microsoft Outlook 2000
This article, which was originally published in April 1999 under the title "Extending Outlook 2000 Part II: Building a COM Add-in," is reprinted with permission of Informant Communications Group, Inc. Please visit their Web site at www.informant.com/mod/index.asp.
Summary: This article from Microsoft Office and Visual Basic for Applications Developer builds on a previous article and helps you build a COM add-in in Microsoft Outlook. (13 printed pages)
In a previous article ["COM Add-ins Part I: Introducing an Office 2000 Solution for the Entire (Office) Family"] we discussed the architecture behind the Microsoft® Office 2000 COM add-in technology. In this article, we'll put the theory into practice by building a COM add-in for Outlook 2000. Besides COM add-ins, Outlook 2000 features a number of other developer enhancements, such as support for Visual Basic® for Applications (VBA), a greatly enhanced object model, Folder Homepages, and Activity Tracking. These features are beyond the scope of this article, however, so please refer to the Outlook 2000 online Help to learn more.
The add-in we're going to build will provide Outlook with two of the capabilities developers request most often: (1) extending menus and toolbars at the application level; and (2) extending property pages for folders, and for the main Options page in Outlook. While you could extend toolbars and menus in Outlook 98, your extensions were probably at the item-level since Outlook 98 didn't provide a way (beyond Exchange Client Extensions) to fire an event when your button or menu item was selected within application scope. In contrast, your COM add-in will be loaded by Outlook, therefore allowing Outlook to call your add-in to respond when users click your custom button or menu item.
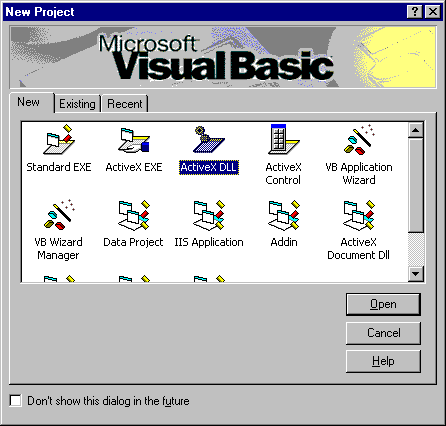
The first step when building a COM add-in is to fire up your favorite COM development tool. We're going to use Visual Basic 6.0 (VB6) in this article, but you can instead use VBA, Visual C++®, etc. In VB6, you need to select an ActiveX DLL as your project type (see Figure 1).

Figure 1. The VB6 New Project dialog box
Once you've done that, you will need to add a reference to the Microsoft Add-in Designer (msaddndr.dll) as shown in Figure 2. This DLL contains the IDTExtensibility2 interface, which our add-in must support. We'll also need to add a reference to the Outlook 2000 and Office 2000 object models, since we're going to use them to extend the Outlook environment.
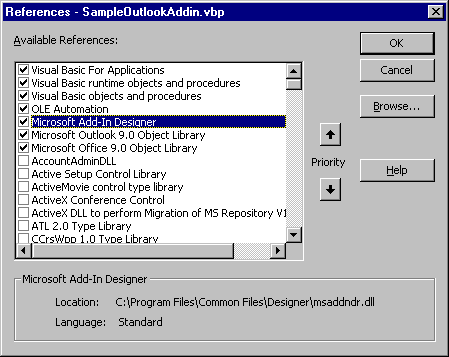
Figure 2. The VB6 References dialog box
Now the coding fun begins. To make sure we tell VB6 that we're going to implement the IDTExtensibility2 interface in our application, we need to add the following statement to our ActiveX DLL code:
Implements IDTExtensibility2
VB6 will then add the methods we need to implement to the drop-down list in the VB6 interface. With the methods for IDTExtensibility2 in place, we need to add our code to those methods to implement our functionality. All the routines—their names begin with "IDTExtensibility2"—are shown in Listing One, where they have been fully implemented. (Both projects discussed in this article are available for download; see the end of this article for details.)
Listing One. IDTExtensibility2
Implements IDTExtensibility2

Dim WithEvents oApp As Outlook.Application
Dim oCB As Office.CommandBarButton
Dim oCBs As Office.CommandBars
Dim oMenuBar As Office.CommandBar
Dim WithEvents oNS As Outlook.NameSpace
Dim WithEvents oMyCB As Office.CommandBarButton
Dim WithEvents oResetCB As Office.CommandBarButton
Dim oFolder As Outlook.MAPIFolder

Private Sub IDTExtensibility2_OnAddInsUpdate( _
        custom() As Variant)

    ' Use this subroutine when Add-ins are updated.
    MsgBox "OnAddInsUpdate called"
End Sub

' Use this subroutine when the host app is shutting down.
' You should persist or destroy your objects in this
' subroutine.
Private Sub IDTExtensibility2_OnBeginShutdown( _
    custom() As Variant)

    MsgBox "OnBeginShutdown called"
    On Error Resume Next

    Set oApp = Nothing
    Set oCBs = Nothing
    Set oMenuBar = Nothing
    Set oMyCB = Nothing
    Set oNS = Nothing
    Set oCB = Nothing
    Set oResetCB = Nothing
    Set oFolder = Nothing
End Sub

Private Sub IDTExtensibility2_OnConnection( _
    ByVal Application As Object, ByVal ConnectMode As _
    AddInDesignerObjects.ext_ConnectMode, _
    ByVal AddInInst As Object, custom() As Variant)

    ' This subroutine is called when your Add-in is connected
    ' to by the host application.
    MsgBox "OnConnection called"
    ' Get the Application object for Outlook.
    Set oApp = Application
    ' Get the Namespace.
    Set oNS = oApp.GetNamespace("MAPI")
    ' Get a Folder to extend with the PropPage extension.
    ' Let the user pick the folder.
    Set oFolder = oNS.PickFolder()
    ' Customize the Outlook Menu structure and toolbar.
    Set oCBs = oApp.ActiveExplorer.CommandBars
    Set oMenuBar = oCBs.Add("CustomMenu", , True, True)
    oMenuBar.Visible = True
    Set oMyControl = _
        oMenuBar.Controls.Add(msoControlPopup, , , , True)
    oMyControl.Caption = "&Menu Item"
    Set oResetCB = oMyControl.Controls.Add( _
        Type:=msoControlButton, Temporary:=True, Before:=1)
    oResetCB.Caption = "&Reset Menu"
    oResetCB.Enabled = True
    Set oMyCB = oMyControl.Controls.Add( _
        Type:=msoControlButton, Temporary:=True, Before:=1)
    oMyCB.Caption = "&Test Menu Item"
    oMyCB.Enabled = True
End Sub

Private Sub IDTExtensibility2_OnDisconnection( _
    ByVal RemoveMode As _
        AddInDesignerObjects.ext_DisconnectMode, _
    custom() As Variant)

    ' This Sub is called when your add-in is
    ' disconnected from the host.
    MsgBox "OnDisconnection called"
End Sub

Private Sub IDTExtensibility2_OnStartupComplete( _
    custom() As Variant)

    ' This Sub is called when the host application has
    ' completed its startup routines.
    MsgBox "OnStartupComplete called"
End Sub

Private Sub oMyCB_Click( _
    ByVal Ctrl As Office.CommandBarButton, _
    CancelDefault As Boolean)

    MsgBox "You clicked me!"
End Sub

Private Sub oNS_OptionsPagesAdd( _
    ByVal Pages As Outlook.PropertyPages, _
    ByVal Folder As Outlook.MAPIFolder)

    If Folder.Name = oFolder.Name Then
        ' Add in the Options page to the folder.
        Set oNewPage = CreateObject("TestPropPage.PropPage")
        Pages.Add oNewPage
    End If
End Sub

Private Sub oApp_OptionsPagesAdd( _
    ByVal Pages As Outlook.PropertyPages)

    ' Add a new Prop Page to the Tools/Options prop page.
    Set oNewPage = CreateObject("TestPropPage.PropPage")
    Pages.Add oNewPage
End Sub

Private Sub oResetCB_Click( _
    ByVal Ctrl As Office.CommandBarButton, _
    CancelDefault As Boolean)

    oMenuBar.Delete
End Sub
We added code in the OnConnection method, so we can store the Outlook Application object in one of our global variables for use throughout the DLL. The OnConnection method passes an Application variable as an object to the procedure. This Application object will be the Application object for the host Office application that loads your add-in. Because we're being loaded by Outlook, the variable that is passed is the Outlook Application object. If you want to validate that your add-in is being loaded by the correct host Office application, you can check the variable or properties on the variable. For example, Outlook's Application object has a ProductCode property which returns a GUID that uniquely identifies Outlook. You can create a constant that contains this GUID and then compare it to the ProductCode property to see if the host application loading your add-in is Outlook.
Once we've captured the Application object in a variable, we need to use the Office CommandBars collection to modify the menu items and toolbars of the Outlook client. Because the CommandBars collection is used across all the Office products, all the code that you see in Listing One could be used to modify menu items and toolbars in other Office products.
To modify the menu bar in Outlook, we need to first retrieve the CommandBars collection from an Outlook Explorer object. Once we have the CommandBars collection, we want to add a new menu bar for our custom application. To do this, we'll use the Add method on the CommandBars collection. In this method, True is passed to the MenuBar property, which will cause the new CommandBar to act like a menu bar, and replace the default Outlook menu bar.
After we create the new menu bar, we need to add buttons to it. To do this, the code uses the Add method of the Controls collection for the new CommandBar we created. First, the code adds a popup control for the first menu item on the menu bar. Then, we use the Add method on this new menu item's Controls collection to add new menu options to its drop-down list. When the code is finished executing, you'll see a menu structure like the one shown in Figure 3.
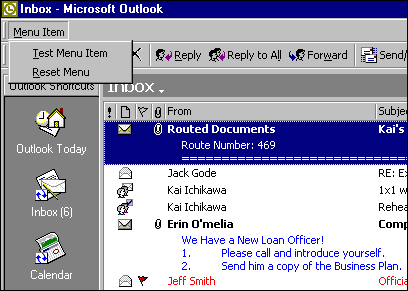
Figure 3. The example custom menu structure
Now that we've created the items for new menu, we need to be able to handle having a user click on one of those items. To do this, the code declares the variables for the menu items using the WithEvents keyword. This keyword allows your code to receive events fired by the application and write code to handle the events. To handle the Reset Menu command, the code fires on the Click event for that menu item, and then deletes the new menu bar that we created. Outlook automatically reverts to its original menu bar when you delete the custom one.
With that code snippet finished, let's turn our attention to the custom property page. Outlook 2000 provides a great deal of extensibility to its shell through the use of custom property pages. Not only can you extend Outlook's standard Options dialog box, but you can also extend the property pages for individual folders. Figures 4 and 5 show examples of both types of customization. Although the figures show the same custom property page, you can provide different property pages for both types of property page environments. In fact, you can provide unique custom property pages for every folder in your Outlook client.
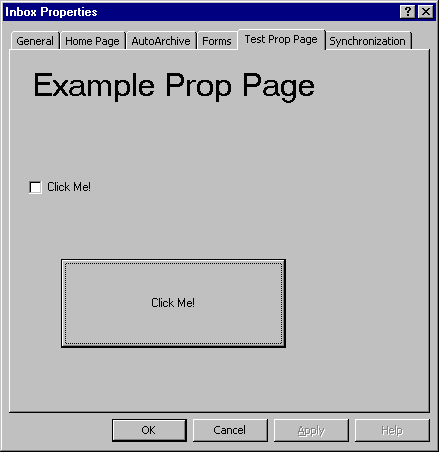
Figure 4. The customized Inbox Properties dialog box
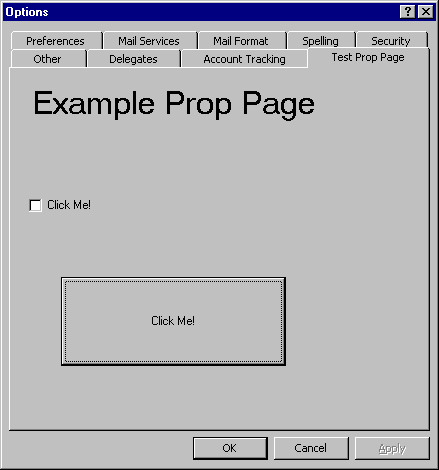
Figure 5. The customized Options dialog box
Creating custom property pages is straightforward in Outlook 2000. The first step is to create a new ActiveX® control in VB6. The ActiveX control you create will be the interface and functionality for your custom property page. Listing Two shows the code for the sample property page for this article.
Listing Two. The PropertyPage
Implements Outlook.PropertyPage

Private oSite As Outlook.PropertyPageSite
Private boolInitializing As Boolean
Dim m_fDirty As Boolean
Dim m_AdminDLL As Object

Private Sub SetDirty()
    If Not oSite Is Nothing Then
        m_fDirty = True
        oSite.OnStatusChange
    End If
End Sub

Private Sub PropertyPage_Apply()
    On Error GoTo PropertyPageApply_Err
    m_fDirty = False
    Exit Sub

PropertyPageApply_Err:
    MsgBox "Error in PropertyPage_Apply.    Err# " & _
        Err.Number & " and Err Description: " & Err.Description
End Sub

Private Property Get PropertyPage_Dirty() As Boolean
    PropertyPage_Dirty = m_fDirty
End Property

Private Sub PropertyPage_GetPageInfo(HelpFile As String, _
    HelpContext As Long)

    HelpFile = "nothing.hlp"
    HelpContext = 102
End Sub

Private Sub Check1_Click()
    MsgBox "You clicked me!"
    SetDirty
End Sub

Private Sub Command1_Click()
    MsgBox "You clicked me!!"
    SetDirty
End Sub

Private Sub UserControl_EnterFocus()
    boolInitializing = False
End Sub

Private Sub UserControl_Initialize()
    m_fDirty = False
    boolInitializing = True
End Sub

Private Sub UserControl_InitProperties()
    On Error Resume Next
    Set oSite = Parent
End Sub

Public Property Get Name() As Variant
    ' Set the caption for the proppage.
    Name = "Test Prop Page"
End Property
The next step is to implement the Outlook PropertyPage interfaces by placing this statement in your code:
Implements Outlook.PropertyPage
and then implementing the resulting three methods: Apply, Dirty and GetPageInfo.
The Apply method should implement the required functionality for your application when the user changes a value in your control, and then presses the Apply button to make those changes permanent. The sample property page just resets an internal variable that keeps track of whether the page is dirty. However, in your applications you could write to the registry, or save information into a database, when this method is called.
The Dirty property is used by Outlook to check whether the value of some item on your property page has changed. This property is used with the OnStatusChange method on the Outlook PropertyPageSite object. When an item gets dirty on your property page, you need to tell Outlook the status has changed for your page. To do this, call the OnStatusChange method on the PropertyPageSite object. Outlook will then check the Dirty property to see if the page has truly become dirty. If you return True for the Dirty property, Outlook will enable the Apply button at the bottom of your property page.
The GetPageInfo method allows you to specify a help file and help index for your custom property page. Because we don't have any help for our example, the code specifies a bogus file and index.
Pretty easy, right? Well, there's one "gotcha" you should know about. To get the name of your page to display in the tabs with all the other property pages, you need to create a special property in your code. To do this, just create a new property. I named this new property Name in my code. Then, go to the Tools menu and select Procedure Attributes. Make sure your property is selected in the Name drop-down list, then click the Advanced button. For the Procedure ID drop-down, be sure to select Caption. You need to set this unique ID for this property so Outlook knows what name to use for the tab for your property page. Figure 6 shows these steps in VB6.
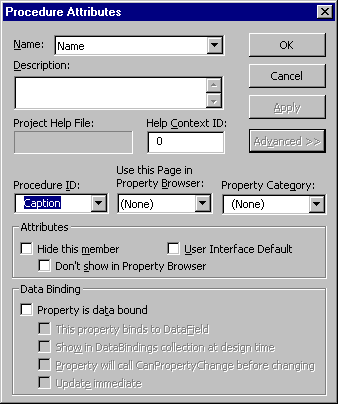
Figure 6. The VB6 Procedure Attributes dialog box
Now that we have the OCX set for our property page, we need to have Outlook add our new property page to the standard property pages. To do this, we use the new OptionsPageAdd event in the Outlook 2000 object model. Both the Namespace and Application objects in Outlook fire this event when someone goes to launch a set of property pages.
For the Application object, this event is fired when the user selects Tools | Options. For the Namespace object, this event is fired whenever a user goes to the properties for a folder. The only difference between the two events is that the Namespace version gets passed a MAPIFolder object named Folder that contains the folder whose properties the user is trying to get. You can use this object to check which custom property page you should create and add to the standard property pages for the folder.
Both events get a PropertyPages collection object named Pages. Using the Add method of this collection, you can add your new custom property page to the collection. To do this, you'll first need to instantiate your ActiveX control using CreateObject, then you'll need to pass the variable containing your new control to the Add method.
That's it! You now have a new custom property page in Outlook 2000.
While this series has helped you get started with the world of COM add-ins in Office 2000, there is a lot more you can do with this technology to extend your Office applications. To learn more about COM add-ins, be sure to pick up a copy of Microsoft Office 2000 Developer Edition when it's released. Enjoy!
Both projects referenced in this article are available for download from the Informant Web site at www.informant.com/mod/modfile.asp. File name: mod9904tr.zip.
Thomas Rizzo works as a Product Manager in the Microsoft Exchange Server Product Unit in Redmond, WA. He specializes in evangelizing development features in both Exchange and Outlook. You can reach Tom at thomriz@microsoft.com. Tom is also the author of Programming Microsoft Outlook and Exchange Server [Microsoft Press, March 1999].