Microsoft Visual C++ for Beginners
Ranga Narasimhan
Microsoft Corporation
November 30, 1999
Applies to: Microsoft Visual C++ Version 6.0
Contents
About Visual C++
Visual C++ AppWizards
Console vs. Windows Projects
Workspace and Projects
Creating a Win32 Console Application
Adding Files to a Project
Navigation
Compiling and Linking
Cleaning and Copying a Project
Troubleshooting Build Errors
Adding New and Existing Projects to a Workspace
Tips
Conclusion
For More Information
Summary: This article has been written for people who are new to C/C++ programming and Visual C++. It is not intended to teach you C/C++ programming. It is intended to introduce you to the Visual C++ (VC++) environment and help you to:
- Create a simple Win32 console-based program using the AppWizards.
- Understand the organization of projects and workspaces.
- Troubleshoot compiler/linker errors.
(16 printed pages)
About Visual C++
Microsoft® Visual C++ 6.0 is a member of the Visual Studio 6.0 family of development products. It is available in three editions: Standard, Professional, and Enterprise. For more information, refer to "About the Visual C++ Editions" in the MSDN Library.
Visual C++ (VC++) provides an Integrated Development Environment (IDE) that allows you to write, build, and debug 32 bit C/C++ programs. It also provides easy navigation of your source code (see the Navigation section of this article for more information).
Visual C++ AppWizards
VC++ provides a set of AppWizards (application wizards) that guide you through creating a new program. These AppWizards provide some basic settings and/or code, thereby saving considerable time. It is important to select the appropriate AppWizard for the type of application you want to create.
To display the AppWizards
- On the File menu, click New.
- Click the Projects tab.
The AppWizards are displayed, as shown in Figure 1.
- Select Win32 Console Application from the list.
This AppWizard helps you create a console program using the Console API functions, which provide character-mode support in console windows.
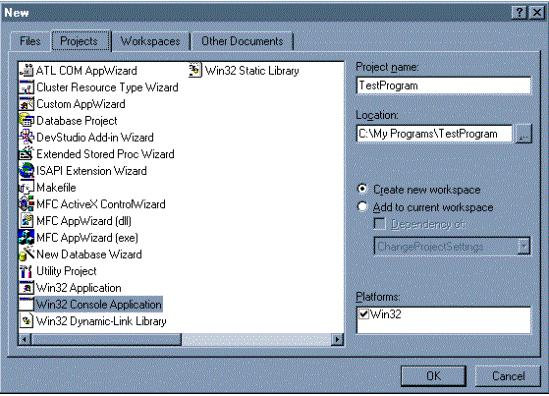
Figure 1. The Win32 Console Application AppWizard
Tip For more information, see "Overview: Creating a Console Program" in the MSDN Library.
Console vs. Windows Projects
A console program is meant to run under the MS-DOS command prompt. It’s a 32-bit program but not a Windows program. The first function that is called in a C/C++ console-based program is:
int main(int argc, char *argv[])
The first function that is called in a Windows-based program is:
int WINAPI WinMain(HINSTANCE hInstance, HINSTANCE hPrevInstance, LPSTR lpCmdLine, int nCmdShow)
A console application doesn’t present a user interface, such as a dialog. If you are new to C/C++ programming, then you should concentrate on creating console applications.
Workspace and Projects
VC++ organizes programs that were created using the AppWizards as groups of projects in a workspace. That is, a workspace consists of projects, and individual projects contain files. Projects can share files. The following figure explains this organization.
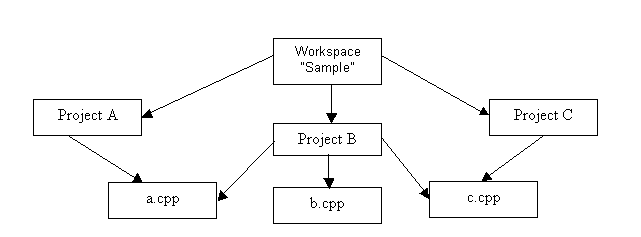
Figure 2. Organization of workspace and projects in Visual C++
The Sample workspace in the figure above contains three projects: A, B, and C. These projects contain different C++ files: a.cpp, b.cpp, and c.cpp, respectively. These files are shared between the three projects.
Workspace information is stored in files with .dsw extensions and project information is stored in files with .dsp extensions. The AppWizards create a workspace and a project by default; adding multiple projects to a workspace is documented in a later section. See "File Types Created for Visual C++ Projects" in the MSDN Library for more information on the starter files that VC++ generates for your project.
To open a workspace
- Click Open Workspace on the File menu.
- Search for the workspace file that has the .dsw extension.
Alternatively, you can open the project file (*.dsp). The .dsw and .dsp filename extensions have shell extensions associated with them, so you can use Windows Explorer to locate the .dsw or .dsp file and double-click the file to open the workspace in VC++.
Creating a Win32 Console Application
Follow the steps below to create a new console project.
To create a new console project
- On the File menu, click New and then click the Projects tab.
- Click Win32 Console Application.
- Specify the location for your project in the Location edit box.
- Type the project name in the Project name text box.
The Location edit box adds a backslash followed by the project name you typed in step 2. Your project files will be stored in a subdirectory in the location directory.
Figure 3 shows a Win32 console project called TestProgram being created in the C:\My Program\TestProgram directory:

Figure 3. Creating a new console project
- Click OK.
The Win32 Console Application – Step 1 of 1 dialog box is displayed.
- Accept the default selection, An empty project, and click Finish.
The other selections create files and add extra settings. See Figure 4.
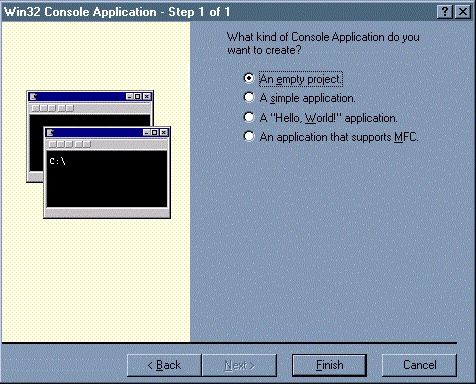
Figure 4. The Win32 Console Application—Step 1 of 1 dialog box
Note to VC++5.0 users You will not see this dialog box, so skip step 6. By default, the AppWizard creates an empty project.
- The final New Project Information dialog box displays the contents and summarizes the project you have created. Click OK.
VC++ creates the following set of files as a part of the TestProgram project (and places them in the C:\My Program\TestProgram directory:
- TestProgram.DSW: Workspace file
- TestProgram.DSP: Project file
- TestProgram.OPT: Workspace configuration file
- TestProgram.NCB: ClassView file (also contains information for AutoCompletion)
For more information on the starter files that VC++ generates for your project, refer to “File Types Created for Visual C++ Projects” in the MSDN Library.
Note Do not delete the .dsw and .dsp files. The .opt and .ncb files can be renamed or deleted because VC++ regenerates them upon opening the workspace.
Following the previous steps will create a workspace with an empty project. An empty project doesn’t contain any source files. Both the project and the workspace are called TestProgram. Follow these steps to add a file to the empty project:
To add a file to an empty project
- On the File menu click New, and then click the Files tab.
- Click C++ Source File.
- Specify a filename in the File name textbox. By default, the Add to project checkbox is selected. Also, the default filename extension is .cpp. For example, if you type Test, then the filename will be Test.cpp. If you want to give it a .c filename extension, you must specify it. See Figure 5.
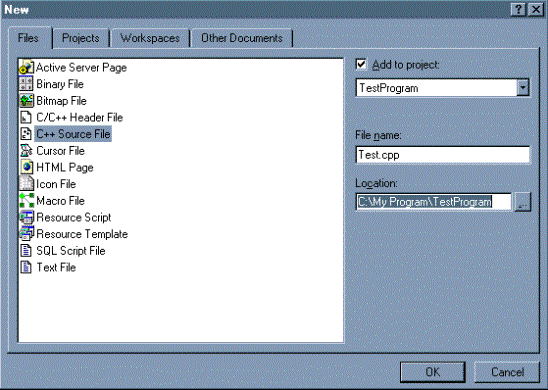
Figure 5. The New dialog box
- Click OK.
- In the empty File, type the following code:
#include<stdio.h>
float ver;
void main()
{
    ver = 6.0;
    printf("Welcome to Visual C++ %.1f\n",ver);
}
- Click Build TestProgram.exe on the Build menu or press the F7 key.
This starts the build process that comprises compiling and linking the entire project. If you have many files in the project, all of them are built. The progress of the build is displayed in the Output window at the bottom of the VC++ IDE. For this project you should see the following, as shown in Figure 6.

Figure 6. The Output window
The details in Figure 6 indicate that the TestProgram.exe executable file was created successfully without any errors and warnings. When there are any errors in your program, the appropriate message(s) are printed in this window. You also see “Configuration: TestProgram – Win32 Debug.” This is the default configuration, and can be changed to “Win32 Release” or a custom configuration. See the Compiling and Linking for more information.
If you want to compile the open file only, select Compile Test.cpp from the Build menu; this action doesn’t produce an executable file. For more information, go to Compiling and Linking in this article.
To run or execute TestProgram.exe
- Select Execute TestProgram.exe on the Build menu or press Ctrl+F5.
You will see an MS-DOS prompt with the message “Welcome to Visual C++ 6.0."
- Press any key to continue.
Adding Files to a Project
As mentioned earlier, a Project can host many files with different extensions such as .h, .rc, and so on. To add a header file (.h) to the TestProgram console project (see Creating a Win32 Console Application section) follow this procedure.
To add a header file (.h) to the TestProgram console project
- On the File menu, click New, and then click the Files tab.
- Select C/C++ Header File.
- Type a filename in the File name text box.
The default filename extension is .h. For example, if you type Test, then the filename will be Test.h. If you want a different extension you must specify it.
- Click OK.
Note By default, the Add to project checkbox is selected. Do not clear this check box; if you do, the file may not be built during the build process.
To add existing files
- In VC++, open the project in which you want to add files.
- On the Project menu, click Add To Project.
- Click Files.
- In the Insert Files into Project dialog box, select the file(s) and click OK.
This lets you reuse existing files. Code reuse is part of what makes C++ such a powerful language.
Navigation
Navigation is very easy in VC++ when you use the Workspace window. To launch this window, click Workspace on the View menu. If you have created the TestProgram console project (see Creating a Win32 Console Application section) you will see that the Workspace window has two tabs, ClassView and FileView. (See Figure 7.)
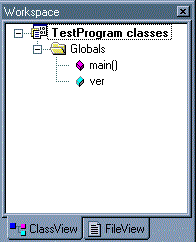
Figure 7. The Workspace window
ClassView
The ClassView tab displays the C++ classes and the global data present in the project. In case of the TestProgram project you should see TestProgram classes (as shown in Figure 7). Expand that node by clicking the + sign; you should see a Globals folder. Expand that folder and you’ll see main and ver. To get to the file containing the main function, double-click it. This opens the Test.cpp file with the caret positioned on the main function.
For more information about ClassView, see “Overview: ClassView” in the MSDN Library.
FileView
The FileView tab displays the files belonging to your project. For the TestProgram project you should see TestProgram files; upon expanding (click the + sign) you will see Source Files, Header Files, and Resource Files. Because the project contains only one file (Test.cpp), you should see it under the Source Files folder. If you add another file, for example, Test.h, then you should see it under the Header Files folder. These folders will contain files with the appropriate extensions; the source files normally end in the .c or .cpp filename extension and the header files in the .h filename extension. To open a file in the source editor, double-click it. (See Figure 8.)
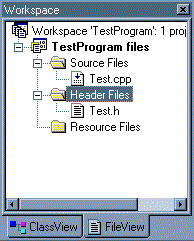
Figure 8. The FileView tab
For more information on FileView, refer to "FileView" in the MSDN Library.
You can also use the Wizard Bar for navigation. To activate it, do the following:
To activate the Wizard Bar
- Click Customize on the Tools menu.
- Click the Toolbars tab.
- Click WizardBar in the Toolbars window on the left side of the dialog.
For more information, see Overview: WizardBar in the MSDN library.
Compiling and Linking
The compilation process is responsible for creating object (.obj) files and other intermediate files. The VC++ compiler CL.EXE takes all the project files as input to generate the .obj files for them. For the console project created in the previous section a target directory is created under C:\My Program\TestProgram depending on the configuration you have chosen. This directory holds the .obj, intermediate, and executable files.
The default configuration is Win32 Debug. In this configuration your executable will reside in the C:\My Program\TestProgram\Debug directory. In the debug configuration, your code contains debug information that will help you to easily debug your application. In the debug configuration your code is not optimized. The other configuration that VC++ provides for your application is Win32 Release. This configuration provides code optimization settings and doesn’t include debug information. Code built in the release configuration will reside in C:\My Program\TestProgram\Release directory. Refer to "Elements of Project Workspaces" in the MSDN library for more information.
It is the job of the linker (LINK.EXE) to take the .obj files and other intermediate files as input and generate the final .exe. The build process first runs the compiler and then the linker. To generate an executable, you should build the project. If you compile only the file then an .obj file is generated.
This build process can be best explained with the following diagram (Figure 9).
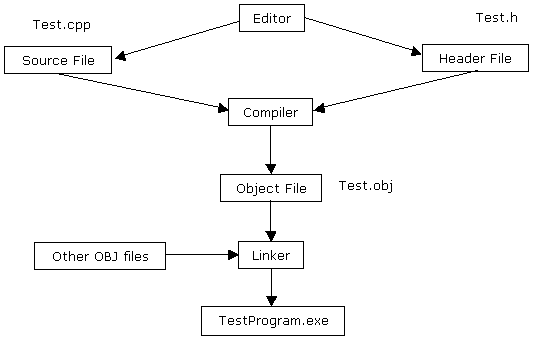
Figure 9. Diagramming the build process
The Output window shown in Figure 10 displays the results of a build.

Figure 10. The Output window displaying the results of a build
In this case, the C:\My Program\TestProgram\Debug directory will contain the TestProgram.exe executable file.
The build results are also stored in a file with the .plg extension. For the TestProgram project, the TestProgram.plg file contains this information. For more information, see "Compiling and Linking" in the MSDN library.
Cleaning and Copying a Project
To clean a project, click Clean on the Build menu. Cleaning a project removes all the files from the target directory (which could be either the Debug or the Release directory depending on the configuration of the project) including the executable file. If you intend to copy your project to a different location, such as floppy disk, you might want to clean the project. This reduces the size of your project and makes copying faster. In the case of the TestProgram project you could drag and drop the entire directory to another location. To generate the executable file after a clean, you will have to build it again.
Troubleshooting Build Errors
There are many reasons for getting compiler and/or linker errors. For example, the proper header files might not be included, there might be typing mistakes, or there is improper usage of the compiler/linker switches, and so on. Whatever the error might be, the information regarding it is printed in the Output window.
Assume that you have followed the steps in the Creating a Win32 Console Application section of this article and created the TestProgram project. Let’s introduce a mistake in the Test.cpp file; delete the contents of the file and type the following code instead:
#include<stdio.h>

float ver;

void main()
{
      ver = 6.0;
      print("Welcome to Visual C++ %.1f\n",ver); //we have replaced printf
  //with print
}
Build the Project; you will see the following message in the Output window, as shown in Figure 11.

Figure 11. The Output window displaying an error
This window shows that the error has occurred at line 8 in Test.cpp file. To get there, you can either double-click the error message in the Output window or press the F4 key. This is especially useful when you are dealing with big files.
Every error number has some meaning. This can be found from the VC++ Help system (MSDN library). In this example, the error is C2065. To find the various reasons for the occurrence of this error, do the following.
To find the cause of an error
- Using the mouse, set the keyboard caret on the C2065 compiler error code in the output window. Make sure that you see the caret blinking on the error code; otherwise you will not be taken to the correct help topic.
- Press the F1 key.
- For C2065 there are two topics. Select the topic that has “Visual C++ Programmer’s Guide” as the location.
The topic is displayed on the right side. It states to “Make sure the identifier name is spelled correctly.” We know that this is the error.
Alternatively, the following steps can be used to obtain the same information:
- In VC++, click Index on the Help menu.
- Type C2065 in the Type in the keyword to find edit box.
The topic associated with it is displayed in the list box below the edit box.
- Double-click the C2065 topic.
For C2065, there are two topics.
- Select the topic that has “Visual C++ Programmer’s Guide” as the location.
The topic is displayed on the right side. It states to “Make sure the identifier name is spelled correctly.” We know that this is the error.
The information on printf is stored in the stdio.h file that was included in the first line. If you open stdio.h file you won’t find a function called “print” and that is the reason why the compiler complained. Had there been a function called “print” then you might not have received any compiler errors but the runtime behavior of the executable might have been unexpected.
Always refer to the MSDN library for the information on the error numbers. The MSDN Library Online can be accessed at http://msdn.microsoft.com/library/.
Adding New and Existing Projects to a Workspace
The following sections explain how to add a new project and add an existing Project.
Adding new projects
To add a new project to an existing workspace, follow the same steps as in creating the TestProgram project (see the section on Creating a Win32 Console Application) with this exception:
For example, if you are adding a new project called AnotherTestProgram to the TestProgram project, selecting Add to current workspace changes the path from C:\My Program\AnotherTestProgram to C:\My Program\TestProgram \AnotherTestProgram. (See Figure 12.)
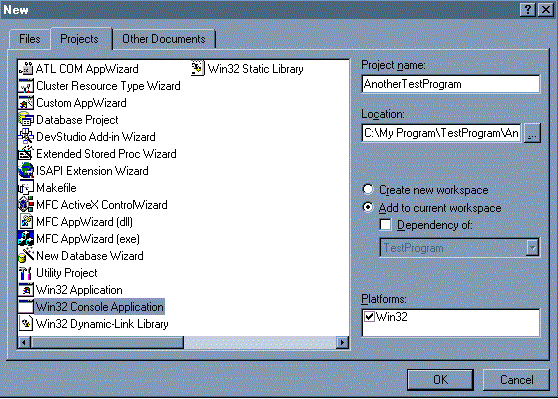
Figure 12. Adding a new project to an existing workspace
Adding existing projects
Follow the steps below to add an existing project.
To add an existing project
- On the Project menu, click Insert Project into Workspace.
- On the Insert Projects into Workspace dialog box, select the project(s) to be inserted.
In this step you should browse for the DSP file(s) that represent project(s).
When you add another project to an existing project, the Workspace window displays all the projects. For example, adding AnotherTestProgram project to the TestProgram project causes the FileView to display both the projects, as shown in Figure 13.
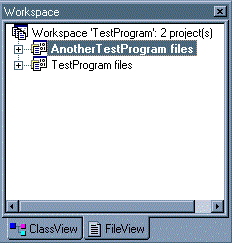
Figure 13. Adding to an existing project
Notice that AnotherTestProgram files is in bold. This means that it is the active project. When you perform a build, the active project is built. You can set your active project by navigating to the Set Active Project sub-menu from the Project menu.
For more information, see "Home Page: Working with Projects" in the MSDN library.
Tips
- Avoid the following:
- Creating a project on a floppy disk directly and building it. You’ll run out of disk space.
- Opening the same project twice in two different instances of VC++ on the same machine.
- Deleting and changing VC++ .dsp and .dsw files. See “File Types Created for Visual C++ Projects” in the MSDN Library for more information on the starter files that VC++ generates for your project.
- Apply latest service packs to VC++. Service packs can be downloaded or ordered from http://msdn.microsoft.com/vstudio/sp/vs6sp3/default.asp.
- For a list of all the keyboard shortcuts select Keyboard Map on the Help menu.
Conclusion
In this article, the basic concepts of navigating the Visual C++ IDE and creating a simple C/C++ program are introduced with the help of easy to understand examples. A list of references is provided for further studies. The purpose of the article is to break down the initial barrier a new programmer faces when trying to create C/C++ programs using Visual C++.
For More Information
For the latest information about VC++, see the following resources:
For more information on C++ programming refer to:
--------------------------------------------
© 1999 Microsoft Corporation. All rights reserved.
The information contained in this document represents the current view of Microsoft Corporation on the issues discussed as of the date of publication. Because Microsoft must respond to changing market conditions, it should not be interpreted to be a commitment on the part of Microsoft, and Microsoft cannot guarantee the accuracy of any information presented after the date of publication.
This White Paper is for informational purposes only. MICROSOFT MAKES NO WARRANTIES, EXPRESS OR IMPLIED, IN THIS DOCUMENT.
Microsoft is a registered trademark of Microsoft Corporation.
Other product or company names mentioned herein may be the trademarks of their respective owners.
Microsoft Corporation · One Microsoft Way · Redmond, WA 98052-6399 · USA


