Shannon Dunn
Microsoft Corporation
September 1998
Adapted from Microsoft Visual J++ 6.0 Developer’s Workshop by Shannon Dunn, available from Fatbrain.com
Summary: This article describes the Microsoft Visual J++ 6.0 Forms Designer and ways to use it. (61 printed pages)
Understanding the Purpose of Forms
Creating and Displaying a Form
Creating a Screen Saver
Creating a Dialog Box
Creating a Persistent Form Class
Subclassing a Form
Creating a Tool Window
Summary
Since the inception of Microsoft® Windows®, developers have been trying to simplify the process of creating Windows applications. Back in the Dark Ages of Windows, developers had to write applications directly to the Windows API using the C language. A developer had to deal with message pumps, event handling, and other labor-intensive tasks just to display a simple window. Developers wrote applications in this way for a number of years, and some brave souls are still out there piecing together their applications the hard way. Then came what I call the Visual Era. The Visual Era started with Visual Basic® and has carried on to Visual C++®. With these applications, developing windows and using controls is as easy as dragging and dropping them onto a visual designer. Having to worry less about the act of creating a window and adding components to it has made Windows a popular platform for people to write to.
Visual J++® 6.0 has not only joined the Windows development world, it has jumped into the Visual Age. From the moment Microsoft decided that Visual J++ should allow developers to write Windows applications using the Java language, Visual J++ developers concentrated on ensuring that both the integrated development environment (IDE) and the Windows Foundation Classes (WFC) allowed for robust and rapid application design. WFC and its component model provide the capabilities for creating a powerful application, but the visual Forms Designer provides the speed in designing your application’s user interface. While working with Visual J++, you’ll spend a considerable amount of time with the Forms Designer. Whether you’re designing an application’s windows and dialog boxes, creating a custom WFC component, or simply wiring up the event handlers for the windows and dialog boxes in your application, the visual Forms Designer will save you an incredible amount of time and effort.
In this article, we’ll use the Forms Designer to study the creation and manipulation of your application’s windows. The examples will show some of the interesting uses you can give forms as well as the different types of windows and dialog boxes that you can create. By the end of the article, you’ll be able to create forms and tackle any type of form-related application requirements.
In Visual J++, a form is the visual representation of a window or dialog box. As a developer, you’ll use forms to design your application’s user interface. The visual Forms Designer package is composed of three tools: the Forms Designer itself, the Toolbox, and the Properties window. The Forms Designer is the canvas on which you design your user interfaces. The Toolbox provides controls that you can drag onto the Forms Designer to set up the visual layout of your user interface. The Properties window allows you to set properties and event handlers on either the form or the controls that you place on the form. You’ll find that designing Windows applications is much easier once you’ve mastered the Forms Designer.
The only time you don’t use the Forms Designer in developing an application is when you’re creating an application with no user interface, or when you want to create an application’s user interface on the fly. Even with on-the-fly applications, the Forms Designer can make your life easier because you can provide instances of the controls and position them at run time based on conditions within your application. So, as you can see, a Windows developer must clearly comprehend how to create and manipulate Visual J++ forms. The following examples demonstrate form creation and manipulation and provide you the information you need to work with forms in your application design.
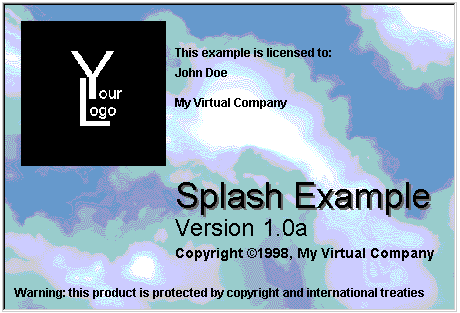
To help you understand how to create and display a form, I thought it would be cool to show you the art of creating a splash screen. Figure 1 shows an example of what the splash screen will look like.
I know, creating a splash screen is relatively easy, and the word art might be a bit exaggerated, but going through the process is a great way to demonstrate to you how to create and show a form. In this example, we’ll create a splash screen that not only shows a form, but also provides methods that allow you to define the splash screen’s look and feel. When you’ve completed the following steps, you’ll have a splash screen form that you can modify and reuse in your own applications.
Figure 1. SplashScreen.java at run time
First, we need to create a project in Visual J++ for our splash screen form. Our project will require only two forms, so we’ll use the standard Windows Application template that Visual J++ provides. Follow the instructions from the example in Chapter 2 of Microsoft Visual J++ 6.0 Developer’s Workshop for creating a project if this is your first time creating a project in Visual J++. Specify a path for your project, and enter SplashExample as the project name. We’ll want to rename the default form to something a little more explanatory. To rename the form, you’ll need to perform two steps:
For now, we’re done with this form file. The form will act as our application.
With our project and application form created, we can now start the process of creating the splash screen form. Add a new form to the project and name it SplashScreen.java. This form will become our splash screen and is where most of the example’s code will go. Once the form displays in the Forms Designer, you’ll need to resize the form to the size specified in Table 1. The splash screen will use only two WFC controls: the PictureBox and the Timer. Drag these controls from the toolbox onto the form, and use the information in Table 1 to set each of the control’s properties.
Tip You can add a form or any project item to your project by selecting Add Item from the Project menu. You can also add an item to your project by right-clicking the project in the Project Explorer. From the shortcut menu displayed, choose Add and then select the form or project item that you want to add.
Table 1. SplashScreen.java Components and Property Settings
| Component Type | Property | Setting |
| Form | size.x | 455 |
| size.y | 310 | |
| controlBox | false | |
| borderStyle | Fixed Dialog | |
| minimizeBox | false | |
| maximizeBox | false | |
| text | ““ | |
| showInTaskbar | false | |
| startPosition | Center Screen | |
| PictureBox | name | picLogo |
| size.x | 145 | |
| size.y | 145 | |
| sizeMode | Stretch Image | |
| Timer | name | tmrSplash |
| interval | 2500 |
Figure 2 shows how this form should look during development.
The values assigned to the form’s controlBox, borderStyle, and text properties create the solid-bordered, captionless window we need for our splash screen. The showInTaskbar property is set to false to prevent the splash screen from being displayed as a task in the Windows taskbar. Even though this property is set for the splash screen’s form, the application’s form is not precluded from being displayed in the taskbar. The picLogo’s sizeMode property allows our logo’s bitmap to be stretched to fit a standard size. This flexibility allows us to keep the picture box in the same location and size and simply stretches the bitmap to fit the box. The tmrSplash’s interval property is set to an initial value of 2,500 milliseconds (2.5 seconds). We’ll allow the user of our splash screen form to set the interval to any allowable interval in later steps.
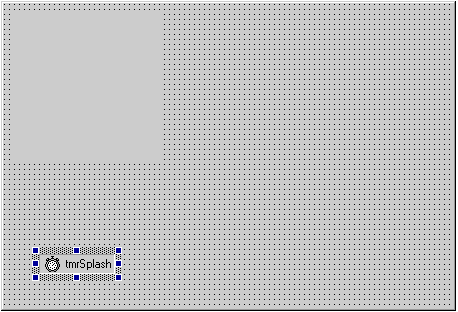
Figure 2. SplashScreen.java during development
One last item that we need to add to our form is an import statement for WFC’s com.ms.wfc.io package. We’ll use some static methods from this package to determine the location of bitmap files on the system. You should place the following code after all other imports in the SplashScreen.java source file:
import com.ms.wfc.io.*;
With both of our splash screen example’s forms created and designed in the editor, we’ll now write some code. The objective of this splash screen example is to show you not only how to create a form and display it, but also how to create a form that has all its features encapsulated in one class. As in any object-oriented language or framework, in Visual J++ your objective should be to make the class self-sufficient and capable of being reused in other applications. To make the SplashScreen class as reusable as possible, we’ll provide a number of public methods to get and set the information and graphics that are displayed on our splash screen. This encapsulation of the form’s features will also assist us later when we expose the splash screen as a COM object.
The first code we’ll add to our splash screen form is the set of private member variables that we’ll use to store the information that the splash screen will display. We’ll also add mutator methods for setting the values of these private variables. The splash screen we’re creating displays the product name, version number, copyright, warning text, and licensed user information for the application we’re showing. Also, the user can supply a background and logo image to be displayed. Add the following code to the SplashScreen class:
    //Private member variables for splash information
     private String m_sProduct = new String();
     private String m_sVersion = new String();
     private String m_sCopyright = new String();
     private String m_sWarningText =
             new String(“Warning: this product is protected by “
                        + “copyright and international treaties”);
     private String m_sUserName = new String();
     private String m_sCompanyName = new String();
     private String m_sBackPath = new String();
     private Bitmap m_bmBackSplash;

     /**Sets how long the splash screen is displayed*/
       private void setSplashDelay(int delay)
     {
         //If no delay is specified, use default of 2500
         if (delay > 0)
             tmrSplash.setInterval(delay);
     }

     /**Sets the splash screen’s product name*/
     public void setProduct(String productName)
     {
         m_sProduct = productName;
     }

     /**Sets the splash screen’s version string*/
     public void setVersion (String versionText)
     {
         m_sVersion = versionText;
     }

     /**Sets the splash screen’s copyright information*/
     public void setCopyright(String copyRight)
     {
         m_sCopyright = copyRight;
     }

     /**Sets the splash screen’s licensed user*/
     public void setUserName(String userName)
     {
         m_sUserName = userName;
     }

     /**Sets the splash screen’s licensed company name*/
     public void setCompany(String company)
     {
         m_sCompanyName = company;
     }

     /**Sets the splash screen’s warning text*/
     public void setWarningText(String warning)
     {
         //Determine if we have text specified.
         if (warning.length() > 0)
         {
             m_sWarningText = warning;
         }
         /* If the parameter is equal to “NA” then
          * set warning text to nothing. */
         if (warning.equals(“NA”) == true)
         {
             m_sWarningText = ““;
         }
     }

     /**Sets the path and loads the bitmap
      * to be displayed as the logo*/
     public void setLogoImage(String logoImage)
         throws IOException
     {
         /* Only set the logo if a non-zero length path is specified
          * and the file exists in the path specified. */
         if (logoImage.length() > 0 && File.exists(logoImage) == true)
         {
             try
             {
                 //Load the specified bitmap into the logo picturebox.
                 picLogo.setImage(new Bitmap(logoImage));
                 /* Display the picture box
                  * since it is invisible by default. */
                 picLogo.setVisible(true);
             }
             catch (IOException ex)
             {
                 MessageBox.show(“Error loading splash screen “
                                     + “logo bitmap file. Please “
                                     + “check the path and filename “
                                     + “specified.”,
                                 “Splash Example”,
                                 MessageBox.ICONERROR
                                     + MessageBox.OK);
                 /* Since we cannot load the logo bitmap,
                  * make picture box invisible. */
                 picLogo.setVisible(false);
                 /* Since this is exception is not fatal,
                  * continue execution. */
                 return;
             }

         }
     }

     /**Sets the path to a bitmap
      * to be displayed as the background*/
     public void setSplashBackground(String backImage)
     {
         m_sBackPath = backImage;
     }
     public SplashScreen(String product,
                         String version,
                         String copyright,
                         String userName,
                         String company,
                         String warning)
     {
         this();
         setProduct (product);
         setVersion(version);
         setCopyright(copyright);
         setUserName(userName);
         setCompany (company);
         setWarningText(warning);
     }
With a couple of exceptions, most of the code is pretty simple. The private member variables store the string and bitmap information that the splash screen will display. All the string member variables default to empty strings, with the exception of m_sWarningText. I thought it would be easier to add the text by default. If you don’t want to show any warning text, simply call the setWarningText method with the string NA specified as the parameter. To leave the default warning text, simply call the setWarningText method with an empty string as a parameter. One of the private String member variables doesn’t display information on the splash screen but instead stores the path to the splash screen’s background bitmap (if the user chooses to specify a background bitmap to be displayed). The bitmap member variable is left uninitialized; it is initialized only if a user specifies a background bitmap to display.
Most of the mutator methods are simple; they accept a String parameter and assign it to the appropriate private member variable. The two exceptions to these mutators are the setLogoImage and setSplashDelay methods. The setLogoImage method accepts a path to a bitmap file that will be displayed in the picLogo PictureBox control that we placed on the form in the previous step. We declare the method with a Throws statement for .IOException exceptions. The Throws statement is necessary to implement the exception handling code that is needed to trap I/O exceptions. An I/O exception might occur when loading an image into the picLogo PictureBox control. The method’s code first determines if the path assigned to the method’s parameter is not an empty string. If a path is specified, the code uses the File class’s exists method to see whether the file exists. This method returns a Boolean value of True if the path and file name assigned to it exist. If both of these conditions are met (that is, if the path is specified and the file exists), the code proceeds to load the specified image file into a Bitmap object that is then assigned to the picLogo PictureBox control. If for some reason picLogo can’t be properly loaded, the code within the catch block will display an error message and leave picLogo invisible. The exception handling code is made simple because it isn’t that important that a logo be displayed.
The setSplashDelay method is a private mutator that sets the amount of time that the splash screen is displayed. The method is declared private because it is a helper method for the showSplash method (which is discussed in the following step).
We also added a constructor to the SplashScreen class to make loading all the textual information into the splash screen as easy as possible. The new constructor uses the code in the default constructor by calling it in the first line of the code. Although it doesn’t save a lot of code in this example, I highly recommend that, if you create a constructor (or any method, for that matter), you call its overloaded versions. This call will allow you to reuse code that is defined in other constructors, especially in larger applications with larger constructors.
With the code for setting the splash screen information behind us, we’ll now add the methods and event handlers that will allow this information to be displayed in the splash screen. We’ll also create the method for setting the splash screen delay and displaying the form. Add the following code to the SplashScreen class:
    /**Shows the splash screen. The parameter defines
      *  how long the splash screen is displayed.*/
     public void showSplash(int interval) throws IOException
     {
         /* Set the amount of time (in milliseconds)
          * to show splash screen. */
         setSplashDelay(interval);
         /* Check to see that a file name has been specified
          * and that it exists. */
         if (m_sBackPath.length() > 0
             && File.exists(m_sBackPath) == true)
         {
             try
             {
                 /* Initialize the bitmap object
                  * by loading the specified bitmap. */
                 m_bmBackSplash = new Bitmap(m_sBackPath);
             }
             catch (IOException ex)
             {
                 MessageBox.show(“Error loading splash screen “
                                     + “background bitmap file. “
                                     + “Please check the path “
                                     + “and filename specified.”,
                                 “Splash Example”,
                                 MessageBox.ICONERROR
                                     + MessageBox.OK);
             }
         }
         //Enable the timer
         tmrSplash.setEnabled(true);
         //Show the splash screen modally.
         this.showDialog();
     }

     /**Event handler for the timer
      * that shuts down the splash screen */
     public void closeSplash(Object sender, Event e)
     {
         tmrSplash.setEnabled(false);
         this.dispose();
     }

     /**Paint Event handler for form.
      * Handles all painting of the splash screen information */
     public void paintSplash(Object sender, PaintEvent e)
         throws java.lang.NullPointerException
     {
         Graphics gdi;
         /* If the bitmap is null (no background specified)
          * use the form to draw info. */
         if (m_bmBackSplash == null)
         {
             /* Create a graphics object for the form
              * so we can paint to it */
             gdi = this.createGraphics();
         }
         else
         {
             /* We have a valid bitmap
              * so we will draw our information to it. */
             gdi = m_bmBackSplash.getGraphics();
         }

         /* Set the graphic object to not draw Opaque
          * so that a grey border is not added around all text. */
         gdi.setOpaque(false);
         //Set the font to use for the license text.
         gdi.setFont(new Font(“Arial”, 12.0f,
                              FontSize.CHARACTERHEIGHT,
                              FontWeight.BOLD,
                              false, false, false));
         //Draw license text above user and company strings.
         gdi.drawString(“This example is licensed to:”, 170, 40);

         //Draw user name text.
         if (m_sUserName.length() > 0)
             gdi.drawString(m_sUserName, 170, 60);
         //Draw company name text.
         if (m_sCompanyName.length() > 0)
             gdi.drawString(m_sCompanyName, 170, 90);
         //Set the font for the version text display.
         gdi.setFont(new Font(“Arial”, 18.0f));
         //Draw version text.
         if (m_sVersion.length() > 0)
             gdi.drawString(m_sVersion, 170, 210);

         //Set the font for the copyright information display.
         gdi.setFont(new Font(“Arial”, 14.0f,
                              FontSize.CHARACTERHEIGHT,
                              FontWeight.BOLD,
                              false, false, false));
         //Draw copyright text.
         if (m_sCopyright.length() > 0)
             gdi.drawString(m_sCopyright, 170, 240);

         //Set the font for the warning text display
         gdi.setFont(new Font(“Arial”, 12.0f,
                              FontSize.CHARACTERHEIGHT,
                              FontWeight.BOLD,
                              false, false, false));
         //Draw warning text.
         if (m_sWarningText.length() > 0)
             gdi.drawString(m_sWarningText, 10, 280);

         //Set the font for displaying the product name.
         gdi.setFont(new Font(“Arial”, 36.0f,
                              FontSize.CHARACTERHEIGHT,
                              FontWeight.NORMAL,
                              false, false, false));
         //Draw the product name first in dark gray text.
         gdi.setTextColor(Color.GRAYTEXT);
         gdi.drawString(m_sProduct,172, 172);
         /* Then draw the product name in black.
          * This creates a 3D effect. */
         gdi.setTextColor(Color.BLACK);
         gdi.drawString(m_sProduct, 170, 170);

         //Draw the background image, if one is specified.
         if (m_bmBackSplash != null){
             //Reassign the graphics object to the form
             gdi = this.createGraphics();
             /* Draw the background display and information
              * on the form */
             gdi.drawImage(m_bmBackSplash , 0,0);
         }
     }
In this code, only one standard method, showSplash, is defined. You use the showSplash method for displaying the splash screen. The only parameter defined for this method is an integer that defines the amount of time (in milliseconds) that the splash screen should be displayed. The showSplash method is responsible not only for displaying the form and specifying the amount of time that the splash screen should be displayed, but also for initializing the m_bmBackSplash bitmap object that will be used for the splash screen’s background. Like the mutator method for loading the logo bitmap, this method contains exception handling code in case the file specified is not a valid bitmap file. Once the bitmap is displayed, the code enables the timer control and calls the showDialog method to show the splash screen modally.
The other two methods that we add in this step are both event handlers. To create an event handler, you typically click the object with the events you want to handle in the Forms Designer and display the Event View of the Properties window. (You get to this view by clicking the “thunderbolt” icon.) The Event View of the Properties window displays all the available events for the currently selected object in the Forms Designer. To create an event handler, you can either double-click the name of the event you want to handle, which will create a default named handler for you, or you can specify your own event handler name by typing a method name next to the event you want to handle. If you want to use an event handler that is already defined in your class, you can simply click the drop-down list located next to the event and choose it from the list. For a given event, the drop-down list will contain all event handlers that contain the appropriate method signature to support the event. If you copied the source code above to your project, using this drop-down list is the only way to get the event handlers hooked up with the event, that is, to call the event handler.
No matter which way you choose to create an event handler, when you’re done, you’ll have an event handler method created for you in the form’s class as well as supporting code for wiring the event handler to its event source. In this example, the CloseSplash and PaintSplash methods will be our event handlers.
The CloseSplash method handles the tmrSplash Timer control’s Timer event. This event handler closes the splash screen when the interval, specified by the user at the time the splash screen is loaded, expires. The code disables the Timer control and disposes the form.
The PaintSplash method handles the form’s Paint event and is where the more interesting code in the example is located. The Paint event occurs any time the form needs to be repainted. For most forms, the Paint event is handled when the form is obscured by another window and needs to be repainted. Since our splash screen is displayed only once, the Paint event should occur only when the form is initially displayed. In the PaintSplash event handler, we’ll draw all the information for our splash screen. The tool used for drawing this information on our splash screen is the Graphics class. The Graphics class wraps the functionality of the Windows Graphics Device Interface (GDI). With a Graphics object, you can draw images, text, and shapes to the object that the Graphics object is attached to.
In the beginning of the method’s code, we create a single Graphics instance named gdi. Because we’ve given the splash screen’s user the option of displaying a background image, we must first check to see whether our background Bitmap object is initialized with a bitmap. If the Bitmap object is null, we know that no background image is specified, so we’ll initialize gdi to draw to the form using the form’s createGraphics method. On the other hand, if the Bitmap object is not null, we’ll initialize gdi to draw to the Bitmap object by using the Bitmap object’s getGraphics method.
Now that we have a valid Graphics object, the rest of the code proceeds to draw the information to the splash screen, using the Graphics object’s methods. The call to the setOpaque method with the parameter false forces all graphics to be drawn transparently onto the form or Bitmap object. If we didn’t call this method in this fashion, the Graphics object would place a gray background behind all of our text. Each piece of information is drawn on the screen using the Graphics object’s drawString method. The drawString method allows you to specify where to draw the specified string on the “drawing surface.” Because of all the varying font sizes and weights in the splash screen, in a number of places, a call to setFont is made to specify the font and font styles the gdi Graphics object will use.
Take a look back at Figure 1 and notice the product name (displayed as “Splash Example”). To create the three-dimensional (3-D) text shown, we do the simple yet effective trick of printing the text twice, first in dark gray and then in black. We also drop the gray text down and to the right. This dropping of the text is what creates the 3-D text appearance. Notice that, in the code, we paint the gray version of the text first and then the black version, because we want the black text to be on top. When using Graphics objects to draw, remember one key point: Complete the drawing tasks that need to stand out and end at the top.
With the drawing complete, the code ascertains whether the gdi Graphics object is writing to the form or to the Bitmap object. The code repeats the same check it performed in the beginning of the method to determine which object to create the Graphics object for. If the form is currently the drawing surface for the gdi Graphics object, the code needs to do nothing because all the drawing occurred directly to the form. On the other hand, if the gdi object used the Bitmap object, the bitmap needs to be displayed to show the information we drew on it. The gdi Graphics object is assigned to the form so that the Graphics object can draw the Bitmap object on the form. The form displays the image by calling the Graphics object’s drawImage method and passing the bitmap as one of the parameters. Once this step is complete, the form will show the bitmap and all the text that was drawn on it. In fact, if you want to, you can call the Bitmap object’s save method with a path and filename specified, and the bitmap with the text that was drawn will be saved to the file. With this code added, our splash screen example class is complete and ready to be shown in our application.
The last task we need to perform is to write the code to display the splash screen from our application. Add the following code to the SplashExample’s constructor. Make sure you place the code after the call to initForm so that the initialization of the form isn’t interrupted.
        SplashScreen splash = new SplashScreen(
                                     “Splash Example”,
                                     “Version 1.0a”,
                                     “Copyright ©1998, “
                                         + “My Virtual Company”,
                                     “John Doe”,
                                     “My Virtual Company”,
                                     ““);
         splash.setLogoImage(“Logo.bmp”);
         splash.setSplashBackground(“Clouds.bmp”);
         splash.showSplash(5000);
This code is pretty easy to follow. First, the application creates an instance of the splash screen and calls our custom constructor for the SplashScreen class with all the string information that we want to have displayed. Notice that the last parameter that we pass to the constructor is an empty string. This final parameter defines the warning text. As I mentioned in Step 3, by assigning an empty string to the warning text, you’re notifying the SplashScreen object to display the default warning text. The calls to setLogoImage and setSplashBackground define the bitmaps to display as the logo and splash screen background, respectively. Because they have no path specified, the bitmap files must be located in your project directory to run the example properly. Finally, the application makes a call to showSplash with a value of 5,000. This method call will display the splash screen modally and keep it displayed for 5 seconds.
Now that you’ve written this code, compile and run it to see the splash screen in all its glory. Once you’ve executed it on your system, play with some of the settings. Create the instance of the SplashScreen using the standard constructor instead of our custom constructor, and then call the SplashScreen’s mutator methods to set the display information. Remove the background and logo bitmaps to see that the splash screen’s information is still displayed. Although the example is intended to show you how to display a form using WFC, most of the code will also prove useful in your other programming efforts.
Where Do We Go from Here? Now that you’ve created this example, you might be saying to yourself, “OK, this was cool, but I would add this and I would do this differently and….” Feel free to modify this code and use it in your projects. This example is designed to be modified. Try adding some of these features to make the example even cooler:
In the previous example, we created a splash screen to illustrate how to display a form. We used the splash screen more as a drawing canvas than as a traditional form. In this example, we’ll continue to work with forms of this nature by building a screen saver. A screen saver is an interesting type of application to build because it requires a lot of creativity while at the same time requiring that you work directly with the operating system; it was the first type of application that I created as a Windows developer.
To create a screen saver for Windows, you’ll need to do a lot more than display a maximized form that contains no borders or caption. To create a screen saver, you’ll need to manage its command line, hide and show the mouse cursor, handle mouse and keyboard events, and more. The screen saver that we’ll create in this example is similar to the marquee screen saver that comes with Windows. The only major difference between the Windows marquee and our screen saver is that ours will be able to display the current time. A minor difference is that the Windows screen saver provides a dialog box for changing the screen saver’s properties. The screen saver that we’ll create requires you to hard code its options.
Fear not, though. In the next example (see Creating a Dialog Box), we’ll create an options dialog box for our screen saver. After we’ve created the screen saver and provided an options dialog box, you’ll have a screen saver that you can use or modify to suit your needs. You’ll also become familiar with the processes required to create your own screen savers from scratch.
You use the Windows Application template to create a new project. Name the project DWMarquee. The form that Visual J++ creates by default will act as the screen saver’s display window. Rename this form ScreenSaver.java, and use the Visual J++ Find and Replace feature to rename all instances of the word Form1 to ScreenSaver.
Now we need to set our screen saver form’s display properties and add the controls necessary to create our marquee. Add a Label and a Timer control to the form. Where we place the controls is unimportant, since we’ll move them during the marquee display. Use the settings in Table 2 to set the properties for the form and its controls.
Table 2. ScreenSaver.java Components and Property Settings
| Component Type | Property | Setting |
| Form | backColor | Black |
| controlBox | false | |
| borderStyle | None | |
| keyPreview | true | |
| text | ““ | |
| showInTaskbar | false | |
| windowState | Maximized | |
| minimizeBox | false | |
| maximizeBox | false | |
| startPosition | Manual | |
| Label | name | lblMarquee |
| foreColor | White | |
| text | ““ | |
| visible | false | |
| Timer | name | tmrDoSaver |
| interval | 1 | |
| enabled | true |
Figure 3 shows how the ScreenSaver form should look at design time.
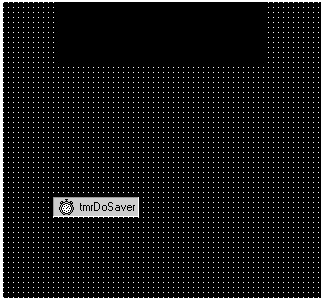
Figure 3. ScreenSaver.java during development
As you can see from Table 2, the screen saver doesn’t use many controls. The Timer control allows us to perform the screen saver’s marquee operations every millisecond, and the Label control acts as our marquee text display. As in the previous splash screen example, we need to create this form without a border or caption bar so that the window looks like a standard screen saver window. To display the form full screen, we set the windowState property to Maximized. I also recommend setting the keyPreview property to true for this and all screen savers that you create. The keyPreview property allows the form to receive all keyboard events first, before the control with focus receives the event. Although none of the controls on our screen saver form can receive the focus, setting the keyPreview property to true is just a good habit when creating a screen saver.
Before we get into the heart and soul of the screen saver’s source code, we need to add some private member variables that we’ll use to define our screen saver’s behavior. We’re declaring these member variables as private because we’re not exposing them to another program to use. If you wanted to expose these “properties” to another user, you would simply provide mutator methods to access the private member variables. Add the following code to the SplashScreen class:
     private boolean m_bRandom = true;
     private boolean m_bTime = true;
     private int m_iSpeed = 20;
     private String m_sMarqueeText = new    String(“Welcome to “
                                                + “Visual J++”);
     //Change FONT to new constructor
     private Font m_fMarqueeFont = new Font(“Arial”, 62.0f,
                                            FontSize.CHARACTERHEIGHT,
                                            FontWeight.BOLD,
                                            false, false, false);
     private Color m_cMarqueeColor = new Color(0x00FFFFFF);

     private int m_iDistance;
     private int m_ixStart= 0;
     private int m_iyStart= 0;
To change the screen saver’s behavior, we can modify the values we specify for each of these variables. The m_bRandom variable specifies whether or not the screen saver displays the marquee at random locations. The m_bTime variable specifies whether or not the current time is displayed instead of the text defined in the m_sMarqueeText String variable. The other two member variables, m_fMarqueeFont and m_cMarqueeColor, define the font and color of the text to display in the marquee. The code uses the m_iDistance, m_ixStart, and m_iyStart variables to assist in positioning and displaying the marquee text.
Now that we’ve designed our form and defined our private member variables, we can add some code to make it all work. First we need to create event handlers for the tmrDoSaver’s Timer event and the lblMarquee’s Click event. We’ll also need to create event handlers for the form’s Click, KeyDown, and MouseMove events. Except for the tmrDoSaver’s event handler, all the event handlers that we need to create will be responsible for closing our screen saver. Depending on the type of screen saver you’re creating, you might not want to shut down for each of these events. For example, if your screen saver is also a game and you want to trap the keyboard commands, you wire up only the Click event and the MouseMove events. For this example, we’ll wire them all to shut down the screen saver. The code for these event handlers is shown below. The code listing also shows a method called Shutdown that does all of the shutdown work.
    /**Event handler for key down event. Shuts down screen saver.*/
     private void SSaverKeyDown(Object sender, KeyEvent e)
     {
         Shutdown();
     }

     /**Event handler for mouse move event. Shuts down screen saver.*/
     private void SSaverMouseMove(Object sender, MouseEvent e)
     {
         /* Determine if the mouse cursor position
          * has been stored previously. */
         if (m_ixStart == 0 && m_iyStart == 0)
         {
             //Store the mouse cursor coordinates.
             m_ixStart = e.x;
             m_iyStart = e.y;
             return;
         }
         /* Has the mouse cursor moved
          * since the screen saver was started? */
         else if (e.x != m_ixStart || e.y != m_iyStart)
             Shutdown();
     }

     /**Event handler for mouse click event. Shuts down screen saver.*/
     private void ClickMarquee(Object sender, Event e)
     {
         Shutdown();
     }

     /**Shuts down the screen saver and restores the system. */
     private void Shutdown()
     {
         //Show the mouse cursor again.
         Cursor.show();
         //Disable the timer so screen saver does not continue.
         tmrDoSaver.setEnabled(false);
         //End the application.
         Application.exit();
     }

     /**Event handler for the timer control.
      * Performs screen saver marquee work.
      */
     private void DoSaver(Object sender, Event e)
     {
         //Are we displaying time or marquee text?
         if (m_bTime == true)
         {
             //Set the marquee label to the current time.
             lblMarquee.setText(new Time().formatLongTime());
         }
         else
             //Set the marquee label to the current marquee text.
             lblMarquee.setText(m_sMarqueeText);
         //Set the height of the label to the height of the font.
         lblMarquee.setHeight(
                     lblMarquee.getFont().getFontMetrics().height);
         /* Create a graphics object so we can
          * determine the width of the label. */
         Graphics gdi = this.createGraphics();
         //Assign the label’s font to the graphics object.
         gdi.setFont(lblMarquee.getFont());
         /* Set the width of the label based on
          * the width of the text in the graphics object. */
         lblMarquee.setWidth(gdi.getTextSize(lblMarquee.getText()).x);
         /* Call the DoMarquee method to do
          * the actual screen saver work. */
         DoMarquee();
     }
Once you’ve added the code to the ScreenSaver class, you’ll need to connect the event handlers to their event sources. Connect the ClickMarquee event handler to both the form and lblMarquee’s Click events. Visual J++ allows you to connect an event handler for one component to another component’s event source as long as the events create the same type of event object and the components are on the same form.
The SSaverKeyDown event handler allows our screen saver to capture the form’s KeyDown event. We’re handling the KeyDown event over the KeyPress event because the KeyDown event is triggered when a user presses any key; the KeyPress event doesn’t handle all keys. The SSaverMouseMove event handler is connected to the form’s MouseMove event and allows us to capture any mouse movement.
All the event handlers we’ve discussed so far have been designed to close the screen saver when the event is fired. All these event handlers make a call to the Shutdown method to perform the shutdown of the screen saver, as well as maintenance tasks such as reshowing the mouse cursor. Only the SSaverMouseMove event handler requires more code than simply calling the Shutdown method. When a form displays for the first time, the system triggers a MouseMove event. That causes a problem for a screen saver: we do want to trap the MouseMove event so that we can shut down the screen saver, but not when the screen saver is first displayed. The SSaverMouseMove event handler code captures and stores the mouse coordinates when the screen saver starts and exits the method. When the SSaveMouseMove event handler is called again, the screen saver is shut down if the mouse cursor is not in the same location as it was when it started.
The final event handler that we added is DoSaver. This event handler is connected to the tmrDoSaver’s Timer event and is called every millisecond to handle the task of displaying the marquee. This event handler includes preparation code that the screen saver needs to execute before it displays the marquee. DoSaver performs tasks such as updating the label display with either the current time or the current marquee text and setting the dimensions of the marquee’s Label control. One interesting line of code in this event handler is the call to setHeight for the lblMarquee control. This code uses the FontMetrics object associated with the control’s Font object to determine the top height of the entire text of the control. The height variable of the FontMetrics class returns the height in pixels, which is ideal for sizing lblMarquee to the correct height to display the text. At the end of its code, DoSaver makes a call to the DoMarquee method. This method performs all the grunt work for the screen saver and is discussed in the next step of the example.
To complete the screen saver, we need to add the DoMarquee method that I mentioned earlier and modify the form’s constructor and main method. First we’ll add the DoMarquee method to the class. Add the following code to the SplashScreen class:
    /**Handles the display and movement of the marquee */
       private void DoMarquee()
       {
           //Get the working area of the the computer screen.
           Rectangle ssWorkArea = Screen.getWorkingArea(this);
           /* If we are not displaying the label randomly,
            * force its vertical position to be centered. */
           if (m_bRandom == false)
               //Move the label control to its new position
               lblMarquee.setLocation(ssWorkArea.width - m_iDistance,
                                      (ssWorkArea.height / 2));
           else
               /* Otherwise, increment the marquee text horizontally
                * but leave its vertical position. */
               lblMarquee.setLocation(ssWorkArea.width - m_iDistance,
                                      lblMarquee.getLocation().y);
           //Make the label visible if it is not currently visible.
           lblMarquee.setVisible(true);
           /* Increment the label distance
            * based on the speed set by the user. */
           m_iDistance += m_iSpeed;
           /* If the label is offscreen, then
            * we want to reposition it to the right. */
           if (lblMarquee.getLocation().x <= -(lblMarquee.getWidth()))
           {
               //Reset the distance to 0.
               m_iDistance = 0;
               //Are we in random mode?
               if (m_bRandom == true)
               {
                   //If the label is at the top, move it to the middle.
                   if (lblMarquee.getLocation().y == 0)
                       lblMarquee.setLocation(
                                           lblMarquee.getLocation().x,
                                           (ssWorkArea.height / 2));
                   /* If label is in the middle of the screen
                    * move it to the bottom. */
                else if(lblMarquee.getLocation().y
                         == ssWorkArea.height /2)
                         lblMarquee.setLocation(
                                     lblMarquee.getLocation().x,
                                     ssWorkArea.height
                                     - lblMarquee.getHeight());
                 //Move the label back to the top.
                 else
                     lblMarquee.setLocation(
                                     lblMarquee.getLocation().x,
                                     0);
             }
         }
     }
The DoMarquee method displays the marquee’s text. The code uses WFC’s Screen class to get the screen dimensions of the system it is working on. A Rectangle object, which we’ll use to determine the location of lblMarquee, stores the dimensions. The marquee’s core functionality comes in the following code segment:
        /* If we are not displaying the label randomly,
          * force its vertical position to be centered. */
         if (m_bRandom == false)
            //Move the label control to its new position
             lblMarquee.setLocation(ssWorkArea.width - m_iDistance,
                                    (ssWorkArea.height / 2));
         else
             /* Otherwise, increment the marquee text horizontally
              * but leave its vertical position. */
             lblMarquee.setLocation(ssWorkArea.width - m_iDistance,
                                    lblMarquee.getLocation().y);
The code uses the m_iDistance member variable to position the Label control. Each time this method is called, it increments m_iDistance. The amount of the increment varies based on the value of the m_iSpeed member variable, which defines the speed of the marquee text display. The label’s horizontal positioning depends on whether the screen saver is set to display randomly or to be strictly centered on the screen.
To hide the shuffling of the Label control’s position when the screen saver is initially displayed, the Label control’s visible property is set to false at design time. DoMarquee makes the label visible again the first time it’s called.
Why a Label Control for the Marquee? At this point, you might be asking yourself, “Why did we use a Label control instead of drawing the text manually?” The reason is twofold. First, it’s easier to work with. It contains all the information we need, and in a shorter amount of code space. Second, and probably more important, if you draw the text from the form’s Paint event, many times you’ll get a nasty flicker of the text. The repainting of the window each time the text is moved causes this flicker. No matter which methodology you choose, it’s nearly impossible to keep the “flicker factor” out of a marquee, especially when displaying text in a large font.
If the m_bRandom variable is set to true, the final if/else block of code in the method moves the vertical positioning of the Label control either to the top, bottom, or middle of the screen. Although this positioning isn’t exactly random, it’s pretty close to random and will save you the complexities of creating a random number and validating that the random number generated is a valid vertical screen coordinate. Again the WFC Screen class is called into action to determine the location of the middle of the screen and the bottom.
With the more difficult code behind us, we’ll now modify the SplashScreen class’s constructor and main method to ensure that the screen saver displays correctly and handles the command line arguments Windows passes to it. Add the following code to the ScreenSaver class’s constructor. Place the code below the call to initForm so that it doesn’t interfere with the form’s initialization.
        //Set the font and forecolor of the label control.
         lblMarquee.setFont(m_fMarqueeFont);
         lblMarquee.setForeColor(m_cMarqueeColor);
         //Hide the mouse cursor.
         Cursor.hide();
The code added to the constructor sets the font and font color for the Label control based on the values in m_fMarqueeFont and m_cMarqueeColor. The final line of code hides the mouse cursor while the screen saver displays. Remember from our discussion of the Shutdown method that it will reshow the mouse cursor when the screen saver closes.
Add the following code to the main method of the ScreenSaver class. This code should completely replace the default code generated by Visual J++.
        //Display the options dialog box.
         if (args[0].equals(“/c”))
         {
             /* Show a message box to let user know
              * there are no options, then exit. */
             MessageBox.show(“There are no options available for “
                                 + “this screen saver”,
                             “DWMarquee Screen Saver”,
                             MessageBox.ICONINFORMATION);
             Application.exit();
         }
         //Start the screen saver normally.
         else if (args[0].equals(“/s”))
             //Run the screen saver application.
             Application.run(new ScreenSaver());
         /* We are not supporting passwords in this screen saver
          * so show message box and quit. */
         else if (args[0].equals(“/a”))
         {
             MessageBox.show(“Passwords are not available “
                                 + “for this screen saver”,
                             “DWMarquee Screen Saver”,
                             MessageBox.ICONINFORMATION);
             Application.exit();
         }
         //For any other command lines passed, exit.
         else
             Application.exit();
The final bit of code we added to the screen saver code handles the screen saver’s display mode. Windows will pass one of four different command line arguments to your screen saver. These command line arguments are passed based on user actions or on the act of showing the screen saver. Table 3 outlines each of these command line arguments and the events that cause them to be passed.
To keep the example focused on displaying the screen saver, we haven’t added a password or options dialog box to the screen saver. We’ll add an options dialog box in the next example, though. Because of the lack of a password or options dialog box, the code for the /a and /c command line arguments displays a message box alerting the user that no options or passwords are available and exits the application. Since we’re also not providing support for the preview monitor, the code simply exits the application when it receives the /p command line argument. The /s command line argument is used for normal screen saver display.
Table 3. Command line options Windows passes to a screen saver
| Command Line Argument | Cause and Reason |
| /s | Because of user inactivity or because the user requests a preview of the screen saver, Windows needs to display the screen saver. |
| /a | The user has selected the Change Password button on the Screen Saver tab of the Display dialog box. This command line allows you to display a password dialog box to the user to assign a password. |
| /c | The user has selected the Settings button on the Screen Saver tab of the Display dialog box. This command line option allows you to display a dialog box to the user to change the settings for the screen saver. |
| /p | The user has selected the Screen Saver tab of the Display dialog box. This command line argument allows you to display the screen saver in the preview monitor provided. |
Now that our project’s source code is completed, we’ll build and package our screen saver so that we can see it in action from within Windows. Build your project as you normally would. Once you have a successful build of the project, the next step is to package it into an executable. Choose DWMarquee Properties from the Project menu to display the DWMarquee Properties dialog box. Find and select the Output Format tab. This tab allows us to define the package we’ll create for our project. For almost all the projects in this book, we’ll create a Windows .exe file. The Windows .exe is a package file that you can execute as you would any normal executable file on your system. Select the Enable Packaging option to start creating our .exe file. Make sure that the Packaging Type drop-down list’s Windows EXE option is selected, and then enter DWMarquee.scr for the filename. Instead of using the .exe extension for this project, we’ll use the .scr extension. Windows looks for this extension when seeking available screen savers. You can leave the other options at their default settings and click OK.
With our project’s package defined, we simply rebuild the project. At the end of the compilation stage, Visual J++ 6.0 will build our Windows .exe file in the project’s directory. To run the screen saver in Windows, copy the DWMarquee.scr file to your Windows\System directory (Winnt\System32 directory for Windows NT) and run the Display applet to select our screen saver from the list of available screen savers. If you click either the Change Password button or the Settings button on this dialog box, you should see the message box that we defined. Also, if you click the Preview button, you should see the splash screen in all its glory!
Once you’ve created the screen saver, go back to the code and change the settings to see how the screen saver behaves. Set a different font, change the color, or increase the display speed. Once you’ve played with the settings for awhile, go on to the next example. In the next section, we’ll add an option dialog box to the project to enhance the user’s experience with the screen saver, and we’ll complete our screen saver code.
In the previous example, we created a screen saver that was pretty inflexible. There was no way for users to modify the screen saver’s properties according to their preferences. In this example, we’ll add a dialog box to the screen saver project that will allow the user to configure the screen saver. The example will not only showcase the creation of a dialog box, but it will also demonstrate how to use some WFC controls that are available in Visual J++ and how to use the Registry and RegistryKey classes to store and retrieve the user’s settings from the Windows Registry. Figure 4 shows an example of how the options dialog box looks when it appears in the Screen Saver tab of the Windows Display dialog box.
Dialog boxes are an important part of developing any application. Whether you’re changing the options of an application or displaying status information for a file transfer, dialog boxes will become an integral part of your Windows application development. The goal of this example is to demonstrate how to use the Forms Designer features to create dialog boxes. You’ll find that the Forms Designer simplifies and accelerates the creation of your application’s user interface.

Figure 4. ScreenSaverOptions.java at run time
To ensure that we don’t destroy our existing splash screen project, use Windows Explorer to create a different project directory on your system and title it DWMarquee2. Once you’ve created the directory, copy all the files from the original project directory over to the DWMarquee2 directory. Double-click the DWMarquee.sln file in the DWMarquee2 directory to open the project. Before we can start working on our new project, you’ll need to right-click the project name in the Project Explorer and rename the project DWMarquee2. Do the same for the Solution node at the top of the Project Explorer. Now we’re ready to add our options dialog box without damaging the original project.
Use the standard Form template in the Add Item dialog box to add a form to the project, and name it ScreenSaverOptions.java. The options dialog box we’re creating will allow the user to change the font, text color, marquee text, and speed. The user will also be able to choose the display mode (time versus standard marquee text) and the marquee positioning (centered versus random). Table 4 provides the property settings we need to make for each of the controls and the form.
Table 4. ScreenSaverOptions.java components and property settings
| Component Type | Property | Setting |
| Form | size.x | 470 |
| size.y | 318 | |
| text | Screen Saver Options | |
| borderStyle | Fixed Dialog | |
| maximizeBox | false | |
| minimizeBox | false | |
| startPosition | Center Screen | |
| acceptButton | btnOK | |
| cancelButton | btnCancel | |
| GroupBox | name | grpDisplay |
| text | Display M&ode: | |
| RadioButton | name | optShowTime |
| text | Show &Time | |
| RadioButton | name | optShowText |
| text | Show &Marquee Text | |
| checked | true | |
| GroupBox | name | grpSpeed |
| text | &Speed | |
| Label | name | lblSlow |
| text | Slow | |
| Label | name | lblFast |
| text | Fast | |
| TrackBar | name | trbSpeed |
| maximum | 30 | |
| minimum | 5 | |
| value | 5 | |
| tickFrequency | 5 | |
| Label | name | lblMarqueeText |
| text | Mar&quee Text: | |
| Edit | name | txtMarqueeText |
| text | ““ | |
| GroupBox | name | grpMPos |
| text | Marquee &Positioning: | |
| RadioButton | name | optRandom |
| text | &Random | |
| checked | true | |
| RadioButton | name | optCenter |
| text | &Center of Screen | |
| Button | name | btnSetFont |
| text | Set &Font | |
| Button | name | btnOK |
| text | OK | |
| Button | name | btnCancel |
| text | Cancel |
Figure 5 shows how the dialog box should look when all the controls are placed on the form and positioned correctly. Use this figure as a guide when designing the form.
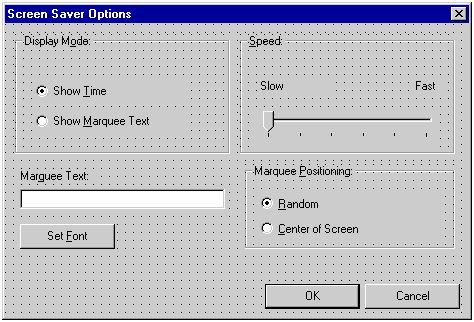
Figure 5. ScreenSaverOptions.java during development
If you recall the private member variables that we defined in the ScreenSaver class to modify the screen saver’s properties, you’ll notice that each of the primary controls on the form sets one of these properties. The only screen saver properties that the controls do not directly modify on the form are the marquee’s font and text color. These properties will be modified when the user clicks the Select Font button. This button will use the FontDialog class to display a dialog box that allows the user to modify all the marquee’s text settings. Now that we have our screen saver options dialog box designed visually, the next step is to add the event handlers to respond to user actions.
The options dialog box contains a fair number of controls. Therefore, you might expect that it would also require an equal number of event handlers to respond to user interactions, which is not exactly true in this case. Remember that the entire reason for creating this dialog box for our screen saver is to allow the user to set the screen saver’s properties. Since each control has properties that provide a value, the number of event handlers in our dialog box is minimal. Add the following code to the ScreenSaverOptions class:
    /**Event handler for OK button’s Click event.
      * Saves information to registry and
      * closes the dialog box.
      */
     private void AcceptOptions(Object sender, Event e)
     {
         SaveInfo();
         dispose();
     }

     /**Event handler for Cancel_Click button. Disposes the form.
      */
     private void CancelOptions(Object sender, Event e)
     {
         dispose();
     }

     /**Event handler for CheckChanged event of the MarqueeText
      * option button. Disables marquee text control and label.
      */
     private void ShowMTCheckChanged(Object sender, Event e)
     {
         /*Disable or enable controls based on the value of the
           option button.*/
         lblMarqueeText.setEnabled(optShowText.getChecked());
         txtMarqueeText.setEnabled(optShowText.getChecked());
     }

     /**Event handler for btnSetFont_Click event.
      * Calls font dialog box.
      */
     private void SetTextFont(Object sender, Event e)
     {
         //Set the font dialog box’s initial color setting
         m_FontDlg.setColor(m_cTempColor);
         //Set the font dialog box’s initial font setting
         m_FontDlg.setFont(m_fTempFont);
         //Display the font dialog box
         m_FontDlg.showDialog();
         /* If the font is the same as it was
          * before the file dialog box, ignore settings. */
         if (m_FontDlg.getFont().equals(m_fTempFont)
             && m_FontDlg.getColor().equals(m_cTempColor))
             return;
         /* Set the current font and color values based
          * on dialog box settings */
         m_fTempFont = m_FontDlg.getFont();
         m_cTempColor = m_FontDlg.getColor();
     }
The ScreenSaverOptions form’s four event handlers are fairly simple, with the exception of the SetTextFont event handler. This event handler is connected to the btnSetFont button’s Click event and is responsible for displaying a FontDialog object that modifies the screen saver’s font and color. The FontDialog class is a class wrapper around the Windows Font common dialog box. First the code assigns the currently selected font to the FontDialog object so that the user’s previous font and text color settings show in the dialog box. The FontDialog object then displays the dialog box to allow the user to make any desired changes. When the dialog box returns code execution to the event handler, the event handler checks whether the font and text color that it specified in the dialog box are the same as the current font and text color. If the font has changed or the text color has changed (or both), the font and color are updated to reflect the user’s changes in the FontDialog object.
Although we could have simply made the changes to the font and text color even if they weren’t different, I try to avoid executing code unnecessarily. To display the font common dialog box and store the font and text color, you need to define a set of three private member variables. The following code shows these private member variables. Add these lines to the top of the ScreenSaverOptions class.
     private FontDialog m_FontDlg = new FontDialog();
     private Font m_fTempFont = new Font(“Arial”, 62.0f,
                                         FontSize.CHARACTERHEIGHT,
                                         FontWeight.BOLD,
                                         false, false, false);
     private Color m_cTempColor = new Color(0x00FFFFFF);
The other event handler of note is ShowMTCheckChanged. This event handler is connected to the optShowText’s checkedChanged event. This event occurs each time a radio button’s value is changed. We use the ShowMTCheckChanged event handler to enable or disable the option dialog box’s lblMarqueeText and txtMarqueeText controls based on whether the optShowText radio button is checked. We disable these controls so that the users aren’t confused when they select the optShowTime option.
The other two event handlers are AcceptOptions, which is connected to the btnOK button’s Click event, and CancelOptions, which is connected to the btnCancel button’s Click event. Both event handlers dispose of the dialog box, but the AcceptOptions event handler also makes a call to SaveInfo, a method that stores the user’s settings. We’ll define this method in the next step.
The options dialog box for our screen saver is almost complete. In this step, we’ll add two methods to our ScreenSaverOptions dialog box. These methods store and retrieve the screen saver’s settings to and from the Windows Registry. In this step, we’ll also change the ScreenSaverOptions’ constructor to ensure that the dialog box is displayed correctly. Add the following code to the ScreenSaverOptions class:
    /**Loads the dialog box’s settings from the registry. */
     private void LoadRegistryInfo()
     {
         Font.Editor tempEditor = new Font.Editor();
         Color.Editor tempCEditor = new Color.Editor();

         RegistryKey rKey = Registry.CURRENT_USER.createSubKey(
                             “Software\\VJDevWorkshop\\DWMarquee”);

         //Get registry settings for Display Mode.
         if (rKey.getValue(“ShowTime”) == null)
             //Assign default value (show time)
             rKey.setValue(“ShowTime”, new Integer(0));

         /* If the value is equal to `0’ then
          * set ShowTime option to true. */
         if (rKey.getValue(“ShowTime”).equals(new Integer(0)))
             optShowTime.setChecked(true);
         else
             optShowText.setChecked(true);

         /* Initial setting of the label and text for marquee
          * text based on the current Checked setting of the
          * optShowText option */
         lblMarqueeText.setEnabled(optShowText.getChecked());
         txtMarqueeText.setEnabled(optShowText.getChecked());

         //Get registry settings for Positioning.
         if (rKey.getValue(“Centered”) == null)
             //Assign default value (show time)
             rKey.setValue(“Centered”, new Integer(0));
         if (rKey.getValue(“Centered”).equals(new Integer(0)))
             optCenter.setChecked(true);
         else
             optRandom.setChecked(true);

         //Get registry settings for Marquee Text.
         if (rKey.getValue(“MarqueeText”) == null)
             //Assign default text
             rKey.setValue(“MarqueeText”, “Welcome to Visual J++”);

         //Set the text for the Marquee Text edit box.
         txtMarqueeText.setText(
                         rKey.getValue(“MarqueeText”).toString());

         //Get registry settings for Speed.
         if (rKey.getValue(“Speed”) == null)
             //Assign default speed
             rKey.setValue(“Speed”, new Integer(5));
         //Set the position of the thumb for trackbar control
         trbSpeed.setValue(rKey.getValue(“Speed”).hashCode());

         //Get font information from registry.
         if (rKey.getValue(“MarqueeFont”) == null)
         {
             String tempString = tempEditor.getTextFromValue(
                                                     m_fTempFont);
             rKey.setValue(“MarqueeFont”, tempString);
         }
         m_fTempFont = (Font)tempEditor.getValueFromText(
                             rKey.getValue(“MarqueeFont”).toString());

         //Get the font color.
         if (rKey.getValue(“FontColor”) == null){
             String tempString = tempCEditor.getTextFromValue(
                                                         Color.WHITE);
             rKey.setValue(“FontColor”, tempString);
         }
           m_cTempColor = (Color)tempCEditor.getValueFromText(
                               rKey.getValue(“FontColor”).toString());
       }

       private void SaveInfo()
       {
           Font.Editor tempEditor = new Font.Editor();
           Color.Editor tempCEditor = new Color.Editor();

           RegistryKey rKey = Registry.CURRENT_USER.getSubKey(
                                   “Software\\VJDevWorkshop\\DWMarquee”,
                                   false);

           //Save Display Mode.
           if (optShowTime.getChecked() == true)
               rKey.setValue(“ShowTime”, new Integer(0));
           else
               rKey.setValue(“ShowTime”, new Integer(1));

           //Save Marquee Text.
           rKey.setValue(“MarqueeText”,txtMarqueeText.getText());

           //Save Speed.
           rKey.setValue(“Speed”, new Integer(trbSpeed.getValue()));

           //Save Positioning.
           if (optCenter.getChecked() == true)
               rKey.setValue(“Centered”, new Integer(0));
           else
               rKey.setValue(“Centered”, new Integer(1));

           //Save Current Font.
           rKey.setValue(“MarqueeFont”,
                         tempEditor.getTextFromValue(m_fTempFont));
           //Save Current Font Color.
           rKey.setValue(“FontColor”,
                         tempCEditor.getTextFromValue(m_cTempColor));
       }
Let’s take a look at the LoadRegistryInfo method first. This method retrieves the screen saver’s settings and sets the initial control values for the dialog box’s controls. The code begins by creating instances of the Form.Editor and Color.Editor classes. We’ll use these instances later on in the method’s code. The code then creates an instance of RegistryKey. This object will represent the location in the Registry where we will store our settings. To make creating Registry keys easier, WFC includes a Registry class that contains static member variables that you can use to select one of the Registry’s predefined base keys. We use this class in the instantiation of the rKey Registry key. The Registry key is created in \\HKEY_CURRENTUSER\Software\VJDevWorkshop\DWMarquee by the call to RegistryKey’s createSubKey method.
With a key created, the code can now easily read from and write to the Registry. In each setting that we store in the Registry, the code checks to see whether the value is defined in the Registry. If it isn’t, the code creates a Registry entry and provides a default value. Once the default value has been stored in the Registry, the code proceeds to retrieve the value back out of the Registry and sets the appropriate control values on the form. This step ensures that the Registry stores the values correctly. For the Boolean dialog box settings, instead of storing the value as text, the code stores the value as an integer and retrieves it using the hashCode method.
The Font and Color objects defined earlier in the example provide some interesting code to store and retrieve the objects’ values. The code to retrieve and store the Font and Color objects uses the Font.Editor and Color.Editor objects that we defined at the top of the method’s code. Both these objects provide the getTextFromValue method, which is used to get a string representation of the object passed as an argument. The converse happens for the getValueFromText method. The code uses these .Editor objects to retrieve the current font and text color. Like the other sections of code for retrieving the settings from the Registry, the code to store the Font and Color objects defines a default value when one isn’t found in the Registry. The converse of the LoadRegistryInfo method occurs in the SaveInfo method. The values from each of the dialog box controls, as well as the private member variables that hold the screen saver’s current font and text color, are stored in the Registry. The SaveInfo method also uses local Font.Editor and Color.Editor objects to store the font and text color.
We need to add the last line of code to the constructor of ScreenSaverOptions. Add this line of code to the constructor, below the call to initForm:
//Load the screen saver options into the dialog box’s controls.
 LoadRegistryInfo();
This single line of code makes a call to the LoadRegistryInfo method, which we defined earlier in this step. Now that the last bit of code is added to the dialog box, we’ll wire our screen saver to take advantage of the dialog box.
The code to display the options dialog box and load the screen saver Registry values is relatively easy. First, you’ll need to clear the default values that we assigned to our original screen saver’s code to define its behavior. The following code demonstrates how the private member variable declaration code should look now in the ScreenSaver class:
     private int m_iDistance;
     private boolean m_bRandom ;
     private boolean m_bTime;
     private int m_iSpeed;
     private String m_sMarqueeText = new String();
     private Font m_fMarqueeFont = new Font(“Arial”, 62.0f,
                                            FontSize.CHARACTERHEIGHT,
                                            FontWeight.BOLD,
                                            false, false, false);
     private Color m_cMarqueeColor = new Color(0x00FFFFFF);
     private int m_ixStart, m_iyStart;
We no longer need most of the default values because our screen saver will load these variables from the Registry settings. Next, we need to add a method to the ScreenSaver class that will load the Registry settings into the private member variables. Add the following code to the ScreenSaver class:
    /**Gets the settings for the screensaver from the registry */
     private void GetRegistryInfo()
     {
         Font.Editor tempEditor = new Font.Editor();
         Color.Editor tempCEditor = new Color.Editor();

         /* Get the registry key that contains all of the
          * screensaver settings. */
         RegistryKey rKey = Registry.CURRENT_USER.createSubKey(
                             “Software\\VJDevWorkshop\\DWMarquee”);

         //Get registry settings for Display Mode.
         if (rKey.getValue(“ShowTime”) == null)
             //Assign default value (show time)
             rKey.setValue(“ShowTime”, new Integer(0));

         if (rKey.getValue(“ShowTime”).equals(new Integer(0)))
             m_bTime = true;
         else
             m_bTime = false;

         //Get registry settings for Positioning.
         if (rKey.getValue(“Centered”) == null)
             //Assign default value (show time)
             rKey.setValue(“Centered”, new Integer(0));
         if (rKey.getValue(“Centered”).equals(new Integer(0)))
             m_bRandom = false;
         else
             m_bRandom = true;

         //Get registry settings for Marquee Text.
         if (rKey.getValue(“MarqueeText”) == null)
             //Assign default text
             rKey.setValue(“MarqueeText”, “Welcome to Visual J++”);

         //Set the text for the Marquee Text.
         m_sMarqueeText = rKey.getValue(“MarqueeText”).toString();

         //Get registry settings for Speed.
         if (rKey.getValue(“Speed”) == null)
             //Assign default speed.
             rKey.setValue(“Speed”, new Integer(5));
         m_iSpeed = rKey.getValue(“Speed”).hashCode();

         //Get font information from registry.
         if (rKey.getValue(“MarqueeFont”) == null)
         {
             String tempString = tempEditor.getTextFromValue(
                                                     m_fMarqueeFont);
             rKey.setValue(“MarqueeFont”, tempString);
         }
         m_fMarqueeFont = (Font)tempEditor.getValueFromText(
                                         rKey.getValue(“MarqueeFont”)
                                         .toString());

         //Get the font color.
         if (rKey.getValue(“FontColor”) == null){
             String tempString = tempCEditor.getTextFromValue(
                                                     m_cMarqueeColor);
             rKey.setValue(“FontColor”, tempString);
         }
         m_cMarqueeColor = (Color)tempCEditor.getValueFromText(
                                         rKey.getValue(“FontColor”)
                                         .toString());
     }
You might recognize that most of this code duplicates the code in the LoadRegistryInfo method in the ScreenSaverOptions class. The only major difference between the two methods is the destination of the retrieved settings from the Registry. In the GetRegistryInfo method, the values are stored in the private member variables that we use to define our screen saver’s behavior. Like the LoadRegistryInfo method, this method attempts to read the information from the Registry. If the value doesn’t exist, the Registry entry is created with a default value. A user might never call the options dialog box for the screen saver, and without default values, the screen saver wouldn’t have any settings defined for it. If you later decide to change the screen saver’s default settings, make sure that you modify the default values in both the GetRegistryInfo method and the LoadRegistryInfo method. Otherwise, the default values will be defined differently based on which method creates the initial entries in the Registry.
To complete our screen saver’s integration with the options dialog box, we must change both the ScreenSaver’s constructor and its main method. For the constructor, we need only make a call to our new GetRegistryInfo method for retrieving the screen saver settings. The code to add to the constructor is as follows:
        //Retrieve the registry information for the screen saver.
         GetRegistryInfo();
Place this code after the call to initForm but before the other code in the constructor.
The changes to the main method require us to replace some of the code that we had defined for some of the command line options. The following is the complete code for the main method. Make the changes needed to the existing code.
    public static void main(String args[])
     {
         //Display the options dialog box.
         if (args[0].equals(“/c”))
         {
             //Create an instance of the screen saver options dialog
             ScreenSaverOptions options = new ScreenSaverOptions();
             //Show the dialog modally
             options.showDialog();
             //Exit the application.
             Application.exit();

         }
         //Start the screen saver normally.
         else if (args[0].equals(“/s”))
             //Run the screen saver application.
             Application.run(new ScreenSaver());
         /* We are not supporting passwords in this screen saver
          * so show message box and quit. */
         else if (args[0].equals(“/a”)){
             MessageBox.show(“Passwords are not available “
                                 + “for this screen saver”,
                             “DWMarquee Screen Saver”,
                             MessageBox.ICONINFORMATION);
             Application.exit();
         }
         //For any other command lines passed, exit.
         else
             Application.exit();
     }
The most notable difference between the two versions of the main method is in the code that handles the /c command line option. Instead of displaying a message box, the new implementation of the main method creates an instance of our ScreenSaverOptions class and calls its showDialog method to show the options dialog box modally. Once the dialog box returns, the application exits.
Our code is complete. You can now rebuild the project and repackage the screen saver’s Windows .exe file. If you want to keep both screen saver versions on your system, change the name of the Windows .exe package to DWMarquee2 in the Output Format tab of the Project Properties dialog box. Place the new version of the screen saver in the Windows\System directory (Winnt\System32 directory for Windows NT) so that we can test it. With the Screen Saver tab selected in the Display applet, select the DWMarquee2 screen saver from the list and click the Settings button. You should see our splash screen’s options dialog box displayed with the default settings we chose (that is, if you didn’t run the project from the development environment first). Play with the different settings, and then click the Preview button in the Screen Saver tab to see the results. Click the Set Font button in the Screen Saver Options dialog box, and change the font and text color to various settings. Now you have a working and useful screen saver that you can use on your system.
Where Do We Go from Here? Now that you’ve created the example, use these suggestions to change or enhance the screen saver and options dialog box:
In my opinion, reusable code is one of the most important tools for successful programming. Why write code only to write it again? Java provides all the tools you need to create reusable code. The ability to create new classes from existing classes and inherit existing functionality is a prime component in creating reusable code. You can subclass almost any class, and Visual J++’s Form class is no different. Think of the possible uses of subclassing a form. Say you created a form that was ideal for one project, but now you want to change the form and add it to a different project. By simply subclassing the form, you can add features and controls to a new form class and leave the superclass form alone. If you change the superclass form’s code, the subclassed form automatically inherits the changes. This feature’s applications are limitless.
In this example, we’ll create a new form class based on WFC’s Form class that allows you to make the form’s position, size, and state persist when the window is closed. A persistent form is useful for toolboxes, Single Document Interface (SDI) applications, and special window situations. Not only will we create a form class that can remember where it was the last time it was shown, but we’ll also create a class that you can add to the list of form templates in the Add Item dialog box. This procedure will allow us to use this form class in other projects.
We’ll begin by creating a project using the Empty Project template. This template is available from the New Project dialog box directly under the Visual J++ Projects node. Name the project PersistentForm. The project will have no source files. Add a form to this project, and name it PersistentForm.java. Set the startPosition property to Manual. This property is the only one we need to set for the new form class.
The code that we’ll add in this step stores the form’s bounds and window state when the form is closed. The form’s bounds include its height and width as well as its vertical and horizontal positioning on the screen. The form’s window state is an integer value that determines whether the form is in a normal, minimized, or maximized state. The Windows Registry stores this information in a key that the class’s constructor defines. Before we add any code to the project, remove the form’s default constructor (PersistentForm). Since our class needs to have a Registry key in order to work, we must remove the default constructor and provide a single constructor that can accept a RegistryKey object as an argument. Once you’ve removed the default constructor, add the following code to the PersistentForm class:
    private RegistryKey persistKey;

     public PersistentForm(RegistryKey tempKey)
     {
         //Assign the registry key pass as an argument.
         persistKey = tempKey;
         //Call initForm to setup controls and other form properties.
         initForm();
         //Load the stored window state (if any).
         LoadWindowState();
     }

     public RegistryKey getPersistKey()
     {
         return persistKey;
     }

     private void StoreWindowState(Object sender, CancelEvent e)
     {
         Rectangle.Editor rectEdit = new Rectangle.Editor();

         //Check for a valid registry key.
         if(persistKey != null){
             //Store window state.
             persistKey.setValue(“WindowState”,
                                 new Integer(this.getWindowState()));
             /* If form is maximized,
              * do not store bounds (in fact, clear them). */
             if (this.getWindowState() != FormWindowState.MAXIMIZED)
                 //Store window bounds.
                 persistKey.setValue(
                         “WindowBounds”,
                         rectEdit.getTextFromValue(this.getBounds()));
         }
     }
In this code, we’ve added a private RegistryKey instance that we’ll use to store and retrieve the form’s information to the Registry. The constructor that we created to replace the default constructor accepts a RegistryKey argument that we assign to our class’s RegistryKey instance. The constructor then calls the customary initForm method to set up any controls that the form contains. The last line of code in the constructor calls the LoadWindowState method, which we’ll create in the next step. To make accessing the form’s RegistryKey easier for the developer, we also include the getPersistKey method.
Use the Properties window to connect the event handler, StoreWindowState, to the form’s Closing event. The Closing event occurs while the form is closing and provides a way of stopping the closing process. The StoreWindowState event handler stores the form display properties to the Registry. The code for the method checks for a valid RegistryKey object and then proceeds to write the form’s state to the Registry. Since a form’s bounds are useless when the form is maximized, the code checks to see whether the form is maximized and stores its bounds only if the form is not maximized. Because the return value of the form’s getBounds method is a Rectangle object, the code uses the Rectangle.Editor class’s getTextFromValue method to store the rectangle into the Registry in a string format that can be read back in and restored as a Rectangle object.
Now that the storage mechanism for making the form’s display information persistent is in place, we can add code to retrieve this information from the Registry and make the adjustments to the form. Also, because we removed the form’s default constructor in a previous step, we’ll need to change the class’s main method. Add the following method to the PersistentForm class:
    private void LoadWindowState()
     {
         Rectangle.Editor rectEdit = new Rectangle.Editor();

         //Check state of RegistryKey object and values.
         if (persistKey != null && persistKey.getValueCount() != 0)
         {
             //Retreive window state.
             this.setWindowState(
                     persistKey.getValue(“WindowState”).hashCode());
             //If window is maximized, do not restore window bounds.
             if (this.getWindowState() != FormWindowState.MAXIMIZED)
                 //Retreive window bounds.
                 this.setBounds(
                     new Rectangle((Rectangle)rectEdit
                                     .getValueFromText(persistKey
                                         .getValue(“WindowBounds”)
                                             .toString())));
         }
     }
The LoadWindowState method’s code is similar to the StoreWindowState method. LoadWindowState’s code first determines whether the form’s RegistryKey object is null and whether there are values in the Registry for the specified RegistryKey object. We check this to avoid reading Registry information the first time the window is displayed. Since the Registry doesn’t store the form’s display information the first time the form is displayed, why bother reading the Registry at all?
Next, the code reads the window state from the Registry and sets the form’s window state accordingly. The code then checks to see whether the form’s window state is maximized. If the form is maximized, the code bypasses reading the form’s bounds information. The code again uses the Rectangle.Editor class, but this time it uses the getValueFromText method to read the string value of the form’s bounds and create a Rectangle object. This Rectangle object is then passed to the form’s setBounds method to set the form’s position and size.
Finally, we delete the code in the main method. This change is required because the class PersistentForm no longer contains a default constructor. If you want to use this form class as a project’s main form (the form that starts when a project is run), you’ll simply need to create the same line of code that was in method main but with a Registry key defined in the constructor. The following example shows how the main method would look if PersistentForm were the main form of a project:
    public static void main(String args[])
     {
         /**TODO: To use this form as the application window...
          * add call to Application.run.*/
         Application.run(
             new PersistentForm(Registry.CURRENT_USER.createSubKey(
                 “\\Software\\VJDevWorkshop\\PersistentFormApp”)));
     }
If you don’t plan to use this as a main form or you want to create a form template out of this class, I recommend leaving the main method empty or commented out. I left a comment in the method so that anyone who uses this class will know that, in order to use this form as a project’s main form, a call must be made to Application.run with an instance of the form.
The code for class PersistentForm is now complete. If you added the code shown above to the main method, you can run the form and set the form’s window position and size to something different. Then close the form and rerun the project. When the form is displayed again, it should be positioned and sized exactly the way it was when you last exited the project.
Now that you have this class built and working correctly, you might want to reuse this form in your projects. The best way to do this is to transform the class into an Add Item template. You must perform two steps to turn a class into an Add Item template. The first step is to change all instances of the class’s name in the source code to %FILENAME%. Don’t change the source file’s name, just the name of the class inside the source code. The following code shows our PersistentForm class converted to a template. Notice the locations of the %FILENAME% entries.
 import com.ms.wfc.app.*;
 import com.ms.wfc.core.*;
 import com.ms.wfc.ui.*;
 import com.ms.wfc.html.*;

 /**
 * This class is a derivation of form that extends it to store the
  * location of the window in the registry.
 */
 public class %FILENAME% extends Form
 {
     private RegistryKey persistKey;

     public %FILENAME%(RegistryKey tempKey)
     {
         //Assign the registry key pass as an argument.
         persistKey = tempKey;
         //Call initForm to setup controls and other form properties.
         initForm();
         //Load the stored window state (if any).
         LoadWindowState();
     }

     public RegistryKey getPersistKey()
     {
         return persistKey;
     }

     private void StoreWindowState(Object sender, CancelEvent e)
     {
         Rectangle.Editor rectEdit = new Rectangle.Editor();

         //Check for a valid registry key.
         if(persistKey != null){
             //Store window state
             persistKey.setValue(“WindowState”,
                                 new Integer(this.getWindowState()));
             /* If form is maximized,
              * do not store bounds (in fact, clear them). */
             if (this.getWindowState() != FormWindowState.MAXIMIZED)
                 //Store window bounds.
                 persistKey.setValue(
                         “WindowBounds”,
                         rectEdit.getTextFromValue(this.getBounds()));
         }
     }

     private void LoadWindowState()
     {
         Rectangle.Editor rectEdit = new Rectangle.Editor();

         //Check state of RegistryKey object and values.
         if (persistKey != null && persistKey.getValueCount() != 0)
         {
             //Retrieve window state.
             this.setWindowState(
                     persistKey.getValue(“WindowState”).hashCode());
             //If window is maximized, do not restore window bounds.
             if (this.getWindowState() != FormWindowState.MAXIMIZED)
                 //Retrieve window bounds.
                 this.setBounds(
                     new Rectangle((Rectangle)rectEdit
                                     .getValueFromText(persistKey
                                         .getValue(“WindowBounds”)
                                             .toString())));
         }
     }

     /**
      * %FILENAME% overrides dispose so it can clean up the
      * component list.
      */
     public void dispose()
     {
         super.dispose();
         components.dispose();
     }

     /**
      * NOTE: The following code is required by the Visual J++ form
      * designer.  It can be modified using the form editor.  Do not
      * modify it using the code editor.
     */
       Container components = new Container();

       private void initForm()
       {
           this.setText(“%FILENAME%”);
           this.setAutoScaleBaseSize(13);
           this.setClientSize(new Point(300, 300));
           this.setStartPosition(FormStartPosition.MANUAL);
           this.addOnClosing(new
                             CancelEventHandler(this.StoreWindowState));
       }

       /**
        * The main entry point for the application.
        *
        * @param args Array of parameters passed to the application
        * via the command line.
        */
       public static void main(String args[])
       {
           /**TODO: To use this form as the application window...
            * add call to Application.run.*/
           Application.run(
               new %FILENAME%(Registry.CURRENT_USER.createSubKey(
                   “\\Software\\VJDevWorkshop\\PersistentFormApp”)));
       }
   }
The %FILENAME% entries are placeholders where Visual J++ will insert the class name that the users specify in the Add Item dialog box when they are adding an instance of this class to their projects.
The last step is to copy the PersistentForm.java file to Visual J++’s form templates directory. For example, on my system this directory is located at C:\Program Files\Microsoft Visual Studio\VJ98\VJProjectItems\Form. Once you’ve copied the file to this directory, you can use the template in your projects. To try out this template, create a Visual J++ project. Display the Add Item dialog box, and select our PersistentForm class from the list of forms. The name that you specify in the Add Item dialog box will become the name of your class and its constructors. You can now add controls, menus, and the like to the form, just as you would to a standard form template. The only difference is that when you want to create an instance of this form, you must specify the Registry key where the window position information will be stored.
Where Do We Go from Here? Although this class is concise and capable, you can always improve it. You can add the following suggested features to this example to make it fit your needs and preferences:
In the previous example, we created a new type of form that can save its state. We accomplished this by creating a subclass of the WFC Form class. Although this Visual J++ feature alone is great, the capabilities are even more extensive. As I mentioned in the preceding example, you can use form inheritance to extend a form that you’ve created in one application to add additional features required by a different application. Form inheritance can enable code reuse in your application development. In this example, we’ll create a form with some controls and then subclass it and add additional controls. The user interface (UI) that we create will be for a fictional search engine for a hockey team’s player database. The example doesn’t provide any search capabilities. Instead, the example focuses on the task of subclassing forms. Figure 6 shows both the base form and subform that we’ll create in this example, at run time.
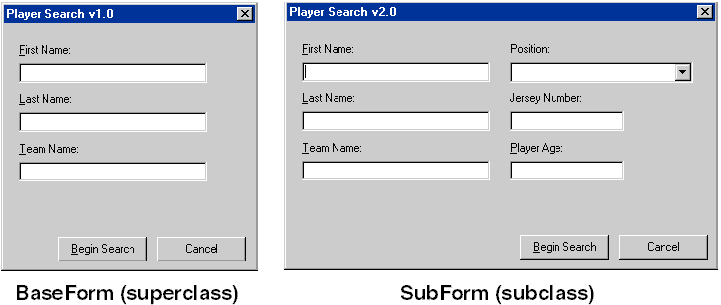
Figure 6. BaseForm.java and SubForm.java at run time
To create a valid subclassed form, you must have a valid base form. In our base form, the user can search for a hockey player’s statistics using three search fields. To begin, create a project using the Empty Project template available in the New Project dialog box and name it FormInheritance. Add a form to your new project, and name it BaseForm.java. We’ll need to add three Label controls, three Edit controls, and two Button controls to the form. To set the properties for the form and its controls, follow the settings in Table 5.
Table 5. BaseForm.java components and property settings
| Component Type/ID | Property | Setting |
| Form | size.x | 260 |
| size.y | 272 | |
| text | Player Search v1.0 | |
| borderStyle | Fixed Dialog | |
| maximizeBox | false | |
| minimizeBox | false | |
| Label - 0 | name | lblFirstName |
| text | &First Name: | |
| size.x | 165 | |
| size.y | 20 | |
| location.x | 15 | |
| location.y | 20 | |
| Edit | name | txtFirstName |
| text | ““ | |
| size.x | 190 | |
| size.y | 20 | |
| location.x | 15 | |
| location.y | 40 | |
| Label | name | lblLastName |
| text | &Last Name: | |
| size.x | 165 | |
| size.y | 20 | |
| location.x | 15 | |
| location.y | 70 | |
| Edit | name | txtLastName |
| text | ““ | |
| size.x | 190 | |
| size.y | 20 | |
| location.x | 15 | |
| location.y | 90 | |
| Label | name | lblTeamName |
| text | &Team Name: | |
| size.x | 165 | |
| size.y | 20 | |
| location.x | 15 | |
| location.y | 120 | |
| Edit | name | txtTeamName |
| text | ““ | |
| size.x | 190 | |
| size.y | 20 | |
| location.x | 15 | |
| location.y | 140 | |
| Button | name | btnBeginSearch |
| text | &Begin Search | |
| size.x | 90 | |
| size.y | 25 | |
| location.x | 55 | |
| location.y | 215 | |
| Button | name | btnCancel |
| text | Cancel | |
| size.x | 90 | |
| size.y | 25 | |
| location.x | 155 | |
| location.y | 215 |
Figure 7 shows how the form should look during development with all its controls placed correctly.
We must have precise control over the size and location of controls added to BaseForm.java to ensure that it’s easy to place controls in the subclass of this form. We can do all the work for the BaseForm form from the Forms Designer since we don’t need to add code to the BaseForm class to support subclassing it.
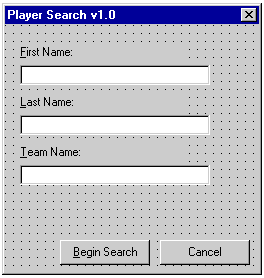
Figure 7. BaseForm.java at design time
Now we’ll add the form that will become our subclassed form. Because Visual J++’s Forms Designer can’t show inheritance visually (or even show the Forms Designer for subclassed forms, for that matter), we’ll work exclusively with the subclassed form’s code. Add a new form to the project and name it SubForm.java. We could have created a class using the standard class templates and then made the new class extend the BaseForm class, but it’s easier to use the Form template because the Form template adds plenty of free code. Since we can’t use the Forms Designer to add the additional controls to the subclassed version of the form, I included the entire subclassed form’s code here:
// SubForm.java

   import com.ms.wfc.app.*;
   import com.ms.wfc.core.*;
   import com.ms.wfc.ui.*;
   import com.ms.wfc.html.*;

   public class SubForm extends BaseForm
   {
       public SubForm()
       {
           /* Make a call to superclass constructor
            * to initialize controls. */
           super();

           // Required for Visual J++ Form Designer support
           initForm();

           //Add player information to drop-down list
           cmbPosition.addItem(“Center”);
           cmbPosition.addItem(“Left Wing”);
           cmbPosition.addItem(“Right Wing”);
           cmbPosition.addItem(“Left Defense”);
           cmbPosition.addItem(“Right Defense”);
           cmbPosition.addItem(“Goaltender”);
       }

       /**
        * SubForm overrides dispose so it can clean up the
        * component list.
        */
       public void dispose()
       {
           super.dispose();
           components.dispose();
       }

       /**
        * NOTE: The following code is required by the Visual J++ form
        * designer.  It can be modified using the form editor.  Do not
        * modify it using the code editor.
        */
       Container components = new Container();
       Label lblPosition = new Label();
       ComboBox cmbPosition = new ComboBox();
       Label lblJerseyNum = new Label();
       Edit txtJerseyNum = new Edit();
       Label lblAge = new Label();
       Edit txtAge = new Edit();

       private void initForm()
       {
           this.setSize(new Point(438, 272));
           this.setText(“Player Search v2.0”);
           this.setClientSize(new Point(432, 247));
           lblPosition.setLocation(new Point(225, 20));
           lblPosition.setSize(new Point(165, 20));
           lblPosition.setText(“Position:”);
           lblPosition.setTabIndex(6);
           cmbPosition.setLocation(new Point(225, 40));
           cmbPosition.setSize(new Point(185, 21));
           cmbPosition.setTabIndex(7);
           cmbPosition.setTabStop(true);
           cmbPosition.setText(““);
           cmbPosition.setStyle(ComboBoxStyle.DROPDOWNLIST);
           cmbPosition.setItems(new Object[] {});
           lblJerseyNum.setLocation(new Point(225, 70));
           lblJerseyNum.setSize(new Point(185, 20));
           lblJerseyNum.setText(“Jersey Number:”);
           lblJerseyNum.setTabIndex(8);
           txtJerseyNum.setBackColor(Color.WINDOW);
           txtJerseyNum.setCursor(Cursor.IBEAM);
           txtJerseyNum.setLocation(new Point(225, 90));
           txtJerseyNum.setSize(new Point(115, 20));
           txtJerseyNum.setTabIndex(9);
           txtJerseyNum.setTabStop(true);
           txtJerseyNum.setText(““);
           lblAge.setLocation(new Point(225, 120));
           lblAge.setSize(new Point(185, 20));
           lblAge.setText(“&Player Age:”);
           lblAge.setTabIndex(10);
           txtAge.setBackColor(Color.WINDOW);
           txtAge.setCursor(Cursor.IBEAM);
           txtAge.setLocation(new Point(225, 140));
           txtAge.setSize(new Point(115, 20));
           txtAge.setTabIndex(11);
           txtAge.setTabStop(true);
           txtAge.setText(““);
           this.btnBeginSearch.setTabIndex(12);
           this.btnBeginSearch.setLocation( new Point(235,215));
           this.btnCancel.setTabIndex(13);
           this.btnCancel.setLocation( new Point(335,215));
           this.setNewControls(new Control[] {
               txtAge,
               lblAge,
               txtJerseyNum,
               lblJerseyNum,
               cmbPosition,
               lblPosition});
       }
       //NOTE: End of form designer support code.

       /**
        * The main entry point for the application.
        *
        * @param args Array of parameters passed to the application
        * via the command line.
        */
       public static void main(String args[])
       {
           Application.run(new SubForm());
       }
   }
If you want to subclass a form but don’t want to spend the time figuring out the size and location of the controls to add to the base form, I recommend displaying the Forms Designer for the base class and adding the controls to it. Once you’ve displayed the form and its controls appear as you want them to appear in the subclass, copy the Sb
method and control instance creation code that the Forms Designer added for you. You can then add the code to the subform’s class and delete the control code that is part of the base form. I used this procedure to obtain the correct positioning for each of the SubForm class controls.
We made important changes to the code generated by the Form template. We changed the form’s constructor and its initForm method. Another important change concerns the class declaration. Instead of extending the WFC Form class, the SubForm class extends the BaseForm class. In the SubForm constructor, a call is made to super. The super method calls the superclass’s constructor, which allows the BaseForm’s controls to be initialized and displayed. We place the call to super above the SubForm’s call to initForm since we want BaseForm’s control code set up first. After the initForm method call, the constructor code adds player position names to the ComboBox control that we’re adding to the form.
The code below the instantiation of the form’s Container object declares the instances of the controls that we’re adding to the SubForm form. We’re adding three Label controls, two Edit controls, and one ComboBox control to the form. These controls will allow users of the hockey player search engine to locate players using additional fields in the database, such as player position, jersey number, and age.
The last code that we added to the SubForm class is within the initForm method. We replaced the default code, which is generated by the template to set up SubForm, with code that extends the size of the form to fit the controls we’re adding. The code also changes the form’s caption to show you that this version of the hockey player search engine is different. After we set the form’s properties, each control that we’re adding is initialized. For each control, we specify values for properties such as text, size, location, and tabIndex. The cmbPosition control also has its style set to DROPDOWNLIST since we want the user only to select a position from the list provided and not to enter a value in the edit portion of the control.
Once the code has initialized these controls, it continues to initialize a couple of the BaseForm’s controls by moving the btnCancel and btnBeginSearch to their new locations. Since the form is now wider to accommodate the new controls, the buttons needed to be moved to the right. To reference any of the controls that we inherited from the BaseForm class, we simply use the keyword this before referencing the control’s name. The last line of code adds our controls to the form’s array of controls.
That’s it. Pretty easy! Although the form isn’t available to be displayed and manipulated in the Forms Designer, you can still subclass a form easily. If you run the project and select the BaseForm class, you should see the form shown in Figure 6. Close the form and rerun the project, but this time choose the SubForm class from the Launch tab of the FormInheritance Properties dialog box. The new version of our search engine should appear with all its new controls displayed and the buttons aligned properly to the right. Now that you know how to subclass a form, you can add this capability to your bag of tricks. This capability can be efficient and handy to use when you want to reuse existing forms and add functionality to them.
Where Do We Go from Here? You can learn a lot more about form inheritance and how to work with a superclass’s controls. Investigate and experiment with the following suggestions:
Not all forms that you create for an application will be used as a modal dialog box or as an application’s main window. Often you’ll want to create tools that are available to users while they’re working in your application. The most common way of providing these tools to the user is through a tool window that remains displayed while the user is working with your application. In this example, we’ll create a tool window that will allow a user to search for text in an Edit control. The user will also have the option of replacing text that the tool window finds. The tool window is designed to work with any Edit control. Figure 8 shows how the tool window and the application’s main window will look when run. By working through this example, you’ll not only understand how to work with tool windows, but you’ll also learn how to use the methods of the Edit control and String class to manipulate text information.
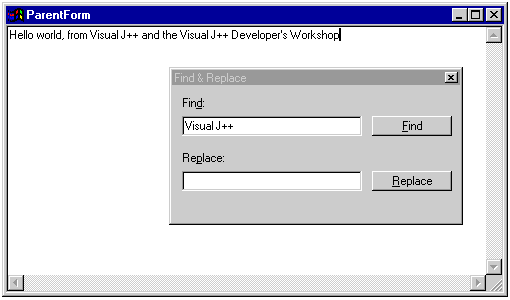
Figure 8. ToolboxExample during run time
In this example, we’ll create two forms: the parent window, which will contain an Edit control that we’ll use to enter the text to be searched; and the tool window, which will provide controls for finding text and replacing it. In this step, we’ll create the project and the tool window’s form. To start, use the Empty Project template to create a project, and name the project ToolboxExample. To the empty project that the template creates, add a form and name it FindAndReplace.java. The tool window will contain two Edit controls, two Button controls, and two Label controls. Figure 9 shows how this form should look in the Forms Designer during development.
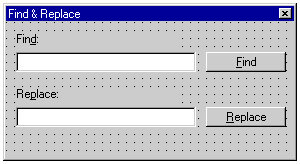
Figure 9. FindAndReplace.java at design time
Modify the properties of these controls by following the settings in Table 6.
Table 6. FindAndReplace.java components and property settings
| Component Type | Property | Setting |
| Form | size.x | 294 |
| size.y | 158 | |
| text | Find And Replace | |
| borderStyle | Fixed Toolwindow | |
| maximizeBox | false | |
| minimizeBox | false | |
| showInTaskbar | false | |
| Label | name | lblFind |
| text | Fin&d: | |
| Edit | name | txtFind |
| text | ““ | |
| Button | name | btnFind |
| text | &Find | |
| Label | name | lblReplace |
| text | Re&place: | |
| Edit | name | txtReplace |
| text | ““ | |
| Button | name | btnReplace |
| text | &Replace |
The only real difference between this form and the other forms we’ve designed up to this point is setting the form’s borderStyle property to Fixed Toolwindow. This setting causes the window to have a nonresizeable border but also reduces the size of the form’s caption bar. With the tool window’s form designed, let’s build the parent form that will use the FindAndReplace tool window.
The application’s main form will be simple. It will contain a single Edit control that will fill the entire client area of the form. This Edit control will act as our text entry control within which the FindAndReplace tool window will search for text. Add a form to your project, and name it ParentForm.java. Add an Edit control to the form and set the properties for the form and the Edit control based on the information in Table 7.
Table 7. ParentForm.java components and property settings
| Component Type | Property | Setting |
| Edit | name | txtAppText |
| dock | Fill | |
| hideSelection | false | |
| multiline | true | |
| scrollBars | Vertical | |
| text | ““ | |
| acceptsReturn | true | |
| acceptsTab | true |
Figure 10 shows how the ParentForm.java form should look during design time.
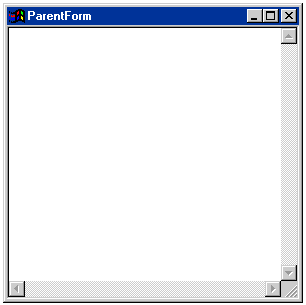
Figure 10. ParentForm.java at design time
For this form, the txtAppText Edit control receives all the property settings. Use the form’s default properties. The txtAppText control’s properties are set to make it behave in a similar way to the editor portion of a text editor. You set the dock property to Fill by selecting the center box in the editor that is displayed for the property in the Properties window. This setting will cause txtAppText to fill the form’s client area automatically. The txtAppText control will fill the form even during run time. By setting the hideSelection property to false, we allow the Edit control to display selected text in the control even if the control doesn’t have focus. This setting is important to our example because we want to show any selected text that is found by using the FindAndReplace tool window. The property settings for scrollBars and multiline finalize the text editor requirements by allowing the Edit control to display multiple lines of text and scroll bars so that a user can scroll the text if needed.
With our project created and our forms added, we’ll now add code to the forms. We’ll work with the ParentForm first, since it requires that code be added to its constructor only to display the FindAndReplace tool window. Add the following code to your ParentForm class’s constructor. Place the code below the call to initForm.
FindAndReplace fnp = new FindAndReplace();
 fnp.setOwner(this);
 fnp.setEditControl(this.txtAppText);
 fnp.show();
Since our example focuses on displaying tool windows, I avoided adding menus or context menus to the form to show the FindAndReplace tool window. The code we added to the ParentForm’s constructor begins by creating an instance of the FindAndReplace tool window. It then sets the owner of the FindAndReplace tool window to be the ParentForm. This piece of code is important because it ties the FindAndReplace tool window to ParentForm and allows the tool window to be displayed on top but not modally. This property setting also allows the tool window to be disposed of properly when the main form is closed. The users will see the FindAndReplace tool window as long as it is shown, yet they can still modify text in the Edit control. The call to setEditControl passes a reference to the ParentForm’s Edit control to the tool window. This method allows the FindAndReplace tool window to search for text more easily and makes the FindAndReplace tool window more modular because it can now work with any form’s Edit control. We’ll talk more about this code in the next step. Finally, the last line of code displays the FindAndReplace tool window using the show method, which causes the form to be displayed, but not modally.
Pretty simple code, eh? If you follow the basic premise of setting ownership of the tool window and displaying non-modally using the show method, you should be able to display any tool window easily.
Our application’s main form is complete, and we’ll now concentrate our efforts on the FindAndReplace form. We’ll begin by adding some private member variables and event handlers to the class. Add the following code to the FindAndReplace class:
    //Used to access an edit control
     private Edit m_txtTempEdit = new Edit();

     //The last index of text found
     private int m_iLastIndex = -1;
     //The last string of text to search for
     private String m_sLastString = new String();

       //Assigns an edit control to local edit control
       public void setEditControl(Edit tempCtrl)
       {
           m_txtTempEdit = tempCtrl;
       }

       //Replaces currently selected text
       private void ReplaceText(Object sender, Event e)
       {
           if (m_txtTempEdit.getSelectedText().length() > 0
               && txtReplace.getText().length() > 0)
               m_txtTempEdit.setSelectedText(txtReplace.getText());
       }

       private void FindText(Object sender, Event e)
       {
           /* Determines if we have a valid edit control
            * and text to search for */
           if (m_txtTempEdit != null
               && txtFind.getText().length() != 0)
               /* Calls search method for finding text
                * in specified edit control */
               SearchForText(txtFind.getText());
       }
The private member variables support our find and replace features. Only one of these variables is used in conjunction with a property: m_txtTempEdit. This variable stores a reference to the Edit control that contains the text that we’ll be searching and replacing. The setEditControl property method allows the ParentForm to assign its Edit control to m_txtTempEdit. The m_iLastIndex variable stores the last index the tool window found and helps in searching for multiple occurrences of a word in the text. The variable m_sLastString stores the last string that was searched for. The code will use this variable to determine whether a change has been made to the text to search for (the text that we’ll be looking for).
The only events that we need to create event handlers for are the Click events of the buttons btnFind and btnReplace. The FindText method is connected to btnFind’s Click event and is responsible for ensuring that the owner form has designated a valid Edit control and that the user has entered text to search for in the txtFind Edit control. If both these conditions are met, the event handler makes a call to the SearchForText method, which does the actual searching. We’ll add the SearchForText method in the next step of this example.
The ReplaceText method is connected to btnReplace’s Click event. This event handler, like the FindText event handler, checks for a valid Edit control to work with and checks that text has been entered into the txtReplace Edit control. If both conditions are met, the event handler replaces the currently selected text in the current Edit control with the text in the txtReplace control. The method uses the setSelectedText method that replaces the currently selected text in the m_txtTempEdit control. If no text is selected in the control, the method does nothing. This fact is important since we want text replacement to occur only if text is selected.
With all the ancillary code out of the way, we’ll now add the primary method that performs the tool window’s text search features. But first we should remove the main method from the FindAndReplace class. For forms that are never intended to be displayed as an application’s main form, such as the FindAndReplace form, removing the method is good practice. This practice forces the form to be instantiated by another form and makes choosing the main form of the application easier. Now lets add the code for the SearchForText method to our class. Add the following lines of code to the FindAndReplace class:
    //Searches for given text in specified edit control
     private void SearchForText(String textToFind)
     {
         int index = -1;

         //Determine if either of the parameters is null or empty.
         if (m_txtTempEdit != null && textToFind.length() > 0)
         {
             /* Determine if we have had no previous found text
              * or if string to search for has changed midstream. */
             if (m_iLastIndex <= 0
                 || m_sLastString.equals(textToFind) == false)
             {
                 //Store currently searched-for text.
                 m_sLastString = textToFind;
                 //Ensure that there is nothing currently selected.
                 m_txtTempEdit.setSelectionStart(0);
                 m_txtTempEdit.setSelectionEnd(0);
                 //Get the initial index of the text to find.
                 index = m_txtTempEdit.getText().indexOf(textToFind);
             }
             else
                   /* Search for index to text based on
                    * existing text that has been found. */
                   index = m_txtTempEdit.getText().indexOf(textToFind,
                                                       m_iLastIndex);

               //If text is not found at all in edit control
               if (index < 0 && m_iLastIndex < 0)
               {
                   MessageBox.show(“Selected Text Not Found”,
                                   “Find & Replace”,
                                   MessageBox.ICONEXCLAMATION);
                   //Reset the index.
                   m_iLastIndex = -1;
                   return;
               }
               /* Determine if we have found things
                * in the past but not on this try. */
               else if (index < 0 && m_iLastIndex >= 0)
               {
                   MessageBox.show(“Last Instance of Text Found”,
                                   “Find & Replace”,
                                   MessageBox.ICONEXCLAMATION);
                   //Reset the index
                   m_iLastIndex = -1;
                   return;
               }
               /* Store the current index based on
                * current index and length of text. */
               m_iLastIndex = index + textToFind.length();
               //Set focus to edit control so we can set selection.
               m_txtTempEdit.focus();
               /* Set the end point of the selection to be
                * the index plus the length of the text. */
               m_txtTempEdit.setSelectionEnd(index
                                             + textToFind.length());
               //Set the start point of the selection.
               m_txtTempEdit.setSelectionStart(index);
           }
       }
The FindText event handler calls the SearchForText method with the user’s choice of text to search for as a parameter. The code for SearchForText begins by declaring an integer variable named index and initializing it to -1. This local variable stores the index of any text found in the specified Edit control. Since 0 is a valid text index, index is assigned the value -1. The code then checks for a valid Edit control and text to search for, as the code in the FindText event handler does. This redundancy keeps the SearchForText method modular. My code tends to have redundant error and situation checks to simplify application debugging. If a valid Edit control and text to search for exist, the code determines whether the user has already searched for the specified text in a previous call to this method. It also checks that the text to search for wasn’t changed. The user can search for a word, find it, and then change the text to search for a different word.
If the search is new, the code stores the current searched string, resets the selection in the m_txtTempEdit control, and finds the text to search for, for the first time. Otherwise, the code uses the m_iLastIndex variable, which contains the previously found text’s index, to search forward from this index. In either case, the code retrieves an index to the text to search for by using the String class’s indexOf method. Both calls to the indexOf method pass the text to search for to the method, but the call that occurs when a search is continuing assigns the previously found text’s index. As a result, we can search beyond the previously found instance of the text to search for in the Edit control. The code then assigns the index to the text in the Edit control to the local variable index. If the text to search for can’t be found in the current Edit control, the index variable is assigned the value of -1.
With the search portion complete, the code performs some checks. It first determines whether the index indicates that the text to search for wasn’t found and whether this is a first-time search for the text. If these conditions are true, the code displays a message box alerting the user that the text was never found in the Edit control and exits the method. The next check determines again whether the index is -1 but also determines whether this is a continuing search. If this search is continuing, a message box alerts the user that the previously found text was the last. If a valid index is found, the code assigns the m_iLastIndex variable the value of the variable index plus the length of the text to search for. This assignment prevents the next search for the text from picking up the currently found instance of the text. After assigning the index plus the length of the text to search for to the variable m_iLastIndex, the code sets focus to the m_txtTempEdit control and sets its selected text using the Edit control’s setSelectionStart and setSelectionEnd methods. These two methods mark the beginning and end of the text to select.
The code for both forms is now complete. Select the ParentForm form as the main form to launch in the Launch tab of the ToolboxExample Properties dialog box, and then build and run the project. You should have both windows displayed, as shown in Figure 8. Enter Hello world, from Visual J++ and the Visual J++ Developer’s Workshop into the main form’s Edit control. As you’re typing into the Edit control, notice that the tool window stays on top of the form. Once you’ve typed in the text, search it by entering different words into the Find text box in the tool window and clicking the Find button. The text should be highlighted. With text highlighted in the main form’s Edit control, enter text into the Replace text box in the tool window and click the Replace button. The new text should replace the selected text. Play around with different searches and text entries in the main form’s Edit control. You can use this simple tool window in other applications that you develop.
Where Do We Go from Here? Although our FindAndReplace tool window is simple, you can enhance it to use in real-world applications. Here are some ways you can take the FindAndReplace tool window to the next level:
This chapter gave you firsthand experience working with the Forms Designer to create various types of windows and dialog boxes. We worked with different styles of windows, such as the screen saver and the splash screen’s borderless and captionless windows. We created dialog boxes and tool windows and displayed them appropriately. We also examined how Visual J++ and Java’s reusability features can extend the Form class so that we can create our own persistent window class. We also learned how to derive one form from another to reuse existing user interfaces in new projects.