Dino Esposito
May 1999
Click here to download the sample script used to customize a folder using HTML templates.
Click here to download the sample script used to customize a folder using XML templates.
Usage note Unzip either of the two sample files above in the directory of your choice. Then make the directory read-only and refresh with F5. See what happens!
Summary: Explores two technologies used to design the content and look of your system folders—namespace extensions (NSE) and hypertext templates (HTT). (19 printed pages) Covers:
Introduction
When Do You Need Custom Folders?
Windows Folders Internals
Thumbnails View
Namespace Extensions
Folder Customization
Hypertext Templates
Writing Your Own Template
The Desktop.ini File
Writing XML-based Templates
Summary
As seasoned users of Microsoft® Windows® we all are accustomed to thinking of folders as a simple list of files and subdirectories. It comes almost naturally, then, to look at them as standard system objects whose behavior has been coded once and for all in some system library. With the introduction of Microsoft's Active Desktop™ shell update for Windows 95 and Windows NT 4.0, though, things began to change. Today, with Windows 98 already in our hands, and as we get closer to the release of Windows 2000, the folder concept is definitely evolving toward the more general idea of a content provider. A folder is a system component holding content that, in its simplest form, provides a list of files and folders. In general, a folder can contain anything, including records from a database, registry entries, e-mail messages, connected printers, scheduled tasks, and so forth.
Behind the curtain of this general schema pulse two far different technologies: namespace extensions (NSE) and hypertext templates (HTT). Both are committed to helping you design, with the highest degree of freedom, the content and the look of your folders. Both are tightly integrated in the Windows platforms. For example, Windows CE Services use a namespace extension to display files on the remote device.
To start off, what are reasonable scenarios in which you may need to create custom folders, and what kind of applications can create and exploit them? A few years ago I had an application that managed quite complex documents. The complexity was not so much in the content itself but in the rendering of the content. It was a collection of JPEG images stored in a single file and I needed the folder view to provide a list of thumbnails to click and zoom in on. In addition, the user was supposed to be able to organize these files by subject and date. Both thumbnails and images were actually stored in the same folder. It was my bad luck that all this happened before Windows 95 came along, because NSE would have been a great tool to employ. Today I'd design a similar application as an NSE that reads the documents and provides a thumbnail view.
Another common scenario in which you might want to consider using customized folders is the following: Suppose you have a shared folder that contains valuable data (for example, a database of bibliography references). Because the folder is shared, all network-connected users may access it. Suppose, also, that there aren't access rights problems and that all users are authorized to see all the content in the database. Typically, they connect and open the database using, say, Microsoft Access. What they obtain is the typical Access user interface with all of the tools available. A time-saving approach, instead, might be to present the user with a customized folder that doesn't show a list of files but a table with the records. In this way, the user would be redirected to the desired link with just a click. Not to mention, you might make the folder's user interface smarter by adding fields to accept and execute queries. (This is demonstrated in my "Active Desktop: The Shell and Beyond" article in the March 1998 issue of MIND magazine at http://www.microsoft.com/mind/0398/cutting0398.htm.)
The former scenario demonstrates namespace extensions in action, while the latter relies on folder customization and hypertext templates. In both cases, you can arrange to make the user interface totally Web-oriented. This is possible due to the HTML support built into the operating system with the advent of the Active Desktop interface. In this article, I'll focus on how the folder customization mechanism works and which windows layout it leverages. Next, I'll discuss which additional features can be made easier to use and how you can make your application's folders more user-friendly. In particular, I'll cover custom icons, descriptions, and infotips.
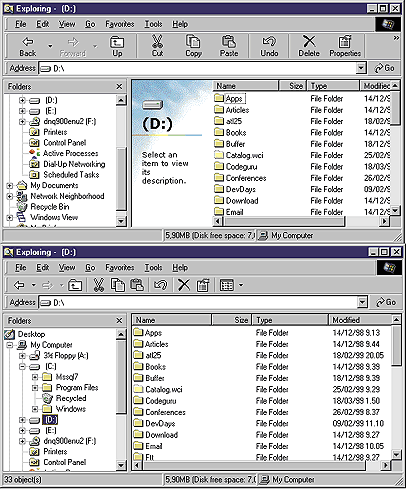
Active Desktop changed something in the internal hierarchy of windows that Windows Explorer employs to show you the folder content. Figure 1 shows two different Windows Explorer views of the same folder. The topmost is a Web view, while the other is a classic view.

Figure 1. A Web and a classic view of the same folder
In Figure 2, with the notable help of Microsoft Spy++, observe the internal structure that lies behind such views. Highlighted in green are the main windows of Windows Explorer. The first corresponds to the Web view. The second relates to the classic view. The different windows employed in each case are outlined in red.
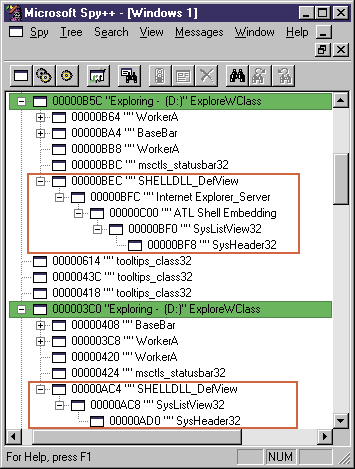
Figure 2. The hierarchy of windows that provide the folder views shown in Figure 1. The core of the view is a window of class SHELLDLL_DefView.
You can obtain such views by switching on and off the View|as Web Page menu item. Notice that you might have a slightly different name for the shell embedding control if you aren't running Windows 98—this screenshot has been taken from a Windows 98 machine.
The window that provides the shell view, namely the list of all the files and subfolders that appears in the right panel, belongs to a class called SHELLDLL_DefView (shell default view). It works as a container for another, more specialized window that is actually responsible for providing and displaying the folder's content. This latter hierarchy of windows changes quite a bit according to the status of the View|as Web page menu item. For this reason, the default view is also known the shell view router.
If the item is not checked, you're displaying a classic Windows 95 view with the usual four options: large icon, small icon, details, and list. (After all, these options have a direct correspondence to the view styles of a Microsoft Win32® ListView control.) Otherwise, when the item is checked, you get an HTML-based view of the folder. In other words, the container hosts a WebBrowser control to display a templatized HTML page that includes the usual file list through a Microsoft ActiveX® control. Figure 3 illustrates this.
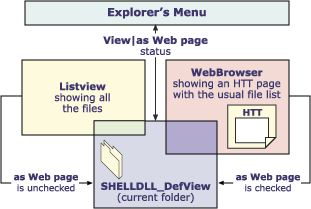
Figure 3. How Windows Explorer switches between classic and Web views
Figure 3 shows the content of Windows Explorer's right panel. In the classic view, the shell reads in the files from the current folder and fills the ListView. In the case of a Web view, the same task is accomplished with an ActiveX control. This is not surprising, because with Web views what you actually perceive as being the folder's content is just an HTML page viewed through the Internet Explorer browser engine. Hence, employing an ActiveX control is a good way to isolate the complexity of the file search. I'll have more to say on HTML templates and the WebBrowser engine shortly.
Overall, there are six different ways to see the content of a folder. In addition to the four ListView styles (large icon, small icon, list, and details) are the Web and thumbnail views. These six views aren't all mutually exclusive. Large and small icon, details, list, and thumbnails are mutually exclusive. All but thumbnails can be combined with the Web view style. In other words, you may have a Web view with only four possible styles. Thumbnails and Web view are mutually exclusive.
What's a thumbnail view? It's a kind of rendering similar to the standard large icon view. It provides a preview of the file that is larger than the 32x32 pixels of a large icon. Very few types of files have a preview available, and in many cases a thumbnail view doesn't make sense at all. When a preview is not available the thumbnails view shows the large icon of the file in a bigger size, about 100x100 pixels. Figure 4 shows a typical thumbnails view based on JPEG images.
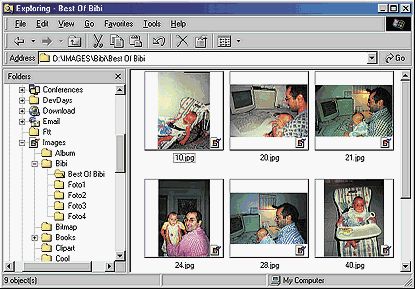
Figure 4. A thumbnails view makes sense for all types of documents for which a preview is available (JPEG, GIF, HTML).
A thumbnails view must be enabled on a rigorous per-folder basis and is not an inheritable attribute. Put another way, if you have a My Pictures subtree with all your graphics, and want all the subfolders to support thumbnails, you need to enable a thumbnails view for each folder.
To enable a thumbnails view you must check the corresponding button in the Properties window of the folder. When you do this, the shell promptly creates two new files in the folder: desktop.ini and thumbs.db. The former is a multipurpose file containing some attributes for the current folder (more on this later). The latter is a compound file that caches the files to preview. Such files are silently removed as soon as you switch off the folder's thumbnails attribute.
This view is provided by a specialized module that is part of the Active Desktop. The desktop.ini file governs its activity. This module, whose Component Object Model (COM) name is Shell.ThumbnailView, is basically a third possibility for the router to switch on. (See Figure 3.) The display capability is provided by an ActiveX control called ThumbCtl. You can also use it from within a Microsoft Foundation Classes (MFC) or Active Template Library (ATL) application to quickly display GIF and JPEG images. Here's a code snippet from a dialog-based application:
   CWnd *pWnd = GetDlgItem(IDC_FILENAME);
   CString s;
   pWnd->GetWindowText(s);
   m_thumbCtl.displayFile((LPCTSTR)s);
Such a control supports .htm, .gif, .jpeg, and .bmp files. To exploit this control in your MFC application, just add it to the dialog template. Microsoft Visual C++® will generate a wrapper class CThumbCtl. Next, define a member variable for it in your dialog class:
CThumbCtl m_thumbCtl;
In the Windows shell, there is always a COM object behind a folder that acts as the content provider. A file system directory is just a special case of a folder whose content is provided by a list of files and subdirectories. It is called a File Folder. Between Windows Explorer and the folders there are a handful of COM interfaces that define a standard way to communicate. Once you write and properly register an object that exposes such interfaces, you're adding a new folder to the shell, the content of which is completely up to you!
Such an object is called a namespace extension (NSE) and is the most powerful way you have to customize the look and behavior of a folder. There's a namespace extension module running behind any folder you see. Each type of folder in the shell's namespace has its own NSE engine. Looking at this another way, each NSE may have a file folder to link itself to the shell. This is what makes a custom node appear in the Desktop, My Computer, or elsewhere.
With a NSE you can access and update Windows Explorer's menu and toolbar, execute control over what's displayed, and even display different items based on the user's access rights. An NSE is subject to the status of the View|as Web Page menu item. This means you can arrange your NSE to show off a different Web-based view when that flag is on. Such a feature requires some additional COM interfaces to be implemented. If you omit them, setting the View|as Web Page menu item has no effect at all on the NSE. Web view and namespace extensions are featured in the article "Implementing a Web View Namespace Extension Using Active Directory Services" by T. Daniell, B. Daigle, D. Bahr, and D. Mims, in the August 1998 issue of Microsoft Systems Journal (http://www.microsoft.com/msj/0898/namespacetop.htm).
In general, to gain the highest control over a folder you need an NSE. NSEs are not that easy to write and require a solid knowledge of COM. However, to customize a folder sometimes you don't need NSEs at all. An alternate approach that is easier, but less powerful overall, is based on HTML templates.
If you installed the Active Desktop under Windows 95 or Windows NT 4.0, as well as run Windows 98 or any available version of Windows 2000, chances are you've already run into a Customize this Folder… menu item. It launches a quick wizard that allows you to:
Such a menu item is part of the background menu displayed when the user clicks in Windows Explorer's right panel where there are no selected or selectable items.
Customizing a folder means that you can specify an .htm file to be used as the folder template. In practice, the folder's content is displayed through a WebBrowser control instead of a SHELLDLL_DefView window. The content of the Web page is what actually gets displayed. Of course, think of this Web page (called hypertext template, or HTT for short) as a template with some placeholders to be filled at display time. This is quite similar to the HTML templates you might use with Common Gateway Interface (CGI) applications.
Usually, there are at least two pieces of information that are known only when the page is shown: the folder path and the folder content. Figure 5 illustrates the layout differences between a classic and a Web view. Normally, a Web view embeds the classic view as an ActiveX control. It is placed somewhere in the template, mainly using absolute positioning. In addition, a Web view includes additional elements—either graphical, such as pictures, or informational, such as the currently selected file or warnings.
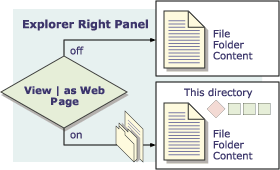
Figure 5. Structural differences between classic and Web views
Because what's displayed is just an HTML page, you can add any element you want: buttons, text, links, other ActiveX controls, or scriptlets, just to name a few. Just like any other HTML page, an HTT can embed some script code to supply custom behaviors. You can also hide from the user the list of files the folder contains, as happens when you open the Windows folder with the Web view flag turned on. Alternately, you can replace the standard control with your own that, for example, shows different folder views according to the user's privileges.
When you set a custom template for a given folder, the wizard adds two files to the folder: desktop.ini and the .htt file you've previously chosen to be the folder's template. This file defaults to a copy of folder.htt, which you can edit at any time. It also changes one of the system attributes of the directory to become read-only. This feature is mandatory in order for the shell to read the content of desktop.ini and act accordingly. If the directory isn't read-only, the shell ignores the local HTT and continues to consider the standard folder.htt the valid template. The standard template is stored in the Web subdirectory of the Windows folder. These operations are undone when you remove the customization.
Adding a background picture, on the other hand, doesn't involve any layout change—it simply leverages a new feature of ListViews introduced with the shell version 4.71, namely the Active Desktop shell update. By sending a ListView a LVM_SETBKIMAGE, you can have it paint its client area using a (possibly tiled) image. This information is also stored in the desktop.ini file.
Windows comes with a number of predefined templates, all located in the Web subdirectory of the Windows folder. They refer to system folders such as Recycle Bin, Dial-Up Networking, Printers, and so forth. One is called folder.htt, which is the default HTT used to customize any folder you choose. If the folder hasn't been explicitly customized through the wizard—and doesn't contain either a desktop.ini file or a local HTT—the folder.htt file in the Web folder (also known as the Template directory) is used to provide a template each time the Web view mode is turned on. Otherwise, once you've finalized the Customization Wizard, the file is copied, and possibly edited, in the folder itself and used from there.
If you want to change the Web view template for all the folders, just change the content of folder.htt in the Web subdirectory. (Of course, because folder.htt is a kind of system file, don't forget to back it up before proceeding.) Now let's examine briefly the structure of such a template and move on to a few changes.
HTTs are basically HTML pages. They can be created only because HTML technology is integrated into the operating system. There is just one main difference between HTTs and HTML pages: HTTs can manage a few special system variables that are replaced at display time with information referring to the current folder. Such variables are listed in Table 1.
Table 1. System Variables for .htt Files
| Variable | Description |
| %THISDIRPATH% | Fully qualified current path name |
| %THISDIRNAME% | Name of the current directory |
| %TEMPLATEDIR% | Fully qualified path to the system's Template directory |
If you open any HTT page with Internet Explorer, such variables won't be recognized and expanded properly. As a result, the variable names will appear there as string literals.
The standard template divides the panel into three particular areas: banner, info block, and file list. The former is located in the top-left corner of the panel where the icon of the folder and the directory name are usually displayed. The info block is a column of text below this and along the left side, where Windows Explorer presents information about the selected files or the chart with the drive's free space and previews of graphics files. Finally, the file list is the ActiveX control that provides a view of the files found in the folder. This component is functionally equivalent to the whole classic view.
I won't show here the source code for folder.htt because it's quite long, but you shouldn't have difficulty understanding it once you keep in mind the following points:
When you decide to create your own template for a given folder, you can start from the source code for folder.htt or write it completely from scratch, depending on your ultimate goal. For a template that is only slightly different, I recommended you start out with folder.htt; otherwise, I suggest you write it as an ordinary HTML page using adequate authoring tools.
When you're quite satisfied with your template, rename it as an HTT and then integrate it with the shell, making sure the file list control works properly and the current directory is detected. Table 2 summarizes some information about the needed ActiveX control.
Table 2. ActiveX Controls Employed in the Folder.htt Template
| ID | Control name | CLSID |
| FileList | Shell DefView | 1820FED0-473E-11D0-A96C-00C04FD705A2 |
| Thumbnail | ThumbCtl Class | 1D2B4F40-1F10-11D1-9E88-00C04FDCAB92 |
| Icon | WebViewFolderIcon | E5DF9D10-3B52-11D1-83E8-00A0C90DC849 |
When it comes to writing your own template, the problem is not so much how to write it, but what to have it do. If the template you are writing is intended to serve a particular application, its commands and features will be application-specific. Another reason to write your own template is to make more easily accessible some system functionality. Figure 6 shows a folder with a couple of additional buttons, a bitmap with a faded effect, a 3-D title, and the usual file list.
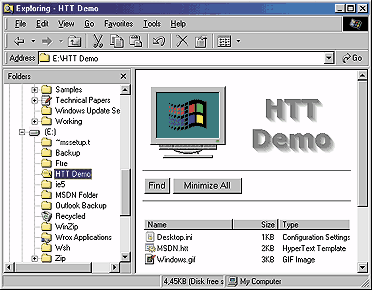
Figure 6. A custom HTT template in action, displaying the file list along with additional buttons to run the Find dialog box and minimize the open windows
The body of the .htt file is the following:
<body onload="init()">
    <table><tr>
    <td width=20%><img src="Windows.gif" class="fade" id="logo"></td>
    <td class=title>%THISDIRNAME%</td>
    </tr></table>
    <hr>
    <table><tr>
    <td><input type=button value="Find" onclick="Find()"></td>
    <td><input type=button value="Minimize" onclick="Minimize()"></td>
    </tr></table>
    <hr>
    <object id="FileList" width=100% height=200
            classid="clsid:1820FED0-473E-11D0-A96C-00C04FD705A2">
    </object>
</body>
The topmost <TABLE> tag includes an image and displays the directory name. Here most of the work is done by the cascading style sheet style employed: fade for the image and title for the text. Some DHTML features add a 3-D effect to the text and make the image fade in:
<style>
.Title {
     font-Size: 38;
     font-Family: Verdana;
     font-Weight: bold;
     color: #808080;
     text-align: center;
     filter:Shadow(Color=#909090, Direction=135);
}
.Fade {filter: alpha(opacity=0);}
</style>
The template is completed with some script code to glue it all together. The script accomplishes the following:
Here's the source code:
<script language="JScript">
function init() {
   logo.flashTimer = setInterval("fade()", 100);
}
function fade() {
   if (logo.filters.alpha.opacity < 100)
     logo.filters.alpha.opacity += 10;
   else
   clearInterval(logo.flashTimer);
}
function FindFolder() {
   obj = new ActiveXObject("Shell.Application");
   obj.FindFiles();
}
function Minimize() {
   obj = new ActiveXObject("Shell.Application");
   obj.MinimizeAll();
}
</script>
A few notes about custom HTTs: You can embed the HTT template as well as its accessory resources, such as .gif files, in binary executables. For example, you can create a dynamic-link library (DLL) with Visual C++ and add GIFs, HTML pages, and whatever else, to its resources. In this case, however, remember to edit the HTML pages to address external resources (GIFs and linked pages) through the res:// protocol, rather than through file:// or http://. (See my article "Pluggable Protocols" in MIND magazine, January 1999, at http://www.microsoft.com/mind/0199/cutting/cutting0199.htm for details and an example.)
HTTs work well also if the folder is shared and visible through the network. In my experience, if you make use of external files, such as .css files or scripts written in Microsoft Visual Basic® Scripting Edition or JScript® development software, they aren't correctly located through the network. So, if your customized folder is intended to be shared, put all the cascading style sheets definitions and the script code in a single .htm file.
If you're using ActiveX controls, they must be registered as safe for scripting and initialization. If they aren't, you'll be prompted to confirm the download of potentially unsafe content.
Everything inherent to the folder customization is kept in the desktop.ini file. The following (pretty unintelligible) code snippet shows how this file looks after you define a custom template:
[ExtShellFolderViews]
{5984FFE0-28D4-11CF-AE66-08002B2E1262}={5984FFE0-28D4-11CF-AE66-08002B2E1262}
[{5984FFE0-28D4-11CF-AE66-08002B2E1262}]
PersistMoniker=file://Folder.htt
The PersistMoniker key points to the URL of the template. The string {5984FFE0-28D4-11CF-AE66-08002B2E1262} identifies either the CLSID of the COM object responsible for the Web view mode and the Web view service itself. The content of the section [ExtShellFolderViews] is a rather unusual assignment that should be read this way: the CLSID specified on the right serves to identify the object to provide the service that the l-value identifies. This hints at the possibility that you could provide your own handler for the Web view mode just by writing a COM object with certain characteristics and putting its CLSID on the right side of the assignment. At present, however, this is just a hunch and no available documentation addresses this.
The desktop.ini file is a local repository for folder-specific information, not just that information inherent to Web views but also information relating to several other aspects of the view. For example, you can add a [.ShellClassInfo] section and add the following entries.
| Entry | Description |
| ConfirmFileOp | If zero, and if the folder is a system folder, prevents the confirmation message when you attempt to delete or move the folder. |
| IconFile | Specifies the file name that contains the icon to show for the folder. It can be an .ico file as well as an executable that includes icons. |
| IconIndex | The index of the icon in the file just specified. This key should be necessary only if you're loading it from a file that contains multiple icons, such as EXEs or DLLs. Set it to zero as the default.
This index has two meanings: If it is a value greater than 0, it refers to the ordinal 0-based position of the icon within the file. If negative, it is interpreted as the icon in the file with a resource ID equal to the absolute value. For example, to get an icon with a resource ID of 202, use –202. |
| InfoTip | This string will appear through a ToolTip when the mouse hovers over the folder, both in the Windows shell and any Open File dialog box. In standard Web view mode this same text is displayed in the info-block of the folder template. |
In all previous figures (Figure 4 in particular) you can see folders with nonstandard icons. They aren't namespace extensions but ordinary folders with this desktop.ini file. Here's an example:
[.ShellClassInfo]
IconFile=email.ico
IconIndex=0
InfoTip=Stores my address book and email messages
For all this to apply, you still need the folder to be set as read-only. You can obtain information about a folder and its item through the GetDetailsOf method of the FileList object. This method is intended to return information based on the columns the folder shows in the report view. Normally, they are as follows.
| Column | Value |
| Name | 0 |
| Size | 1 |
| Type | 2 |
| Date | 3 |
| InfoTip | -1 |
If you're running Internet Explorer 5.0 you can exploit the built-in XML/XSL support even for folder templates. The key thing is that Internet Explorer 5.0 is a direct browser capable of automatically displaying Extensible Markup Language (XML) code using any linked Extensible Stylesheet Language (XSL) style sheet. As you know, XML defines the data while XSL maps it to HTML constructs. As a result, Internet Explorer 5.0 can display any .xml file for which an XSL style sheet document exists.
Using XML instead of HTML has a number of practical advantages. First and foremost, you can concentrate more on the logical structure of the folder than on its detail. Plus, you can change the display algorithm at any time, leaving intact the structure and the content. In a nutshell, with XML the presentation layer is completely separated from the data. Code Sample A demonstrates how the previous HTT could be transformed in XML.
The key code block is the following:
<folder filelist="">
  <banner style="title" />
  <icon style="fade" file="windows.gif" />
  <button caption="Find" onclick="FindFolder()" />
  <button caption="Minimize" onclick="Minimize()" />
  <script language="JScript">
  :
  </script>
</folder>
Of course, the XML tags are completely custom. Feel free to change them to rename existing items or add new ones. With XML you're describing the elements: the folder, its icon, the banner, a few buttons, and a block of script code. In this case, no particular order is required and you can add a new button just by duplicating a line. The style attributes refer to cascading style sheet styles, while the filelist attribute, if present, enables the display of the folder's content. How can this script create the same HTT just shown? XSL style sheets are the answer.
XSL is a topic too large to be covered here. However, I'll try to extract its essence. An XSL style sheet is an XML document that Internet Explorer processes in a particular way. Basically, it contains instructions on how each XML tag should be rendered in HTML. It follows its own syntax and contains several elements that are both informational (such as xsl:value-of, which returns the value of a tag) and control the execution flow (such as xsl:for-each to iterate on all the tags with a certain name).
The next code snippet illustrates the rendering of all the <button> tags seen in Code Sample A.
<xsl:for-each select="folder/button">
<td>
  <xsl:element name="input">
    <xsl:attribute name="type">button</xsl:attribute>
    <xsl:for-each match="@caption">
      <xsl:attribute name="value"><xsl:value-of /></xsl:attribute>
    </xsl:for-each>
    <xsl:for-each match="@onclick">
      <xsl:attribute name="onclick"><xsl:value-of /></xsl:attribute>
    </xsl:for-each>
  </xsl:element>
</td>
</xsl:for-each>
Each button is inserted in a <TD> element. The HTML source code for it is provided by an INPUT element of type BUTTON whose VALUE attribute is derived from the XML CAPTION attribute. Each button, then, has the ONCLICK attribute set to the content of the XML ONCLICK attribute. As a result, the following XML code:
<button caption="Find" onclick="FindFolder()" />
<button caption="Minimize" onclick="Minimize()" />
produces the following HTML output:
<TD>
<INPUT type="button" value="Find" onclick="FindFolder()">
<INPUT type="button" value="Minimize" onclick="Minimize()">
</TD>
As you can see, XSL has something in common with Active Server Pages (ASP) because it contains some HTML tags interspersed with XSL-specific tags.
Applying XML templates instead of HTTs, however, poses a problem. For one thing, Internet Explorer 5.0 recognizes and parses XML documents only if they have an .xml extension. On the other hand, HTTs rely on a special environmental variable to get the current path and the name of the current folder. This variable, %THISDIRNAME%, is managed by the shell when processing the .htt files. This service, however, is provided only if the template has an .htt extension!
In order to have an XML template, therefore, we need a workaround to find out the path of the current folder. The FileList ActiveX control—that is, the component that provides the list of the folder's files—exposes a property called Title that returns the name of the folder:
FileList.Folder.Title
This is just what %THISDIRNAME% returns. Unfortunately, a valid instance of the FileList object is available the first time you navigate to the folder but not if you move back to it using the Back button or click the folder. The FileList control is initialized only when the page is read from disk—the first time and when you press F5. In HTTs, in fact, %THISDIRNAME% is a memory variable, doesn't rely on the FileList features and, more importantly, survives across browser sessions! (Don't forget that displaying the content of a folder through a Web view is just like navigating to a Web site!)
With XML we need to simulate storing a value somewhere to survive a session. By design, the document.cookie property lets you store information that is maintained across sessions. Thus, with XML templates, use it as the repository for the name of the current folder instead of %THISDIRNAME%.
<script event="onload" for="window">
if(typeof(FileList.Folder) == "unknown") {
   curDirName = document.cookie; // not the first time!
}
else {
   curDirName = FileList.Folder.Title;
   document.cookie = curDirName;
}
// use curDirName in place of $THISDIRNAME%
As mentioned earlier, you can't assign the XML template the regular .htt extension. This type of file receives special treatment from the shell that ends up producing errors in the case of an XML format. If you leave the usual .xml extension, or even invent a new one (say, .xtt), all is well.
<?xml version="1.0"?>
<?xml-stylesheet type="text/xsl" href="msdn.xsl"?>

<folder filelist="">
<banner style="title" />
<icon style="fade" file="windows.gif" />
<button caption="Find" onclick="FindFolder()" />
<button caption="Minimize" onclick="Minimize()" />

<script language="JScript">

<![CDATA[
function init() {
   logo.flashTimer = setInterval("fade()", 100);
}

function fade() {
   if (logo.filters.alpha.opacity != 100)
   logo.filters.alpha.opacity += 10;
   else
   clearInterval(logo.flashTimer);
}

function FindFolder() {
   obj = new ActiveXObject("Shell.Application");
   obj.FindFiles();
}
function Minimize() {
   obj = new ActiveXObject("Shell.Application");
   obj.MinimizeAll();
}
]]>
</script>

</folder>
In this article I presented the technologies that lie behind the folder customization process. They vary greatly and provide different strengths. As is often the case, what's better for you depends on what you actually need. NSEs offer total control of the folder, while HTTs are less powerful but far easier to write.
To give your folders a new look, and to help users identify them, you can exploit the features of the desktop.ini file to assign a nonstandard icon, an infotip, and a description to appear in the Web view panel.
If you're running Internet Explorer 5.0, you should also consider using XML and XSL to define a custom template. I provided you with a working example, but in general you should take into account the following facts:
Further documentation about XML/XSL support in Internet Explorer 5.0 can be found in the MSDN Online Library and CD.
Dino Esposito, author of Visual C++ Windows Shell Programming, is a trainer and consultant. At present, though, he spends most of his time teaching XML and scripting to his one-year-old son.