The specific details involved in creating the user interface for a DNA application will undoubtedly vary from application to application, depending on the individual application, and how the user interface will ultimately be generated (for example, dynamic HTML, Win32, HTML 3.2, and so on). However, the process typically involves:
Nowadays, users typically interact with applications using a variety of visual elements, including command buttons, text boxes, and option buttons that are part of a single form, although an application may have any number of forms. Developers design forms by adding and positioning the various visual elements that users will use to interact with their application. Because most users view the user interface as the entire application, form design is extremely important.
To design the forms used by the DNA PurchaseOrder application

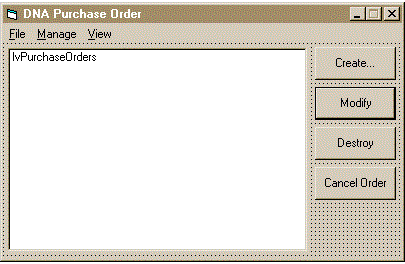
Figure 18. The design of the frmPurchaseOrderManagement form
The frmPurchaseOrderManagement form allows users to perform purchase order management functions, and is configured as shown in Table 19.
Table 19. The frmPurchaseOrderManagement Form Configuration
| Object | Property | Setting |
| Form | BorderStyle | 1 – Fixed Single |
| Caption | DNA Purchase Order | |
| MaxButton | 0 - False | |
| StartUpPosition | 1 – CenterOwner | |
| CommandButton | Name | cmdCancel |
| Caption | Cancel Order | |
| Enabled | 0 - False | |
| CommandButton | Name | cmdCreate |
| Caption | Create... | |
| CommandButton | Name | cmdDestroy |
| Caption | Destroy | |
| Enabled | 0 - False | |
| CommandButton | Name | cmdModify |
| Caption | Modify | |
| Default | -1 - True | |
| Enabled | 0 - False | |
| ListView | Name | lvInventory |
| View | 3 – lvwReport | |
| LabelEdit | 1 – Manual | |
| FullRowSelect | -1 – True | |
| ColumnHeader(1) | Order # | |
| ColumnHeader(2) | Account # | |
| ColumnHeader(3) | Date Ordered | |
| Menu | Name | mnuFile |
| Caption | &File | |
| Menu | Name | MnuFileExit |
| Caption | E&xit | |
| Menu | Name | MnuManage |
| Caption | &Manage | |
| Menu | Name | MnuManageAccounts |
| Caption | &Accounts... | |
| Menu | Name | MnuManageInventory |
| Caption | &Inventory... | |
| Menu | Name | MnuView |
| Caption | &View | |
| Menu | Name | MnuViewOptions |
| Caption | &Options... |
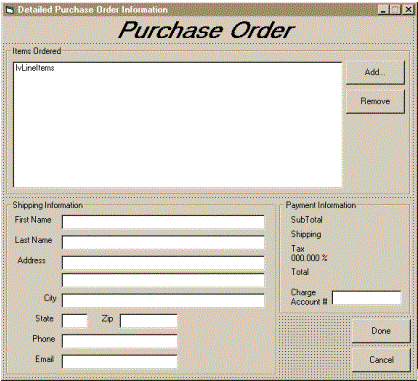
Figure 19. The design of the frmPurchaseOrderDetailed form
The frmPurchaseOrderDetailed form allows users to display detailed purchase order information, and is configured as shown in Table 20.
Table 20. The frmPurchaseOrderDetailed Form Configuration
| Object | Property | Setting |
| Form | BorderStyle | 3 – Fixed Dialog |
| Caption | Detailed Purchase Order Information | |
| StartUpPosition | 1 - CenterOwner | |
| Frame | Caption | Items Ordered |
| Frame | Caption | Shipping Information |
| Frame | Caption | Payment Information |
| Label | Name | Label1 |
| Caption | Purchase Order | |
| Alignment | 2 - Center | |
| Label | Caption | FirstName |
| Label | Caption | LastName |
| Label | Caption | Address |
| Label | Caption | City |
| Label | Caption | State |
| Label | Caption | ZIP |
| Label | Caption | Phone |
| Label | Caption | |
| Label | Caption | SubTotal |
| Label | Caption | Shipping |
| Label | Name | lblTaxRate |
| Caption | Tax 000.000 % | |
| Label | Caption | Total |
| Label | Caption | Charge Account # |
| Label | Caption | |
| Name | lblSubTotal | |
| Label | Caption | |
| Name | lblShipping | |
| Label | Caption | |
| Name | lblTax | |
| Label | Caption | |
| Name | lblTotal | |
| TextBox | Name | txtAddressLine1 |
| TextBox | Name | txtAddressLine2 |
| TextBox | Name | txtCity |
| TextBox | Name | txtEmail |
| TextBox | Name | txtFirstName |
| TextBox | Name | txtLastName |
| TextBox | Name | txtPhone |
| TextBox | Name | txtState |
| TextBox | Name | txtZip |
| TextBox | Name | txtAccountID |
| CommandButton | Name | cmdCancel |
| Caption | Cancel | |
| CausesValidation | 0 - False | |
| Cancel | -1 - True | |
| CommandButton | Name | cmdDone |
| Caption | Done | |
| CausesValidation | 0 - False | |
| CommandButton | Name | cmdAdd |
| Caption | Add... | |
| CausesValidation | 0 - False | |
| CommandButton | Name | cmdRemove |
| Caption | Remove | |
| CausesValidation | 0 - False | |
| Enabled | 0 - False | |
| ListView | Name | lvLineItems |
| View | 3 – lvwReport | |
| LabelEdit | 1 – Manual | |
| FullRowSelect | -1 – True | |
| ColumnHeader(1) | Quantity | |
| ColumnHeader(2) | Title | |
| ColumnHeader(3) | Price |
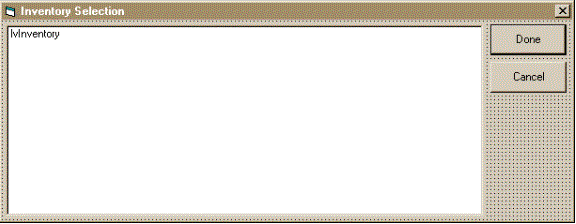
Figure 20. The design of the frmInventorySelection form
The frmInventorySelection form allows users to select inventory items for purchase, and is configured as shown in Table 21.
Table 21. The frmInventorySelection Form Configuration
| Object | Property | Setting |
| Form | BorderStyle | 3 – Fixed Dialog |
| Caption | Inventory Selection | |
| StartUpPosition | 1 – CenterOwner | |
| CommandButton | Name | cmdCancel |
| Caption | Cancel | |
| Cancel | -1 – True | |
| CommandButton | Name | cmdDone |
| Caption | Done | |
| Default | -1 – True | |
| ListView | Name | lvInventory |
| View | 3 – lvwReport | |
| LabelEdit | 1 – Manual | |
| FullRowSelect | -1 – True | |
| ColumnHeader(1) | Inventory # | |
| ColumnHeader(2) | Description | |
| ColumnHeader(3) | Price | |
| ColumnHeader(4) | Quantity on Hand |
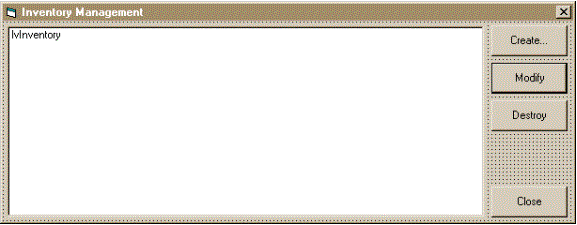
Figure 21. The design of the frmInventoryManagement form
The frmInventoryManagement form allows users to perform inventory management functions, and is configured as shown in Table 22.
Table 22. The frmInventoryManagement Form Configuration
| Object | Property | Setting |
| Form | BorderStyle | 3 – Fixed Dialog |
| Caption | Inventory Management | |
| StartUpPosition | 1 – CenterOwner | |
| CommandButton | Name | cmdClose |
| Caption | Cancel | |
| Cancel | -1 – True | |
| CommandButton | Name | cmdCreate |
| Caption | Create... | |
| CommandButton | Name | cmdDestroy |
| Caption | Destroy | |
| Enabled | 0 – False | |
| CommandButton | Name | cmdModify |
| Caption | Modify | |
| Default | -1 – True | |
| Enabled | 0 – False | |
| ListView | Name | lvInventory |
| View | 3 – lvwReport | |
| LabelEdit | 1 – Manual | |
| FullRowSelect | -1 – True | |
| ColumnHeader(1) | Inventory # | |
| ColumnHeader(2) | Description | |
| ColumnHeader(3) | Price | |
| ColumnHeader(4) | Quantity on Hand |

Figure 22. The design of the frmInventoryDetailed form
The frmInventoryDetailed form allows users to display detailed inventory item information, and is configured as shown in Table 23.
Table 23. The frmInventoryDetailed Form Configuration
| Object | Property | Setting |
| Form | BorderStyle | 3 – Fixed Dialog |
| Caption | Detailed Inventory Information | |
| StartUpPosition | 1 – CenterOwner | |
| Label | Name | Label1 |
| Caption | Inventory | |
| Alignment | 2 – Center | |
| Label | Caption | Description |
| Label | Caption | Price |
| Label | Caption | Quantity on Hand |
| TextBox | Name | txtDescription |
| TextBox | Name | txtPrice |
| TextBox | Name | txtQOH |
| CommandButton | Name | cmdCancel |
| Caption | Cancel | |
| CausesValidation | 0 – False | |
| Cancel | -1 – True | |
| CommandButton | Name | cmdDone |
| Caption | Done | |
| CausesValidation | 0 – False |
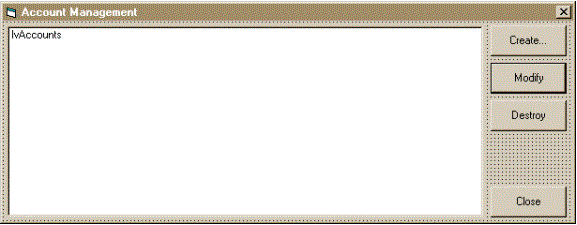
Figure 23. The design of the frmAccountManagement form
The frmAccountManagement form allows users to perform account management functions, and is configured as shown in Table 24.
Table 24. The frmAccountManagement Form Configuration
| Object | Property | Setting |
| Form | BorderStyle | 3 – Fixed Dialog |
| Caption | Account Management | |
| StartUpPosition | 1 - CenterOwner | |
| CommandButton | Name | cmdClose |
| Caption | Close | |
| Cancel | -1 - True | |
| CommandButton | Name | cmdCreate |
| Caption | Create... | |
| CommandButton | Name | cmdDestroy |
| Caption | Destroy | |
| Enabled | 0 - False | |
| CommandButton | Name | cmdModify |
| Caption | Modify | |
| Default | -1 - True | |
| Enabled | 0 - False | |
| ListView | Name | lvAccounts |
| View | 3 - lvwReport | |
| LabelEdit | 1 - Manual | |
| FullRowSelect | -1 - True | |
| ColumnHeader(1) | Account # | |
| ColumnHeader(2) | Owner | |
| ColumnHeader(3) | Balance | |
| ColumnHeader(4) | Available Credit | |
| ColumnHeader(5) | Credit Limit |
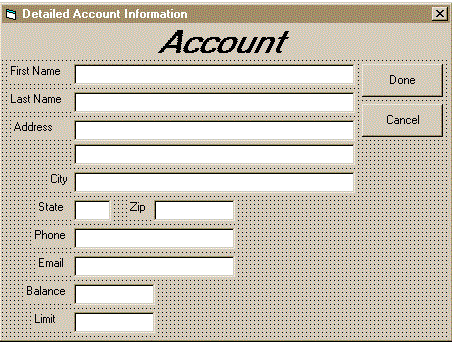
Figure 24. The design of the frmAccountDetailed form
The frmAccountDetailed form allows users to display detailed account information, and is configured as shown in Table 25.
Table 25. The frmAccountDetailed Form Configuration
| Object | Property | Setting |
| Form | BorderStyle | 3 – Fixed Dialog |
| Caption | Detailed Account Information | |
| StartUpPosition | 1 - CenterOwner | |
| Label | Name | Label1 |
| Caption | Account | |
| Alignment | 2 - Center | |
| Label | Caption | FirstName |
| Label | Caption | LastName |
| Label | Caption | Address |
| Label | Caption | City |
| Label | Caption | State |
| Label | Caption | ZIP |
| Label | Caption | Phone |
| Label | Caption | |
| Label | Caption | Balance |
| Label | Caption | Limit |
| TextBox | Name | txtAddressLine1 |
| TextBox | Name | txtAddressLine2 |
| TextBox | Name | txtBalance |
| TextBox | Name | txtCity |
| TextBox | Name | txtEmail |
| TextBox | Name | txtFirstName |
| TextBox | Name | txtLastName |
| TextBox | Name | txtLimit |
| TextBox | Name | txtPhone |
| TextBox | Name | txtState |
| TextBox | Name | txtZIP |
| CommandButton | Name | cmdCancel |
| Caption | Cancel | |
| CausesValidation | 0 - False | |
| Cancel | -1 - True | |
| CommandButton | Name | cmdDone |
| Caption | Done | |
| CausesValidation | 0 - False |
Once each form has been created, developers must provide the controlled interaction between emissaries and the various visual elements on each form. This is a process that typically involves writing code of some kind, whether it's Visual Basic, VBScript, C, C++, or Java.
To provide controlled interaction between the emissaries and the various form elements of the DNA PurchaseOrder application
Once each form has been completely implemented, save your work, identify the startup object for the POVBClient project by choosing POVBClient Properties from the Project menu and selecting frmPurchaseOrderManagement from the Startup Object drop-down list box, and compile the POVBClient project into POVBClient.exe.