Visual Basic Concepts
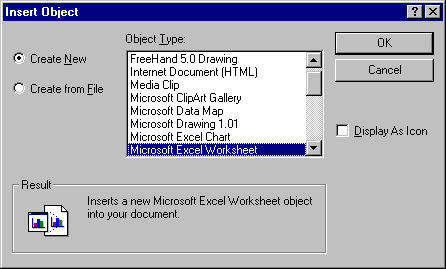
Each time you draw an OLE container control on a form, Visual Basic displays the Insert Object dialog box. You use this dialog box, shown in Figure 10.10, to insert linked or embedded objects at design time. The Insert Object dialog box presents a list of the available objects you can link or embed into your application.
Figure 10.10 The Insert Object dialog box

When you insert an object into the OLE container control at design time, the Class, SourceDoc, and SourceItem properties are automatically set for you. These properties identify the application that supplies the object, the source file name, and any specific data that is linked from within that file. For more information about these and other properties and methods that apply to the OLE container control, see "Inserting Objects at Run Time."
When you insert a linked object, the data displayed in the OLE container control exists in one place — the source file. The object's current data can be viewed from any other applications that contain links to that data. The OLE container control maintains the object's link information, such as the name of the application that supplied the object, the name of the linked file, and an image of the linked data.
To insert a linked object using the Insert Object dialog box
The Insert Object dialog box is displayed. You can also display this dialog box at any time by clicking the OLE container control with the right mouse button and then choosing the Insert Object command.
A Browse dialog box is displayed.
When you use a linked object, every user who runs your application must have access (a valid path) to the linked file and a copy of the application that created the file. Otherwise, when your application is run, an image of the original data is displayed, but the user will not be able to modify the data, nor will the user see changes others may have made to the linked data. This may be a concern if your application is running on a network.
If your application contains a linked object, it is possible for that object's data to be changed by another application when your application is not running. The next time your application is run, changes to the source file do not automatically appear in the OLE container control. To display the current data in the OLE container control, use the control's Update method:
oleObj.Update
For More Information See "Update Method (OLE Container)."
If a user wants to save changes to a linked object, the user must save it from the ActiveX component's menu. The OLE container control's SaveToFile method applies only to embedded objects.
When you create an embedded object, you can either embed data from a file or create a new, empty object that can be filled with data later. When you embed data from a file, a copy of the specified file's data is displayed in the OLE container control. When you create a new object, the application that created the object is invoked and you can enter data into the object.
Typically, you create embedded objects that display existing data at design time. This allows you to view the object's data as it will appear to the user. You can then move and size the OLE container control and the other controls on the form to create your application's user interface.
To display existing data in an embedded object, create the object using an existing file as a template. The OLE container control then contains an image of the data in the file. An application that displays data using an embedded object will be larger than an application that displays the same data using a linked object, because the application with the embedded object actually contains the source file's data.
To create an embedded object using an existing file
The Insert Object dialog box is automatically displayed.
A Browse dialog box is displayed.
Unlike the data in a linked object, data in an embedded object is not persistent. In other words, if you want changes entered by the user to appear the next time your application is run, you must use the SaveToFile method to save the data. For more information on saving embedded data to a file, see "Saving and Retrieving Embedded Data" later in this chapter.
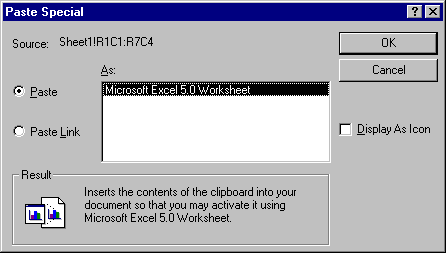
Another way to create an object at design time is to use the Paste Special dialog box (shown in Figure 10.11). This dialog box is helpful if you only want to use a portion of a file — for instance, a range of cells from a spreadsheet, or a paragraph from a Word document.
Figure 10.11 The Paste Special dialog box

To create an object using the Paste Special dialog box
The data is copied onto the Clipboard.
-or-
Select the Paste Link option button if you want to create a linked object.
If there is already an object embedded or linked in the control, a message asks whether you'd like to delete that existing object and create a new one in its place.