Visual Basic Concepts
Forms, controls that display text (as text or captions), and the Printer object support a Font property, which determines the visual characteristics of text, including:
For details on the Printer object, see "Printing from an Application" later in this chapter.
You can set any of the font properties at design time by double-clicking Font in the Properties window and setting the properties in the Font dialog box.
At run time, you set font characteristics by setting the Font objectís properties for each form and control. The following table describes the properties for the Font object.
| Property | Type | Description |
| Name | String | Specifies name of font, such as Arial or Courier. |
| Size | Single | Specifies font size in points (72 points to an inch when printed). |
| Bold | Boolean | If True, the text is bold. |
| Italic | Boolean | If True, the text is italic. |
| StrikeThrough | Boolean | If True, Visual Basic strikes through the text. |
| Underline | Boolean | If True, the text is underlined. |
| Weight | Integer | Returns or sets the weight of the font. Above a certain weight, the Bold property is forced to True. |
For example, the following statements set various font properties for a label named lblYearToDate:
With lblYearToDate.Font
   .Name = "Arial"         ' Change the font to Arial.
   .Bold = True            ' Make the font bold.
End With
The order in which you select font properties is important, because not all fonts support all font variations. Set the Name property first. Then you can set any of the Boolean properties, such as Bold and Italic, to True or False.
You can also store a set of font properties in a Font object. You can declare a Font object just as you would any other object, using the StdFont class:
Dim MyFont As New StdFont
With MyFont
   .Name = "Arial"
   .Size = 10
   .Bold = True
End With
Note Before you can create a new Font object, you must use the References dialog box (available from the Project menu) to create a reference to Standard OLE Types.
You can then easily switch from one set of font properties to another, by setting the form or controlís Font object to the new object:
Set lblYearToDate.Font = MyFont
For More Information See "Font Object" in the Language Reference.
Some fonts do not support the sizes smaller than 8 points. When you set the Size property for one of these fonts to a size smaller than 8 points, either the Name property or the Size property will automatically change to a different font or a different size. To avoid unpredictable results, each time you set the Size property to a font size smaller than 8 points, examine the values of the Name property and the Size property again after setting it.
The effect of setting font properties varies depending on the technique used to display text. If the text is specified by a property (such as Text or Caption), then changing a font property applies to all the text in that control. Labels, text boxes, frames, buttons, check boxes, and all the file-system controls use a property to specify text.
If the application shows text with the Print method, then changing a font property affects all uses of Print after the property change. Text printed before the property change is not affected. Only forms, picture boxes, and the Debug and Printer objects support the Print method.
Because changes in font properties apply to all the text in text boxes and labels, you cannot mix fonts in these controls. If you need to mix fonts (for example, making some words bold but leaving others in normal font), then create a picture box and use the Print method to display text. "Displaying Text on Forms and Picture Boxes" explains how to use the Print method.
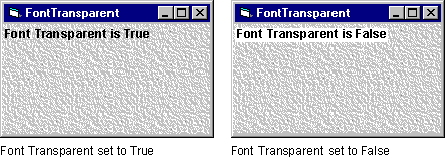
Forms and picture boxes have an additional font property, FontTransparent. When FontTransparent is True, the background shows through any text displayed on the form or picture box. Figure 12.1 shows the effects of the FontTransparent property.
Figure 12.1 The effects of the FontTransparent property
