 To register Windows CE ActiveX controls with Regsvrce.exe
 Before you can use an ActiveX control on a Windows CE-based device, the control must be registered on the device. The Platform Manager automatically registers any controls that are part of your application. As an option, you can use the Regsvrce.exe utility to register them yourself.
 To register Windows CE ActiveX controls with Regsvrce.exe
 The Windows CE ActiveX Control Test Container is an tool that enables you to view, design, and test Windows CE ActiveX controls on Windows CE-based devices.
To use the Windows CE ActiveX Control Test Container on a device, download Asdev.exe, Asdev.dll, and your ActiveX controls to your device. Use the Regsvrce.exe utility to register Asdev.dll, Vbscript.dll, and all the ActiveX controls you will use in the test container.
To run the test container, simply open the directory it is stored in and select Asdev.exe. The Windows CE ActiveX Control Test Container is a stand-alone application; it is not part of the Windows CE Toolkit for Visual C++.
The following table shows the five menu items included in the test container.
| Menu Item | Purpose |
|---|---|
| File | Performing standard Windows file operations: New, Open, Save, Save As, Exit |
| Edit | Deleting an ActiveX control or changing the properties of a selected Windows CE ActiveX Control Test Container form or ActiveX control |
| Controls | Selecting an ActiveX control |
| Mode | Specifying the Edit Script, Design, or Run mode |
| Help | Viewing Windows CE ActiveX Control Test Container copyright information |
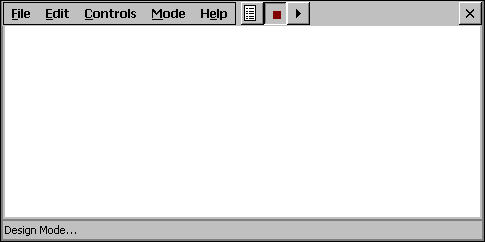
The File menu items enable you to create, open, and save test container forms, not individual ActiveX controls. Each form can contain one or more ActiveX controls. The following screen shot shows the Windows CE ActiveX Control Test Container user interface.

The test container supports all Windows CE ActiveX controls, including controls created with ATL for Windows CE or MFC for Windows CE. The test container supports only properties that have the propget and propput attributes. It does not support the Form property.
 To select an ActiveX control
– Or –
Choose Choose Controls on the Control menu.
You can choose a mode either by selecting an item from the Mode menu or by selecting one of the three mode icons. From left to right, the mode icons represent the Edit Script, Design, and Run modes. In Edit Script mode, you can see and edit a selected control’s VB script. In Run mode, you can see how an ActiveX control behaves during run time. In Design mode, you can change the properties of the design form or of a selected ActiveX control.
Note When you run an application, you will see all the changes you made in Design mode, unless the control’s VB script commands contradict your revisions. For example, a control whose VB script specifies a green RGB value for fill color will be green at run time, even if the control is painted orange in Design mode.
 To change the properties of an ActiveX control in Design mode
Note If you do not select an ActiveX control, changes you make in the Properties dialog box will apply to the test container form itself.