Home | Overview | How Do I | Sample | Tutorial
The framework manages navigation from application user interfaces to help contexts. Implementing further navigation within the Help file is the domain of help authoring rather than programming. The purpose of this article is to describe the general process of authoring and editing Help topic files. Topics covered include:
The following article helps you begin testing your help files:
Compiling and testing your Help file
For details about authoring and compiling Windows Help, see the Help Compiler User’s Guide.
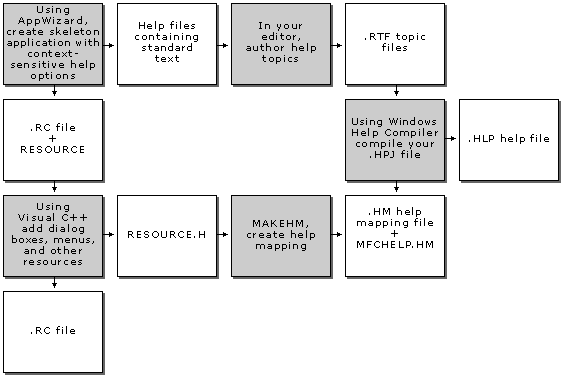
The following figure shows the general process for creating a Help system for your application.
Preparing Help Files

For an example of preparing Help files, see Adding Context-Sensitive Help in Tutorials.
Editing the Help topics for any application is too big a task to work through in just one article; however, a few examples will help you get started. The examples in this article were edited with Microsoft Word for Windows, but you can use any application that can edit rich text format (.RTF) files. To make the following discussion concrete, the examples are drawn from the Scribble tutorial program, presented in Tutorials. If you want to see how Help is prepared for Scribble, look at Adding Context-Sensitive Help in Tutorials.
When you run AppWizard to start the Scribble tutorial, the wizard creates not only source code files, but also a set of files in rich text format (.RTF). These files contain starter Help topics for many of the user-interface elements that Scribble will have, including its menu commands. To complete a Help file for Scribble, follow the steps outlined in this group of Help articles. Then edit the .RTF files to fill in help material that AppWizard couldn’t supply.
You can easily upgrade your Help project files to a 4.0 format with the Windows 4.0 Help compiler included with Visual C++ version 4.0. This gives you access to the Windows 4.0 Help Workshop, a graphical help authoring environment with many useful features. Before you port any of your applications to other platforms, you must make sure that those platforms have a compiler that’s compatible with the 4.0 Help project file before upgrading.
The discussion in the rest of this article takes you through part of that process to illustrate the techniques and to point out some guidelines and tips. Scribble is used here merely as an example.
The .RTF files that AppWizard creates for an application such as Scribble contain starter Help topics for many elements of the Windows user interface. Some of them are fairly complete, while others are skeletal and must be filled out.
If you want to customize the Help topics supplied by AppWizard, you must do the following, using all of the .RTF files in your project’s HLP subdirectory (for example, \MYSCRIB\HLP):
For example, file PEN.RTF contains a topic for the Edit Links command, which Scribble doesn’t support.
Notice that because the class library predefines ID_EDIT_CLEAR_ALL, Scribble’s file PEN.RTF already contains a Help topic for the Clear All command added to the Edit menu in the Scribble tutorial. However, the skeletal directive for such commands, “<< Write application-specific help here. >>,” needs to be replaced with a real description.
Examine the listing of RESOURCE.H in Example Help Contexts in the article Help: The MakeHm Tool. It lists the following Help topics (as seen in Scribble):
In the Scribble tutorial, the Pen Widths dialog box is new, so new Help topics are needed for the dialog box and for two new commands. (The About dialog box is created by AppWizard, so it already has a topic in PEN.RTF.)
Help topics in an .RTF file are separated by hard page breaks. Each topic has a name and a footnote symbol (#).
The footnote symbol (#) identifies a context string in the .RTF file as a jump or a popup. When the user clicks on a hot-link to a context string, a jump takes the user to another topic screen in the Help system, while a popup displays a small popup window containing extra information.
Other possible footnote symbols identify keywords for searching (K) and topic names ($). For more information, see the Tools User’s Guide in the Win32 SDK. If you’re using Word for Windows for .RTF files, you can examine the file PEN.RTF with hidden text displayed.
To illustrate the process of adding topics, this topic shows the structure needed for a user to jump from the main contents screen in Help to a screen showing general information about the new Pen menu, and from there to screens that describe the Scribble tutorial application’s two Pen menu commands. These items are added to the PEN.RTF file.
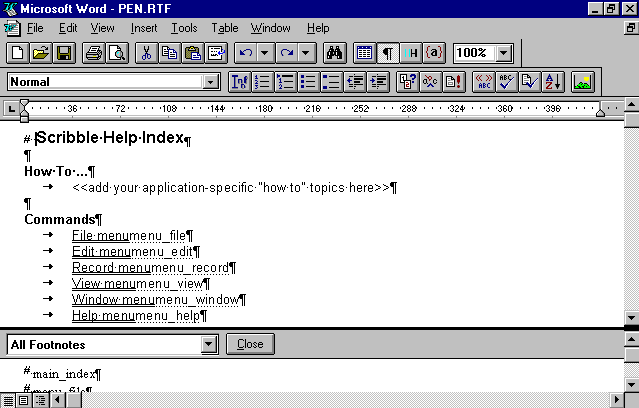
The following figure shows the Help topic for the main contents screen as it appears in Microsoft Word for Windows (with hidden text displayed). The screen contains entries for six menus: File, Edit, View, Pen, Window, and Help. The Pen menu is Scribble-specific, so this jump has been added. The others are created by AppWizard.
The Main Contents Screen in PEN.RTF

Each of the menu names on this screen is a “hot spot” that links to another topic. By clicking this hot spot, the user can jump to another screen in the Help system. If you examine this screen in the PEN.RTF file using Word for Windows, you see that the menu names—such as Pen Menu— are formatted with double underlining. (This might be represented differently by another RTF editor.) Each menu name is followed immediately by a context name formatted as hidden text. For the Pen menu, this text reads “menu_pen.”
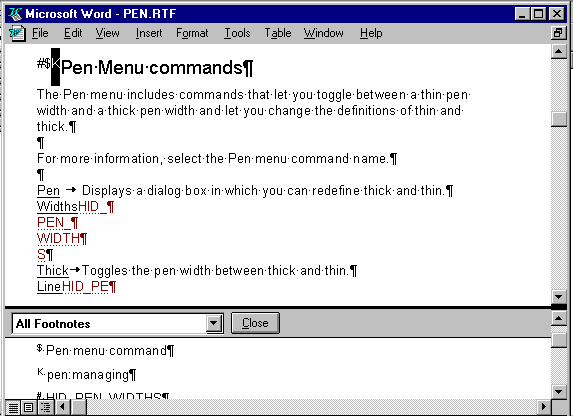
The following figure shows the text in PEN.RTF for a Help screen about the Pen Menu topic. The upper part of the figure shows the text of the file; the lower part shows footnote text. All formatting and hidden text are displayed.
The Pen Menu Topic in the PEN.RTF File

The topic screen begins with a hard page break. The next line shows the footnote character, #, followed by the title to be displayed on the user’s screen, “Pen menu commands.” The rest of the screen contains descriptive text and two more hot spots for jumping to screens about the individual menu items.
The footnote text associated with the # footnote for the Pen menu is “menu_pen,” which is the help context. Jumps to this screen of the Help system must specify this help context.
Setting up this screen requires entering the hard page break and the footnote, then writing the text. In Word for Windows, for example, you use the Break command on the Insert menu to enter a hard page break. Then you use the Footnote entry on the Insert menu to specify a footnote with the special footnote character #.
Next, type the footnote text in the footnote window. Finally, type the descriptive text and format the hot-links.
A hot-link consist of the two parts:
In the RTF files that AppWizard supplies, tables (as in Word for Windows) are used to present groups of jumps, but help authors are not required to use tables.
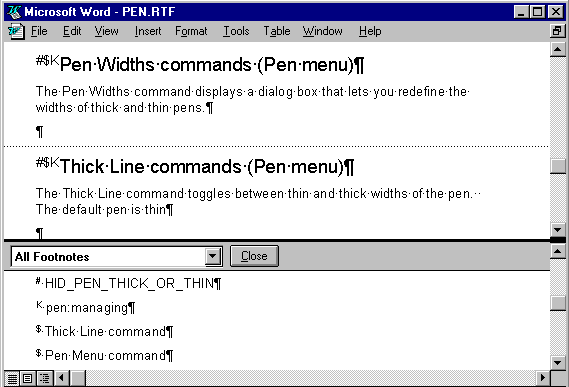
The following figure shows a screen for the Pen Widths and Thick Line menu items.
The Pen Widths and Thick Line Topics in the PEN.RTF File

The screen is set up similarly to its parent screen for the Pen menu as a whole. Notice the text used for the footnotes in the lower part of the figure.