Adding a Stored Procedure to Source Control in Data View
See Also
In Microsoft® Visual InterDev™ and Microsoft® Visual J++™, you can add stored procedures to source control from the Data View window. This allows you to manage the stored procedures in your SQL Server database, and ensure that multiple developers can make changes to the stored procedures without losing changes due to overwritten files.
For this release we are supporting only Microsoft® SQL Server™ version 6.5 databases (with at least Service Pack 3) and Microsoft® Visual SourceSafe™.
The following information applies generally to the source control feature for stored procedures:
-
All users work against the same database.
-
When you open a stored procedure, the text is read from the database.
-
The source control library and database should be in synch unless someone has a stored procedure checked out.
-
You are prompted to log in to the source control library whenever you refresh the data connection or refresh the Stored Procedures folder in the Data View window. If your log in fails or if you cancel the dialog box, then Visual InterDev or Visual J++ will treat the stored procedures as if they were not under source control.
-
You are allowed to view a stored procedure in the editor without checking it out from source control. However, the stored procedure is read-only. To edit the stored procedure, you must check it out.
-
The settings on the Source Control tab of the Options dialog box do not affect using source control with stored procedures in the Data View window.
For stored procedures in the Data View window, a subset of the full source control features is available, as described in the procedures below.
In order to utilize any source control features you must place the database under source code control. When you select this option all stored procedures in the database are added to the source control library.
Note You must also have the Visual SourceSafe client files installed on the SQL Server computer. For more information, see "Setup Issues" below.
To add a database to source control
-
Right-click on the data connection in the Data View window.
-
Choose the Add to Source Control command.
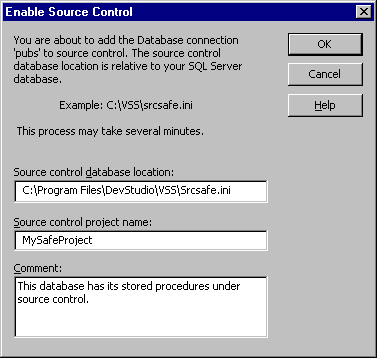
The Enable Source Control dialog box is displayed.
-
-
Enter the location of your source control database, a project name for your source control project, and a comment if desired.
Note The source control database location (the Srcsafe.ini file) is relative to your SQL Server database, not to your local computer. In the figure, the C: drive and the path shown are on the computer containing the SQL Server database.
-
A lock icon is displayed next to each stored procedure in the database, indicating that it is under source control.
-
New stored procedures added to a database under source control must be manually added to the source control library.
To add a new stored procedure to source control
-
Right-click the stored procedure in the Data View window.
-
Choose the Add to Source Control command.
The lock icon is displayed next to the stored procedure. The stored procedure is read from the database and placed in the source control library.
You can check out any of the stored procedures from the database and edit them in your project.
To check out a stored procedure
-
Right-click the stored procedure in the Data View window.
-
Choose the Check Out command.
A check icon is displayed next to the stored procedure.
When you attempt to check out a stored procedure from source control, both the source control version and the database version are retrieved. These versions are then compared. If they are different, you are prompted for which version to use. You can select the database version (and choose to update the source control version), just use the database version, or just use the source control version.
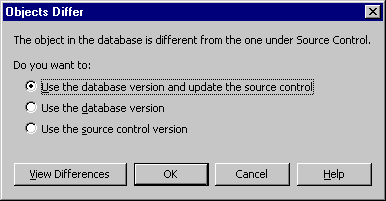
If you select the source control version, the stored procedure is compiled on the database. If the compile fails, the stored procedure is opened in the editor and marked for editing.
You can also click on the View Differences button and see a window displaying the different text for the source control and database versions of the stored procedure.
After you have checked out and edited a stored procedure, you will want to check the changes back into the source control library. When this is done, the stored procedure is read from the database and updated in the source control library. If the stored procedure is open in an editor and marked for editing (as discussed above, the database compile failed when you tried to check the file out), the Check In command is disabled.
To check in a stored procedure
-
Right-click the stored procedure in the Data View window.
-
Choose the Check In command.
-
Enter a comment for this version of the stored procedure in the source control library if you want.
The check icon next to the stored procedure is removed.
Note You always are working against the database. When you check in a file, the latest database version goes into source control.
You can undo a check out if you decide you don't want to save your changes.
To undo a check out
-
Right-click the stored procedure in the Data View window.
-
Choose the Undo Check Out command.
The check icon next to the stored procedure is removed. The lock icon is displayed.
When you elect to undo a check out, an attempt is made to re-synchronize the source control library and the database. The previous version from the source control library is compiled on the database. If an error occurs in compiling, no further action is taken and the lock on source control is cleared.
Note In this case, you're getting the source control version, and replacing the version that you have been modifying, because you decided to undo the check out.
Setup issues
Microsoft Visual InterDev and Microsoft Visual J++ setup will automatically install Visual SourceSafe on your client computer. However, for the source control feature to work, you must install the Visual SourceSafe client software on the computer containing your SQL server.
When you're installing Visual InterDev, make sure to select Visual InterDev Server Setup when this option is offered. This will install the Visual SourceSafe client software on your SQL server.
In addition, the following procedure will help you set up your SQL server to use Visual SourceSafe with stored procedures.
Setting Up Your Computer for Stored Procedure Source Control Through Microsoft Visual SourceSafe
When using source control with stored procedures, the SQL server will be logging into Visual SourceSafe and making the necessary operations on the Visual SourceSafe database. Therefore, it will require appropriate permissions to perform these actions. It is recommended to reduce the security issues by setting the SQL server service to run as a logged on user.
To set the SQL server service to run as a logged on user
-
Click Start Menu, Control Panel, and run Services.
-
Select the service MSSQLServer and click the Startup button.
-
In the Service dialog box, select the option This Account.
-
In the This Account text box, type a domain and user name (for example, "domain\username") that has access to the server where the Visual SourceSafe software is installed.
-
Type a password into the Password text box. Click OK.
-
Stop the MSSQLServer service and then restart it.