Visual InterDev
Would you like to maintain a single page that accommodates all aspects of data entry instead of several pages, each with similar sets of labels, text boxes, and buttons? Would you like to concentrate on the functionality and leave the details of scripting and multiple object models to Microsoft® Visual InterDev™?
Using the new FormManager design-time control to generate run-time script, you can create a versatile page that uses modes for displaying, editing, and adding records to your database.
Instead of scripting your own HTML forms, the modes you specify for the FormManager handle property settings for controls and events on the page. Using modes, you can simplify your Web application design by creating multipurpose pages.
The FormManager control makes creating a data entry page quick and simple, and later on, maintenance is easy. Just open the file and change the FormManager's properties. For more information about this control, see FormManager Design-Time Control and Creating Event-Driven Forms.
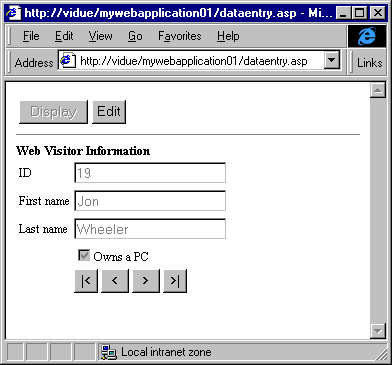
A Data-bound form on a Web page

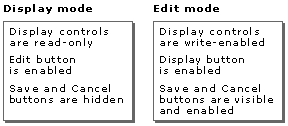
To accomplish the data entry tasks, this page has two modes:
To simplify the example, this page displays a few fields for each record. In a real application, you can place as many fields as you need to accomplish your goal. The data-binding concepts are the same regardless of the number of fields. To see the FormManager in action, see the Data Entry Form Sample.
Before creating a data entry page, be sure you have the following items ready.
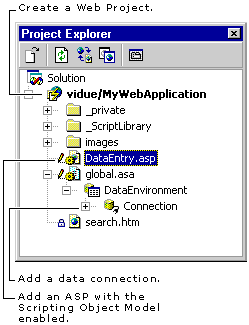
For more information about creating Active Server Pages, see Creating ASP Pages. You can also create HTML pages using these controls. For more information, see Changing Target Platforms in Creating Forms With Design-Time Controls.
Once you are ready to begin, you can add data entry controls and modes to your ASP page with the following steps:
You can create a form on a Web page using data-bound controls. You may have used HTML <FORM> and <INPUT> tags in the past, but data entry forms are most easily implemented and maintained using Recordset and data-bound controls because you get the same scripting object model in both ASP and Microsoft® Internet Explorer 4.0 DHTML.
To add the Recordset control to your page
Note The Scripting Object Model must be enabled to use the design-time controls.
For more information about the scripting object model and the Recordset control, see Scripting with Design-Time Controls and Script Objects and Recordset Design-Time Control.
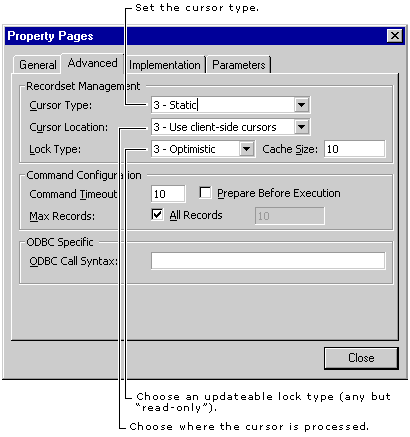
After you drag the Recordset control to the page, choose the source of data and set the lock type to anything other than read-only.
In the example, the Recordset control uses the DEntry table of the Gallery database provided with the Visual InterDev samples. The type of lock used is "Optimistic" so that the form can update records.
Also, make sure the recordset is based on a database object that is updateable. For example, views without a primary key or a unique index are not updateable, regardless of the cursor type you select. For more information about updating records and specifying recordsets, see Modifying Data.
Settings for an updateable Recordset control
Once you have a Recordset control on your page, you can create the form for displaying the fields you want to show the user and for making changes to the records.
Using the design-time controls from the toolbox, you can quickly specify which recordset fields to appear on the page. The field is a property of the control and makes the data display easy to add and, as long as the fields in the recordset do not change, simple to maintain. For more information about using data-bound controls to display records, see Displaying Records.
Forms made with data-bound controls are easy to create and maintain.
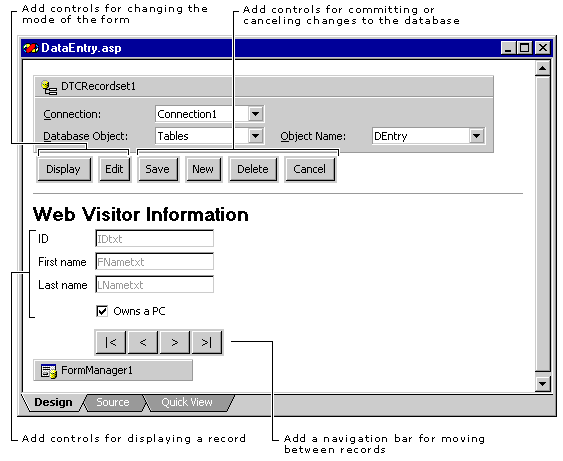
To finish the visual design of the page, add and format text to provide a title for the form. Also, create the row of buttons by adding a table to the page and dragging Button controls into the cells of the table.
For the record display, drag Label, Textbox, and RecordsetNavbar controls to the page. In the example, the Textbox controls and the Checkbox control are bound to the recordset using the property pages to specify the field that the control displays. For a list of all of the initial property settings for the controls on this page, see Completing the Data Entry Page below.
Instead of creating and maintaining several pages with variations of the same control set, the FormManager consolidates it all in a single page that can handle multiple tasks and is easy to maintain.
Using the FormManager control, you can specify modes for your form without scripting the controls and changes. The modes handle changes to the controls and updates to the records.
In addition, you no longer need to scroll through page after page to find the method or event you want to change. The FormManager Properties Dialog Box summarizes all of the property changes and event handling for the page in two tabs.
Of course, if you have user-defined functions, you can reference them in the FormManager control as well. For example, you might have a validation function that you want to use in the form. You can use the FormManager to call the function and validate data whenever the recordset is updated.
Specifying modes covers three main concepts:
In Edit mode, the Save and Cancel button are shown, but the Add button is hidden.
In Insert mode, the Add button is shown and the Save button is hidden.
To add Display and Edit modes to the data entry form
Tip Before adding modes, make sure you have all of the controls you need on the form. For example, you may need to add buttons, such as an Edit button for moving to the Edit mode and a Save button for triggering transition events in that mode.
If you decide to add more controls you can do that later, but adding controls before adding the modes makes them readily available to the FormManager control. This also applies to functions and methods you want to script in the page.
A plan for two modes and their control settings
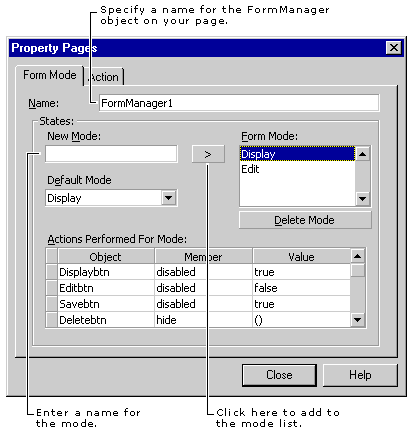
Note For each property you want to set for a control, add a line in the Property/Value pairs grid. For example, if you want the button, btnNew, to be both visible and disabled for the mode, in one line set the disabled property to true and in another line, specify the show() method.
If you want to call a function you created, you can leave the Object column blank and enter the functions name in the Member column and any parameters in the Value column. Be sure to include parenthesis around the parameters.
Tip To ensure proper form behavior, set the properties and methods for each control in each mode. The Web environment is stateless so you can't count on any property maintaining the default value after a transition. If you want a control shown in a mode, specify the show() method for that control. If you want a control hidden, specify Hide() method.
For a complete list of the mode settings for this form, see Completing the Data Entry Page below.
Specify the property settings and method calls for the mode.
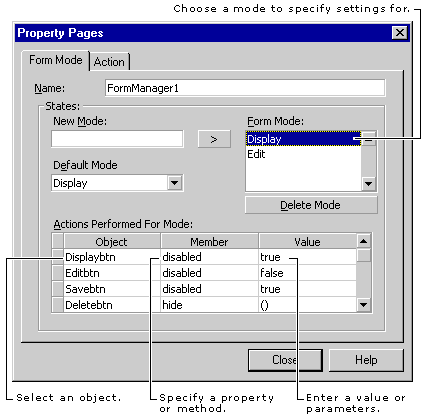
Note Be sure that the disabled property is properly set. If you want to enable the control, its disabled property needs to be "false." These values are case sensitive. It is easy to inadvertently set it to the opposite.
Also, to make a control visible or hidden, use the show() and hide() methods. The server will translate them into the appropriate tags and attributes when it sends the HTML to the Web browser.
For example, when the Edit button is clicked, the form switches from Display mode to Edit mode. Without additional scripting, the mode determines the changes to the controls’ properties as specified in the Form Mode tab.
The Edit button triggers the switch to the next mode.

While in Display mode, the Edit button specifies only that a new mode is active. Additional actions are not required.
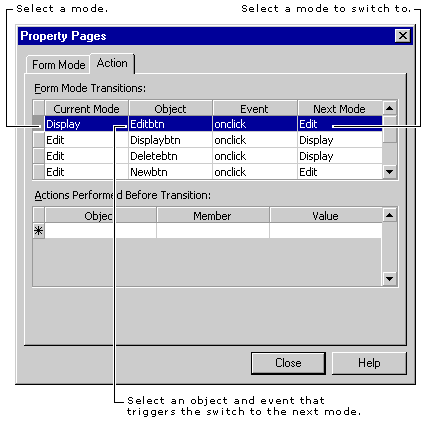
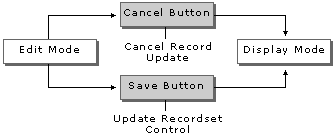
Some transition events require actions in order to complete the entire task intended by the mode.
For example, in Edit mode when the Cancel button is clicked, the changes should be discarded before switching to Display mode. In contrast, when the Save button is clicked, the recordset should be updated before switching to Display mode.
A plan for the transitions and actions between modes
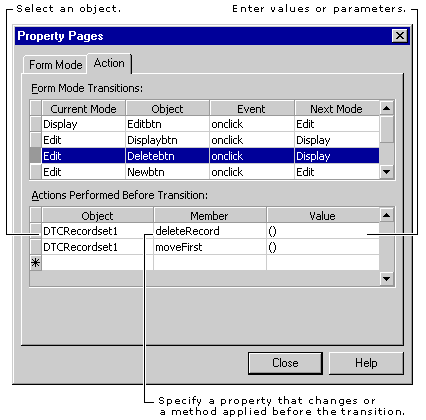
On the Action tab, these actions are specified as shown in the following figure.
The actions occur after the event happens and just before the mode switches.
Note If you add more controls and/or user-defined functions to the page, be sure to incorporate them into the modes using the FormManager control.
Now that you understand the basic use of the FormManager control, you can finish specifying the modes and actions for the data entry page. You can use the tables below for additional settings you might need to complete the data entry page.
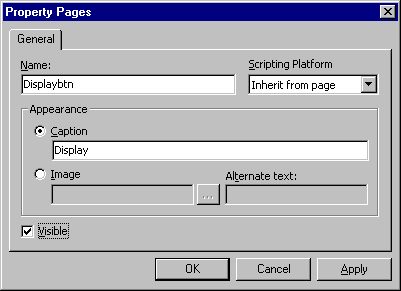
You can set the initial properties for the controls on the form using the General tab of the property pages for the control.
Example of property setting for a button
The following table shows the property settings for the controls on the form before you add the modes.
| Controls for the record | Initial settings |
| Recordset | Connection to the Gallery database used with the Visual InterDev samples. Database object = DEntry table Lock type = Optimistic or Batch optimistic |
| IDlbl | Visible |
| IDtxt | Disabled (read-only), visible |
| FNamelbl | Visible |
| FNametxt | Disabled (read-only), visible |
| LNamelbl | Visible |
| LNametxt | Disabled (read-only), visible |
| PCchk | Visible |
| RecordsetNavbar | Visible, set to recordsetdtc1 |
| Controls for form modes | Initial settings |
| Display Button | Name = Displaybtn Caption = Display Visible = true Disabled = true |
| Edit Button | Name = Editbtn Caption = Edit Visible = true Disabled = false |
| Save Button | Name = Savebtn Caption = Save Record Visible = false Disabled = false |
| New Button | Name = Newbtn Caption = New Visible = true Disabled = false |
| Delete Button | Name = Deletebtn Caption = Delete Visible = true Disabled = false |
| Cancel Button | Name = Cancelbtn Caption = Cancel Visible = false Disabled = false |
You can complete the mode settings for the data entry form by adding the Property/Value pairs into the Form Mode tab.
Use the Form Mode tab of the FormManager control to specify a mode.
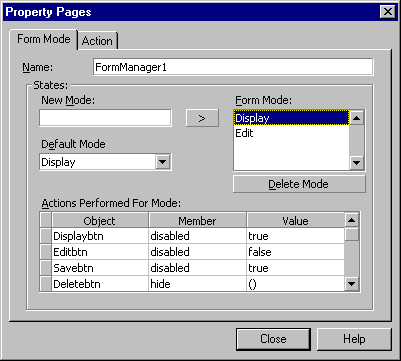
These tables shows the entire set of Property/Value pairs needed to complete the sample data entry page.
| Record display controls | Display state | Edit state |
| IDlbl | show( ) | show( ) |
| IDtxt | show( ) disabled = true |
show( ) disabled = false |
| FNamelbl | show( ) | show( ) |
| FNametxt | show( ) disabled = true |
show( ) disabled = false |
| LNamelbl | show( ) | show( ) |
| LNametxt | show( ) disabled = true |
show( ) disabled = false |
| PCchk | show( ) disabled = true |
show( ) disabled = false |
| RecordsetNavbar | show( ) | hide( ) |
| Mode event buttons | Display mode | Edit mode |
| Display Button | show( ) disabled = true |
show( ) disabled = false |
| Edit Button | show( ) disabled = false |
show( ) disabled = true |
| Mode action buttons | Display mode | Edit mode |
| Save Button | hide( ) disabled = true |
show( ) disabled = false |
| Insert Button | hide( ) disabled = true |
show( ) disabled = false |
| Add Button | hide( ) disabled = true |
show( ) disabled = false |
| Cancel Button | hide( ) disabled = true |
show( ) disabled = false |
| Delete Button | hide( ) disabled = true |
show( ) disabled = false |
You can complete the transition and action settings for the data entry form by identifying the events you want to use to switch between modes and the actions that occur before the switch is completed.
Use the Action tab of the FormManager control to specify transitions and actions.
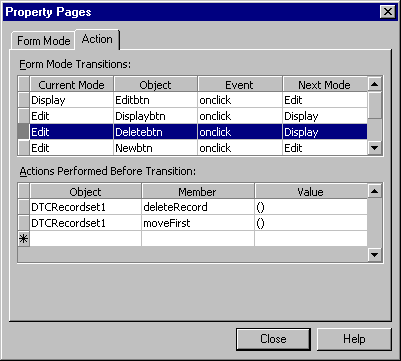
This table shows the settings for both panels in the Action tab of the FormManager control. Remember, the mode itself specifies properties and methods on the display controls. The following settings specify events that trigger the mode and the actions that must be completed before entering the next mode.
| Current mode | Object and event | Next mode | Button actions |
| Display | Editbtn | Edit | None |
| Edit | Displaybtn | Display | None |
| Edit | Savebtn | Display | Recordset.updateRecord( ) |
| Edit | Cancelbtn | Display | Recordset.cancelUpdate( ) Recordset.moveNext( ) |
| Edit | Newbtn | Display | Recordset.addRecord( ) Recordset.moveLast( ) |
| Edit | Deletebtn | Display | Recordset.meleteRecord( ) Recordset.moveFirst( ) |