Visual InterDev
Connecting to a Database
See Also
Before you can display or edit data on your Web page in Microsoft® Visual InterDev™, you must connect to a database. A data connection provides your Visual InterDev project with access to a particular database. You can then use this data connection to connect to the database and display its data on your Web page.
Visual InterDev allows you to connect to databases using two protocols. The preferred protocol is OLE DB, an efficient, full-featured protocol that allows access to a wide variety of data sources. When you install Visual InterDev, the OLE DB data providers for several commonly-used databases, including Microsoft Jet (Access), Microsoft SQL Server, and Oracle, are installed on your computer. Alternatively, you can use ODBC, a widely-used standard for database access.
If you have an OLE DB provider for the database you want to access, you should use that provider. If an OLE DB provider for your database is not available, use an ODBC driver. You will be able to see a list of OLE DB data providers when you start the process of creating a data connection.
For more information about OLE DB providers, see the list of OLE DB providers currently available on the Microsoft Web site.
Creating Data Connections Using OLE DB
Follow this procedure to create a data connection using an OLE DB provider. If you know that you do not have an OLE DB provider for your database, see "Creating Data Connections using ODBC" below. If you're not sure, start with this procedure; you will be able to determine if you need to use an ODBC driver instead.
To create an OLE DB data connection
-
Open your Visual InterDev project and select it in the Project Explorer.
-
From the Project menu, choose Add Data Connection.
The Data Link Properties dialog box appears.

-
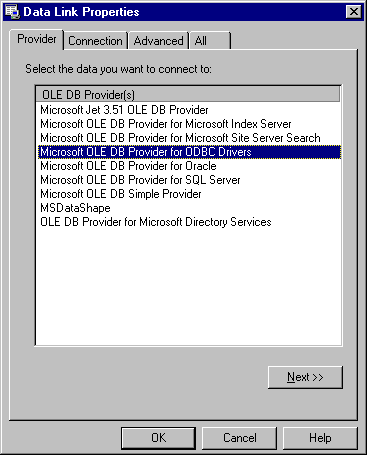
In the Provider tab, select the data provider for your database. For example, if you want to connect to a Microsoft SQL Server database, choose Microsoft OLE DB Provider for SQL Server.
Note If you do not see an OLE DB provider for your database, the provider is not installed. Instead, fdollow the instructions under "Creating Data Connections using ODBC" below.
-
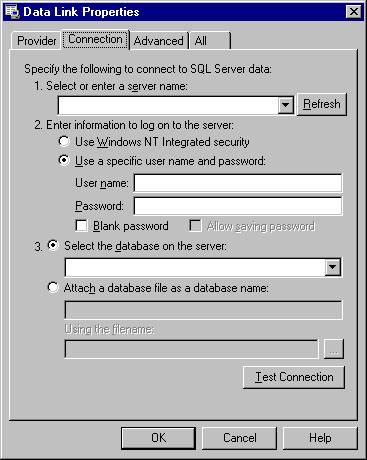
Choose Next to move to the the Connection tab, and then fill in details for the data connection, such as the name of the database to connect to and a user name and password. Each provider will offer you different options in the Connection tab.

Note The user name and password that you fill in are used for design-time access to the database. Run-time access to the database is determined by a setting in the Authentication tab of the Connection Properties dialog box.
-
After filling in the connection information, choose Test Connection to be sure that the information is correct.
-
Choose OK to create the data connection.
The Data Connection is created with a default name of Connectionn, where n is a sequential number. Visual InterDev then opens the Properties dialog box for the new connection.
-
Enter a new name for the connection, if desired, and then choose OK.
Tip Assign a name to the connection that will help you remember what database the connection is for.
After the data connection has been created, it is displayed under the DataEnvironment folder in your project, underneath the global.asa folder. You can also browse and edit the data from this database in the Data View window.
Creating Data Connections Using ODBC
If you do not have an OLE DB provider for your database, you can use an ODBC driver to create a data connection. To do so, you provide a connection string, which is a list of parameters used to connect to the database. A connection string typically includes information such as the server name, database type and name, and login information.
To build a connection string, you build a file-based data source name (a "File DSN") that contains the connection information you need. Visual InterDev can then extract this information from the File DSN and create a "DSN-less" connection string.
Note For background information on creating data connections using ODBC, see the section Data Connections in the topic Data Access Architecture. For more information on the types of data sources you can create, see Choosing a Data Source Name in the Microsoft® Visual Database Tools documentation.
To create a data connection using an ODBC connection string
-
Open your Visual InterDev project and select it in the Project Explorer.
-
From the Project menu, choose Add Data Connection.
The Data Link Properties dialog box appears.

-
In the Provider tab, select Microsoft OLE DB Provider for ODBC Drivers, and then choose Next.
-
In the Connection tab, choose Use connection string, and then choose Build.
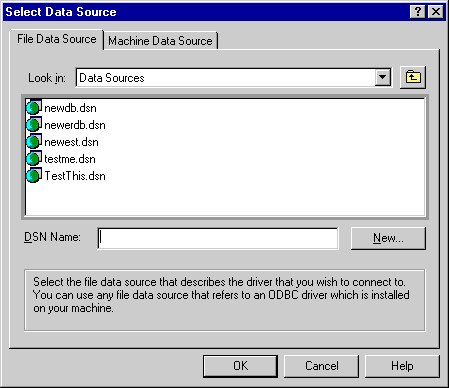
The Select Data Source dialog box appears, where you can build the File DSN.

-
On the File Data Source tab, choose New to launch the Create New Data Source wizard. In the wizard, you:
-
Select the database driver that matches the type of database you are connecting to.
-
Name the File DSN you are creating.
-
Provide information such as the server or file name to access, login information, and access options. The specific options you provide depend on the type of database you are accessing.
Note If the database you are specifying is file-based (such as a Microsoft Jet .mdb file), use the UNC path to the database, not its location on your development computer. This ensures the database will be available from your Web server.
When the wizard is finished, you are returned to the Select Data Source dialog box, and the file data source name you created is displayed in the list.
-
Select the File DSN you have just created, and choose OK. If prompted, log on to the database.
You are then returned to the Data Link Properties dialog. A connection string based on the information from your File DSN is placed into the Connection string box.
-
Choose OK.
The Data Connection is created with a default name of Connectionn, where n is a sequential number. Visual InterDev then opens the Properties dialog box for the new connection.
-
Enter a new name for the connection, if desired, and then choose OK.
Tip Assign a name to the connection that will help you remember what database the connection is for.
The data connection is displayed under the DataEnvironment folder in your project, underneath the global.asa folder. You can also browse and edit the data from this database in the Data View window.
Note You can use the ODBC Data Source Administrator (located in the ODBC folder of your Control Panel) to create and name data sources. These data sources will appear in the Select Data Source dialog box, and you can use them to create data connections in Microsoft Visual InterDev. However, you must do this using the Add Data Connection command; the DSNs created using the ODBC Data Source Administrator don't become data connections until you use the Add Data Connection command to create the connection from the data source.


