
Setting Up Security Zones
You can use security zones to easily provide the appropriate level of security for the various types of Web content that users are likely to encounter. For example, because you can fully trust sites on your company's intranet, you probably want users to be able to run all types of active content from this location. To provide this capability, set the Local intranet zone to a low level of security. You might not feel as confident about sites on the Internet, so you can assign a higher level of security to the entire Internet zone. This higher level prevents users from running active content and downloading code to their computer. However, if there are specific sites you trust, you can place individual URLs or entire domains in the Trusted sites zone. For other sites on the Internet that are known to be sources of potentially harmful Web content, you can select the highest restrictions.
Note Outlook Express shares zone settings with Internet Explorer. You can also select zone settings in Outlook Express. For more information, see the Outlook Express Help files.
You can accept the default security settings for each zone, or you can configure the settings based on the needs of your organization and its users. The options for configuring security zones are the same whether you access them from Internet Explorer 5, the Internet Explorer Customization wizard, or the IEAK Profile Manager. For more information about using the Internet Explorer Customization wizard and the IEAK Profile Manager, see Chapter 15, "Running the Internet Explorer Customization Wizard" and Chapter 22, "Keeping Programs Updated."
Important Internet Explorer 5 maintains the existing security zone settings from previous browser versions.
Configuring Security Zones
You can configure security zones by using the following methods:
- In Internet Explorer, click the Tools menu, click Internet Options, and then click the Security tab.
- You can use the Internet Explorer Customization wizard to create custom packages of Internet Explorer that include security zone settings for your user groups. You can also lock down these settings to prevent users from changing them.
- After the browser is deployed, you can use the IEAK Profile Manager to manage security zone settings through the automatic browser configuration feature of Internet Explorer. You can automatically push the updated security zone settings to each user's desktop computer, enabling you to manage security policy dynamically across all computers on the network.
The following sections describe how to configure zone settings from within Internet Explorer.
 To configure security zone settings
- On the Tools menu, click Internet Options, and then click the Security tab.
The following illustration shows the Security tab.
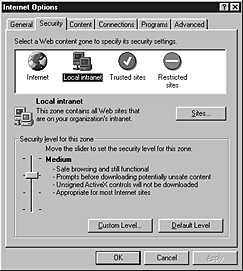
- Click a security zone to select it and view its current settings.
- As necessary, change the following settings:
- Security level - To change the security level for the selected zone to High, Medium, Medium-low, or Low, move the slider. The on-screen description for each level can help you decide which level to select.
- Sites - To add or remove Web sites from the zone, click the Sites button, and then click the Add or Remove button to customize your list of sites for the selected zone.
If you are setting up the Local intranet zone, some additional site options are available. For more information about adding sites to the Local intranet zone, see "Setting Up the Local Intranet Zone" later in this chapter.
- Custom level - For more precise control of your security settings, click the Custom Level button, and then select the options you want. At any time, you can click Default Level to return to the original security level for the selected zone. For more information about Custom Level security options, see "Selecting Custom Level Settings" later in this chapter.
The process required for setting up each security zone is described in the following sections.
Setting Up the Internet Zone
The Internet zone consists of all sites that are not included in the other zones. By default, the Internet zone is set to a Medium security level. If you are concerned about possible security problems when users browse the Internet, you might want to change the setting to High. If you raise the security setting, Internet Explorer prevents some Web pages from performing certain potentially harmful operations. As a result, some pages might not function or be displayed properly. Rather than use a High security setting, you might want to choose a Custom Level so that you can control each individual security decision for the zone.
Note You cannot add Web sites to the Internet zone.
Setting Up the Local Intranet Zone
To ensure a secure environment, you must set up the Local intranet zone in conjunction with the proxy server and firewall. All sites in this zone should be inside the firewall, and proxy servers should be configured so that an external Domain Name System (DNS) name cannot be resolved to this zone. Configuring the Local intranet zone requires that you have a detailed knowledge of your existing networks, proxy servers, and firewalls. For more information, see the MSDN Online Web site.
By default, the Local intranet zone consists of local domain names, as well as domains that are specified to bypass the proxy server. You should confirm that these settings are secure for the installation, or adjust the settings to be secure. When you set up the zone, you can specify the categories of URLs that should be considered. You can also add specific sites to the zone.
To set up sites in the Local intranet zone
- On the Tools menu, click Internet Options, and then click the Security tab.
- Click the Local intranet zone.
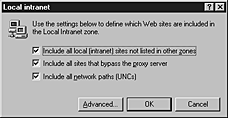
- Click Sites, and then select the following check boxes that apply:
- Include all local (intranet) sites not listed in other zones - Intranet sites, such as http://local, have names that do not include dots. In contrast, a site name that does contain dots, such as http://www.microsoft.com, is not local. This site would be assigned to the Internet zone. The intranet site name rule applies to File as well as HTTP URLs.
- Include all sites that bypass the proxy server - Typical intranet configurations use a proxy server to access the Internet, but have a direct connection to intranet servers. The setting uses this kind of configuration information to distinguish intranet from Internet content for purposes of zones. If the proxy server is otherwise configured, you should clear this check box, and then use another means to designate Local intranet zone membership. For systems without a proxy server, this setting has no effect.
- Include all network paths (UNCs) - Network paths (for example, \\servername\sharename\file.txt) are typically used for local network content that should be included in the Local intranet zone. If some of your network paths should not be in the Local intranet zone, you should clear this check box, and then use other means to designate membership. For example, in certain Common Internet File System (CIFS) configurations, it is possible for a network path to reference Internet content.
The following illustration shows the Local intranet zone settings.
- Click Advanced.
- Type the address of the site you want to include in this zone, and then click Add.
The following illustration shows where you would type the address to add a site to the Local intranet zone.
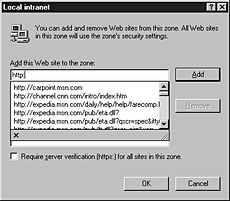
- To require that server verification be used, select the Require server verification (https:) for all sites in this zone check box.
The Local intranet zone is intended to be configured by using the Internet Explorer Customization wizard or the IEAK Profile Manager, although you can also access Local intranet options by clicking Internet Options on the Tools menu, and then clicking the Security tab. After the Local intranet zone is confirmed secure, consider changing the zone's security level to Low so that users can perform a wider range of operations. You can also adjust individual security settings by using a Custom Level of security for this zone. If parts of your intranet are less secure or otherwise not trustworthy, you can exclude the sites from this zone by assigning them to the Restricted sites zone.
Setting Up the Trusted and Restricted Sites Zones
You can add trusted and untrusted Web sites to the Trusted sites and Restricted sites security zones. These two zones enable you to assign specific sites that you trust more or less than those in the Internet zone or the Local intranet zone. By default, the Trusted sites zone is assigned a Low security level. This zone is intended for highly trusted sites, such as the sites of trusted business partners.
If you assign a site to the Trusted sites zone, the site will be allowed to perform a wider range of operations. Also, Internet Explorer will prompt you to make fewer security decisions. You should add a site to this zone only if you trust all of its content never to perform any harmful operations on your computer. For the Trusted sites zone, Microsoft strongly recommends that you use the HTTPS protocol or otherwise ensure that connections to the site are completely secure.
By default, the Restricted sites zone is assigned a High security level. If you assign a site to the Restricted sites zone, it will be allowed to perform only minimal, very safe operations. This zone is for sites that you do not trust. To ensure a high level of security for content that is not trusted, pages assigned to this zone might not function or be displayed properly.
Note A user could copy content from one zone to another, potentially increasing or decreasing the level of security intended for that zone's content.
Working with Domain Name Suffixes
You can address Web content by using either the DNS name or the Internet Protocol (IP) address. You should assign sites that use both types of addresses to the same zone. In some cases, the sites in the Local intranet zone are identifiable either by local name or by IP addresses in the proxy bypass list. However, if you enter the DNS name but not the IP address for a site in the Trusted sites or Restricted sites zone, that site might be treated as part of the Internet zone if it is accessed by using the IP address.
If you want to reference a Web server by using a shorter version of its address that does not include the domain, you can use a domain name suffix. For example, you can reference a Web server named sample.microsoft.com as sample. Then you can use either http://sample.microsoft.com or http://sample to access that content.
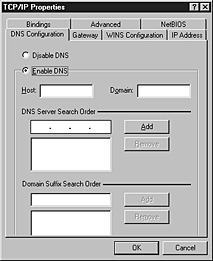
To set up this capability, you must add the domain name suffix for TCP/IP properties to the domain suffix search order.
To add the domain name suffix for TCP/IP properties to the domain suffix search order
- Right-click the Network Neighborhood icon, and then click Properties.
- On the Configuration tab, click TCP/IP, and then click Properties.
- Click the DNS Configuration tab, and then select Enable DNS if it is not already selected.
- In the Domain Suffix Search Order box, add the search order that you want.
The following illustration shows the DNS Configuration tab.
It is important to set up security zones correctly for this capability. By default, the URL without dots (http://sample) is considered to be in the Local intranet zone, while the URL with dots (http://sample.microsoft.com) is considered to be in the Internet zone. Therefore, if you use this capability and no proxy server bypass is available to clearly assign the content to the proper zone, you need to change the zone settings.
Depending on whether the content accessed by the domain name suffix is considered to be intranet or Internet content, you need to assign the ambiguous site URLs to the appropriate zones. To assign URLs, such as http://sample, to the Internet zone, clear the Include all local (intranet) sites not listed in other zones check box for the Local intranet zone, and include the site in the Internet zone.
Selecting Custom Level Settings
The Custom Level button on the Security tab gives you additional control over zone security. You can enable or disable specific security options depending on the needs of your organization and its users. For more information about how to use Custom Level security options, see "Setting Up Security Zones" earlier in this chapter.
The Custom Level security options for Internet Explorer are grouped into the following categories:
- ActiveX controls and plug-ins
- Cookies
- Downloads
- Java
- Miscellaneous
- Scripting
- User authentication
The following table identifies the default value for each Custom Level security option at each level of security.
| Security option |
Low |
Medium-low |
Medium |
High |
|
ActiveX controls and plug-ins
|
| Download signed ActiveX controls |
Enable |
Prompt |
Prompt |
Disable |
| Download unsigned ActiveX controls |
Prompt |
Disable |
Disable |
Disable |
| Initialize and script ActiveX controls not marked as safe |
Prompt |
Disable |
Disable |
Disable |
| Run ActiveX controls and plug-ins |
Enable |
Enable |
Enable |
Disable |
| Script ActiveX controls marked safe for scripting |
Enable |
Enable |
Enable |
Disable |
|
Cookies
|
| Allow cookies that are stored on your computer |
Always |
Always |
Always |
Disable |
| Allow per-session cookies (not stored) |
Always |
Always |
Always |
Disable |
|
Downloads
|
| File download |
Enable |
Enable |
Enable |
Disable |
| Font download |
Enable |
Enable |
Enable |
Prompt |
|
Java
|
| Java permissions |
Low safety |
Medium safety |
Medium safety |
High safety |
|
Miscellaneous
|
| Access data sources across domains |
Enable |
Prompt |
Disable |
Disable |
| Drag and drop or copy and paste files |
Enable |
Enable |
Enable |
Prompt |
| Installation of desktop items |
Enable |
Enable |
Prompt |
Disable |
| Launching applications and files in an IFRAME |
Enable |
Enable |
Prompt |
Disable |
| Software channel permissions |
Low safety |
Medium safety |
Medium safety |
High safety |
| Submit non-encrypted form data |
Enable |
Enable |
Prompt |
Prompt |
| Userdata persistence |
Enable |
Enable |
Enable |
Disable |
|
Scripting
|
| Active scripting |
Enable |
Enable |
Enable |
Enable |
| Allow paste operations via script |
Enable |
Enable |
Enable |
Disable |
| Scripting of Java applets |
Enable |
Enable |
Enable |
Disable |
|
User authentication
|
| User Authentication - Logon |
Automatic |
Automatic |
Prompt |
Prompt |
These Custom Level security options apply to Internet Explorer; other programs might not accept them. These security options are for Microsoft Windows 32-bit platforms, but some options might also apply to Microsoft Windows 16-bit or UNIX platforms. The following sections describe these settings in greater detail.
ActiveX Controls and Plug-ins
These options dictate how Internet Explorer approves, downloads, runs, and scripts ActiveX controls and plug-ins.
Note If a user downloads an ActiveX control from a site that is different from the page on which it is used, Internet Explorer applies the more restrictive of the two sites' zone settings. For example, if a user accesses a Web page within a zone that is set to permit a download, but the code is downloaded from another zone that is set to prompt a user first, Internet Explorer uses the prompt setting.
- Download signed ActiveX controls - This option determines whether users can download signed ActiveX controls from a page in the zone. This option has these settings:
- Disable, which prevents all signed controls from downloading.
- Enable, which downloads valid signed controls without user intervention and prompts users about whether to download invalid signed controls - that is, controls that have been revoked or have expired.
- Prompt, which prompts users about whether to download controls signed by publishers who are not trusted, but still silently downloads code validly signed by trusted publishers. For more information about trusted publishers, see Chapter 6, "Digital Certificates."
- Download unsigned ActiveX controls - This option determines whether users can download unsigned ActiveX controls from the zone. This code is potentially harmful, especially when coming from an untrusted zone. This option has these settings:
- Disable, which prevents unsigned controls from running.
- Enable, which runs unsigned controls without user intervention.
- Prompt, which prompts users about whether to allow the unsigned control to run.
- Initialize and script ActiveX controls not marked as safe - ActiveX controls are classified as either trusted or untrusted. This option controls whether a script can interact with untrusted controls in the zone. Untrusted controls are not meant for use on Internet Web pages, but in some cases they can be used with pages that can absolutely be trusted not to use the controls in a harmful way. Object safety should be enforced unless you can trust all ActiveX controls and scripts on pages in the zone. This option has these settings:
- Disable, which enforces object safety for untrusted data or scripts. ActiveX controls that cannot be trusted are not loaded with parameters or scripted.
- Enable, which overrides object safety. ActiveX controls are run, loaded with parameters, and scripted without setting object safety for untrusted data or scripts. This setting is not recommended, except for secure and administered zones. This setting causes both untrusted and trusted controls to be initialized and scripted and ignores the Script ActiveX controls marked safe for scripting option.
- Prompt, which attempts to enforce object safety. However, if ActiveX controls cannot be made safe for untrusted data or scripts, users are given the option of allowing the control to be loaded with parameters or scripted.
For more information about how to make ActiveX controls safe, see the MSDN Online Web site.
- Run ActiveX controls and plug-ins - This option determines whether Internet Explorer can run ActiveX controls and plug-ins from pages in the zone. This option has these settings:
- Administrator approved, which runs only those controls and plug-ins that you have approved for your users. To select the list of approved controls and plug-ins, use Internet Explorer system policies and restrictions. The Control Management category of policies enables you to manage these controls. For more information about selecting Control Management policies, see Appendix E, "Setting System Policies and Restrictions."
- Disable, which prevents controls and plug-ins from running.
- Enable, which runs controls and plug-ins without user intervention.
- Prompt, which prompts users about whether to allow the controls or plug-ins to run.
- Script ActiveX controls marked safe for scripting - This option determines whether an ActiveX control that is marked safe for scripting can interact with a script. This option has these settings:
- Disable, which prevents script interaction.
- Enable, which allows script interaction without user intervention.
- Prompt, which prompts users about whether to allow script interaction.
Note that safe-for-initialization controls loaded with PARAM tags are unaffected by this option. This option is ignored when Initialize and script ActiveX controls that are not marked safe is set to Enable, because that setting bypasses all object safety. You cannot script unsafe controls while blocking the scripting of the safe ones.
Cookies
These options determine the settings for per-session cookies (text files that store the user's preferences) and cookies that are stored on the client computer.
- Allow cookies that are stored on your computer - This option determines whether cookies are stored on the hard drive for future browsing sessions. For example, this setting can allow a list of preferences or a user's name to be retained for the user's next browsing session. This option has these settings:
- Disable, which prevents persistent cookies from being created. If you disable persistent cookies, some Web sites will not retain their settings when users return to the sites.
- Enable, which automatically accepts persistent cookies.
- Prompt, which prompts users before persistent cookies are created.
- Allow per-session cookies (not stored) - This option determines how long cookies are stored when users browse a Web site. For example, this setting can allow a "virtual shopping cart" to be created while a user is shopping online. Per-session cookies do not remain on the hard disk. They are in effect only for the specific browsing session. This option has these settings:
- Disable, which prevents cookies from being created. If you disable per-session cookies, some Web site information might not be displayed properly.
- Enable, which automatically accepts cookies.
- Prompt, which prompts users before cookies are created.
Downloads
These options specify how Internet Explorer handles downloads.
- File download - This option controls whether file downloads are permitted within the zone. Note that this option is determined by the zone of the page that contains the download link, not the zone from which the file originated. This option has these settings:
- Disable, which prevents files from being downloaded from the zone.
- Enable, which allows files to be downloaded from the zone.
- Font download - This option determines whether Web pages within the zone can download HTML fonts. This option has these settings:
- Disable, which prevents HTML fonts from downloading.
- Enable, which downloads HTML fonts without user intervention.
- Prompt, which prompts users about whether to allow HTML fonts to download.
Java
These options control the permissions that are granted to Java applets when they are downloaded and run in this zone. Depending on the Internet Explorer components that you install, you might not be able to view or set these options.
Each option determines the following:
- The maximum permission level silently granted to signed applets downloaded from the zone.
- The permissions granted to unsigned applets downloaded from the zone.
- The permissions granted to scripts on pages in the zone that call into applets.
Note If a Java applet is downloaded from a different site than the page on which it is used, the more restrictive of the two sites' zone settings is applied. For example, if a user accesses a Web page within a zone that is set to allow a download, but the code is downloaded from another zone that is set to prompt a user first, Internet Explorer uses the prompt setting.
Miscellaneous
These options control whether users can access data sources across domains, submit non-encrypted form data, launch applications and files from IFRAME elements, install desktop items, drag and drop files, copy and paste files, and access software channel features from this zone.
- Access data sources across domains - This option specifies whether components that connect to data sources should be allowed to connect to a different server to obtain data. This option has these settings:
- Disable, which allows database access only in the same domain as the Web page.
- Enable, which allows database access to any source, including other domains.
- Prompt, which prompts users before allowing database access to any source in other domains.
- Drag and drop or copy and paste files - This option controls whether users can drag and drop, or copy and paste, files from Web pages within the zone. This option has these settings:
- Disable, which prevents users from dragging and dropping files, or copying and pasting files, from the zone.
- Enable, which enables users to drag and drop files, or copy and paste files, from the zone without being prompted.
- Prompt, which prompts users about whether they can drag and drop files, or copy and paste files, from the zone.
- Installation of desktop items - This option controls whether users can install desktop items from Web pages within the zone. This option has these settings:
- Disable, which prevents users from installing desktop items from this zone.
- Enable, which enables users to install desktop items from this zone without being prompted.
- Prompt, which prompts users about whether they can install desktop items from this zone.
- Launching applications and files in an IFRAME - This option controls whether users can launch applications and files from an IFRAME element (containing a directory or folder reference) in Web pages within the zone. This option has these settings:
- Disable, which prevents applications from running and files from downloading from IFRAME elements on pages in the zone.
- Enable, which runs applications and downloads files from IFRAME elements on the pages in the zone without user intervention.
- Prompt, which prompts users about whether to run applications and download files from IFRAME elements on pages in the zone.
- Software channel permissions - This option controls the permissions given to software distribution channels. This option has these settings:
- High safety, which prevents users from being notified of software updates by e-mail, software packages from being automatically downloaded to users' computers, and software packages from being automatically installed on users' computers.
- Low safety, which notifies users of software updates by e-mail, software packages to be automatically downloaded to users' computers, and software packages to be automatically installed on users' computers.
- Medium safety, which notifies users of software updates by e-mail and software packages to be automatically downloaded to (but not installed on) users' computers. The software packages must be validly signed; the user is not prompted about the download.
- Submit non-encrypted form data - This option determines whether HTML pages in the zone can submit forms to or accept forms from servers in the zone. Forms sent with Secure Sockets Layer (SSL) encryption are always allowed; this setting only affects data that is submitted by non-SSL forms. This option has these settings:
- Disable, which prevents information from forms on HTML pages in the zone from being submitted.
- Enable, which allows information from forms on HTML pages in the zone to be submitted without user intervention.
- Prompt, which prompts users about whether to allow information from forms on HTML pages in the zone to be submitted.
- Userdata persistence - This option determines whether a Web page can save a small file of personal information associated with the page to the computer. This option has these settings:
- Disable, which prevents a Web page from saving a small file of personal information to the computer.
- Enable, which allows a Web page to save a small file of personal information to the computer.
Scripting
These options specify how Internet Explorer handles scripts.
- Active scripting - This option determines whether Internet Explorer can run script code on pages in the zone. This option has these settings:
- Disable, which prevents scripts from running.
- Enable, which runs scripts without user intervention.
- Prompt, which prompts users about whether to allow the scripts to run.
- Allow paste operations via script - This option determines whether a Web page can cut, copy, and paste information from the Clipboard. This option has these settings:
- Disable, which prevents a Web page from cutting, copying, and pasting information from the Clipboard.
- Enable, which allows a Web page to cut, copy, and paste information from the Clipboard without user intervention.
- Prompt, which prompts users about whether to allow a Web page to cut, copy, or paste information from the Clipboard.
- Scripting of Java applets - This option determines whether scripts within the zone can use objects that exist within Java applets. This capability allows a script on a Web page to interact with a Java applet. This option has these settings:
- Disable, which prevents scripts from accessing applets.
- Enable, which allows scripts to access applets without user intervention.
- Prompt, which prompts users about whether to allow scripts to access applets.
User Authentication
This option controls how HTTP user authentication is handled.
- Logon - This option has these settings:
- Anonymous logon, which disables HTTP authentication and uses the guest account only for Common Internet File System (CIFS).
- Automatic logon only in Intranet zone, which prompts users for user IDs and passwords in other zones. After users are prompted, these values can be used silently for the remainder of the session.
- Automatic logon with current user name and password, which attempts logon using Windows NT Challenge Response (also known as NTLM authentication), an authentication protocol between the client computer and the application server. If Windows NT Challenge Response is supported by the server, the logon uses the network user name and password for logon. If Windows NT Challenge Response is not supported by the server, users are prompted to provide their user name and password.
For information about other secure connection options, see Chapter 8, "Content Ratings and User Privacy."
- Prompt for user name and password, which prompts users for user IDs and passwords. After users are prompted, these values can be used silently for the remainder of the session.
