

Configuring Content Advisor Settings
You can configure Content Advisor settings in several ways:
- In Internet Explorer, click the Tools menu, click Internet Options, and then click the Content tab.
- You can use the Internet Explorer Customization wizard to create custom packages of Internet Explorer that include preconfigured Content Advisor settings for your user groups. You can also lock down these settings to prevent users from changing them.
- After Internet Explorer is deployed, you can use the IEAK Profile Manager to update Content Advisor settings through the automatic browser configuration feature of Internet Explorer. You can automatically push the updated security zone settings to each user's desktop computer, enabling you to manage security policy dynamically across all computers on the network.
You can accept the default Content Advisor settings, or you can configure the settings based on the needs of your organization and its users. The options for configuring Content Advisor are the same whether you access them from Internet Explorer 5, the Internet Explorer Customization wizard, or the IEAK Profile Manager. For more information about using the Internet Explorer Customization wizard and IEAK Profile Manager, see Chapter 15, "Running the Internet Explorer Customization Wizard" and Chapter 22, "Keeping Programs Updated."
After you enable Content Advisor, you can use it to do the following:
- Select content rating levels.
- Configure the list of approved and disapproved Web sites.
- Configure user options for content ratings.
- Change the supervisor password.
- Import new rating systems.
- Specify a different ratings bureau.
 To enable Content Advisor
- On the Tools menu, click Internet Options, and then click the Content tab.
- In the Content Advisor area, click Enable.
- Type the password you want to use.
The following illustration shows the Create Supervisor Password dialog box.
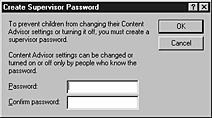
- In the Confirm password box, type the same password again.
 To select content rating levels
- On the Tools menu, click Internet Options, and then click the Content tab.
- In the Content Advisor area, click Settings, and then click the Ratings tab.
- Select the Language, Nudity, Sex, or Violence ratings category.
The following illustration shows the ratings categories for Content Advisor.
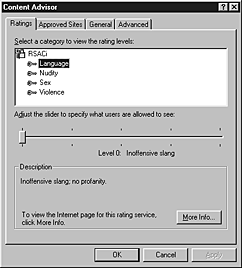
- Drag the slider to the appropriate content level for the selected category.
The default setting for each category is Level 0, which is the most restrictive setting. For more information about ratings levels, see "RSACi Rating System" earlier in this chapter.
 To configure the list of approved and disapproved Web sites
- On the Tools menu, click Internet Options, and then click the Content tab.
- In the Content Advisor area, click Settings, and then click the Approved Sites tab.
The following illustration shows the Approved Sites tab for Content Advisor.
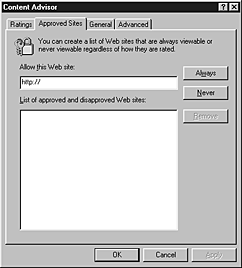
- Type the URL for each Web site that your users can view regardless of its rating level, and then click Always.
- Type the URL for each Web site that your users can never view regardless of its rating level, and then click Never.
Note If you want to delete an approved or disapproved Web site, click the URL in the list, and then click Remove.
 To configure user options for content ratings
- On the Tools menu, click Internet Options, and then click the Content tab.
- In the Content Advisor area, click Settings, and then click the General tab.
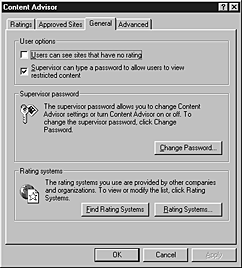
- In the User Options area, select the settings you want.
The following illustration shows the User Options area for Content Advisor.
| Option |
Description |
| Users can see sites that have no rating |
Select or clear this option depending on whether you want users to access Web pages that are not rated. |
| Supervisor can type a password to allow users to view restricted content |
Select or clear this option depending on whether you want users to view restricted content by typing the supervisor password. |
 To change the supervisor password
- On the Tools menu, click Internet Options, and then click the Content tab.
- In the Content Advisor area, click Settings, and then click the General tab.
- Click Change Password.
The following illustration shows the Change Supervisor Password dialog box.

- In the Old password box, type the current password to verify that you are authorized to change Content Advisor settings.
- In the New password box, type the new password.
- In the Confirm new password box, type the new password again.
 To import new rating systems
Important If necessary, install rating systems files following the directions provided by the ratings service. Then proceed with the following steps.
- On the Tools menu, click Internet Options, and then click the Content tab.
- In the Content Advisor area, click Settings, and then click the General tab.
- Click Rating Systems.
The following illustration shows the Rating Systems dialog box.
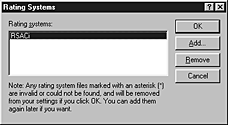
- If the rating system you want to add is displayed on the list, click it, and then click Add.
If the rating system you want to add is not on the list, click OK, and then click Find Rating Systems.
 To specify a different ratings bureau
- On the Tools menu, click Internet Options, and then click the Content tab.
- In the Content Advisor area, click Settings, and then click the Advanced tab.
The following illustration shows the Advanced tab for Content Advisor.
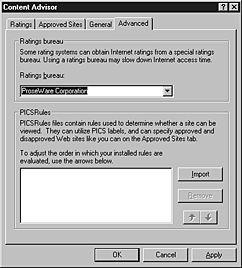
- In the Ratings bureau box, type the name of the ratings bureau (other than RSAC) that Internet Explorer can use to obtain PICS ratings.
- In the PICSRules area, click Import, and then type the name of the PICSRules (.prf) file used by the new ratings bureau.


