

Customizing Fonts, Colors, and Styles
When Web authors and designers create Web pages, they often specify particular fonts, colors, and styles. They might specify the settings for each coded item on the Web page, or they might define the settings in a style sheet. A style sheet provides a template for specifying how different styles should appear throughout a Web site.
Internet Explorer 5 enables users to override any or all of these settings. Users can specify their own font and color preferences for all Web pages. They can also use their own style sheet or select the Windows High Contrast option. If users have installed the Windows Desktop Update, these font, color, and style options will also affect the Windows desktop and file folders.
Because Internet Explorer Help information is also displayed as Web pages, most of the browser accessibility features are also available for viewing Help topics. Users can override and customize formatting and color settings, display text instead of images, disable animation, and even apply their own style sheet to control how Help is presented. When users adjust these options in Internet Explorer and then restart Help, the settings automatically apply to all Help topics.
Overriding Web-Page Formatting
Because of the different methods Web authors and designers can use to format Web pages, some pages might not be affected by customizing the font, color, and style options within the browser. To change the appearance of these pages, users must override the page formatting.
 To override page formatting
- On the Tools menu, click Internet Options.
- On the General tab, click Accessibility.
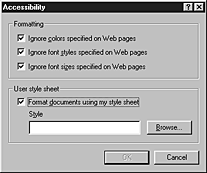
- Select any of the following options:
- Ignore colors specified on Web pages
- Ignore font styles specified on Web pages
- Ignore font sizes specified on Web pages
- Format documents using my style sheet
The following illustration shows these accessibility options.
Changing Font Size
When users browse a Web page, they can immediately change the size of the displayed text.
 To immediately display all text in a larger or smaller font size
- On the View menu, click Text Size, or click the Size button on the toolbar.
- Choose the size you want. A check mark appears next to your choice, and the change takes effect immediately.
If the Size button is not displayed, users can add it to the toolbar.
 To add the Size button to the toolbar
- On the View menu, click Toolbars, and then click Customize.
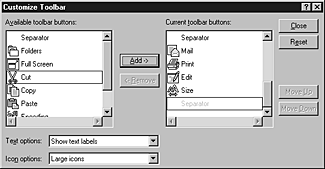
- In the Available Toolbar Buttons list, select Size, and then click Add.
The following illustration shows Size after it has been added to the Current Toolbar Buttons list.
- Click Close.
The changes created by the Text Size menu option and Size button are active for current and future sessions.
For more information about changing font sizes, see "Understanding Font-Size Changes" later in this chapter.
Creating a Style Sheet
This section shows a sample style sheet that adjusts the display of Web pages and Help topics to be read more easily by users who have certain types of low vision. In particular, it overrides normal formatting of all displayed pages in the following ways:
- All items on the Web page appear in high contrast, with a black background and brightly colored text. Body text is white, highlighted text is yellow, and links are brighter versions of their normal blue and purple.
- All text is displayed in a large, sans serif font. Body text is 24 point, and headings are 32 point.
- All bold, italic, and underlining, which might be difficult to read, are replaced by normal text with a single highlight color.
- The keyboard focus is emphasized by showing the active link in a bright, light green, sometimes called "low-vision green."
These settings affect all pages viewed in Internet Explorer, as well as pages displayed by other programs, such as HTML Help.
Note The style sheet in the following example is just one possible solution for increasing the readability of Web pages. By editing the style sheet, users can change the background color and the size, color, and style of the fonts according to their preferences.
 To create a high-visibility style sheet
- Open Notepad.
- Type the following text into a new file:
<STYLE TYPE="text/css">
<!--
BODY, TABLE {
    font-size: 24pt;
    font-weight: normal;
    font-family: sans-serif;
    background: black;
    color: white;}

B, I, U {color: yellow; font-weight: normal; font-style: normal;}
H1 {font-size: 32pt;}
H2 {font-size: 32pt;}
H3 {font-size: 32pt;}
H4 {font-size: 32pt;}
H5 {font-size: 32pt;}

a:visited {color: #FF00FF}
a:link {color: #00FFFF}
a:active {color: #B1FB17}
-->
</STYLE>
- Save the file with a .css file name extension (for example, Mystyle.css) to the folder of your choice.
- In Internet Explorer, on the Tools menu, click Internet Options.
- On the General tab, click Accessibility.
- Click Format documents using my style sheet.
The following illustration shows this option selected.
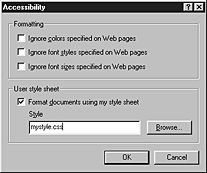
- Type the path of the style sheet file you just created, or click Browse to navigate to the file's location.
Caution Use care when experimenting with the Format documents using my style sheet option. Errors in style sheets can cause serious problems with Internet Explorer. If possible, use style sheets that have been created by professional designers. When trying out new style sheets, keep the style-sheet files on a floppy disk that can be removed if a problem occurs.
Changing Colors of Text, Backgrounds, and Other Objects
Users can select the colors they prefer for text, backgrounds, links, and objects that the mouse pointer hovers over on Web pages.
 To change the color of text, backgrounds, links, and objects that the mouse pointer hovers over
- On the Tools menu, click Internet Options.
- On the General tab, click Colors.
- Clear the Use Windows colors check box.
- Click the Use hover color check box. The Hover button is enabled with the default color.
The following illustration shows Use hover color selected in the Colors dialog box.
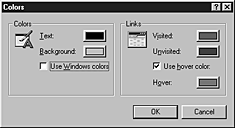
- Click the Text, Background, Visited, Unvisited, or Hover button to display the Color dialog box, which includes the Basic colors and Custom colors palettes.
- In the Color dialog box, click the color of your choice from the color palettes. (To create custom colors, see "Creating Custom Colors" later in this section.)
Creating Custom Colors
Users can create custom colors for fonts, text background, links, and objects that the mouse pointer hovers over.
 To create custom colors
- On the Tools menu, click Internet Options, and then click the General tab.
- Click the Colors button.
- In the Colors dialog box, click the Text, Background, Visited, or Unvisited button to display the Color dialog box, which includes the Basic colors and Custom colors palettes.
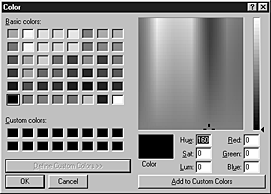
- In the Color dialog box, click Define Custom Colors. The dialog box expands to include the Custom colors palette.
The following illustration shows the expanded dialog box for the Custom colors palette.
- Select a custom color by using either of two methods:
- Type values for either Hue, Sat (Saturation), and Lum (luminescence), or type values for Red, Green, and Blue. The sample box changes color to reflect your choices.
- Click within the color box to select a color, and then move the slider (on the right) up or down to select the luminescence level. The sample box changes color to reflect your choices.
- Click Add to Custom Colors.
Selecting the High Contrast Color Scheme
Instead of creating their own customized color scheme, users can choose to view their Web pages by using the Windows High Contrast color scheme.
 To view Web pages by using Windows High Contrast
- On the Start menu, point to Settings, and then click Control Panel.
- Click the Display icon, and then click the Appearance tab.
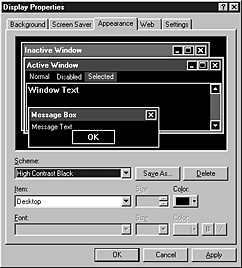
- In the Scheme list, select one of the high contrast options.
The following illustration shows the Appearance tab with High Contrast Black selected.
- In Control Panel, click the Internet Options icon.
- On the General tab, click the Accessibility button.
- Select the Ignore colors specified on Web pages check box, and then click OK.
- On the General tab, click the Colors button.
- Select the Use Windows colors check box.
Note You must restart Internet Explorer before these changes can take effect.
Selecting a Full-Screen Browser Window
When users browse a Web page, they can choose to immediately change the size of the browser window to full screen.
 To immediately change the size of the browser window to full screen
- On the View menu, click Full Screen, click the Full Screen button on the toolbar, or click F11 (shortcut key).
If the Full Screen button is not displayed, you can add it to the toolbar.
 To add the Full Screen button to the toolbar
- On the View menu, click Toolbars, and then click Customize.
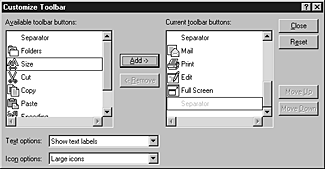
- In the Available Toolbar Buttons list, select Full Screen, and then click Add.
The following illustration shows Full Screen after it has been added to the Current Toolbar Buttons list.
Note The changes created by the Full Screen menu option or the Full Screen button are active only for the current session.
Changing Button Size and Text Labels on the Toolbar
Users with disabilities might want to change the button size and text labels on the Internet Explorer toolbar. Some users might want to view large buttons on the toolbar rather than the smaller Microsoft Office-style buttons. Users who have low vision might prefer these larger buttons. Users can also choose whether to show text labels for the buttons.
 To change button size and text labels on the toolbar
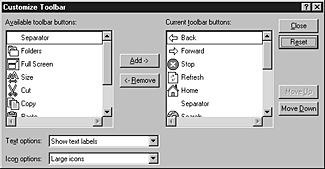
- On the View menu, click Toolbars, and then click Customize.
- In the Icon Options list, select the button size that you want to display on the toolbar.
- In the Text Options list, select whether to display text labels for the toolbar buttons.
The following illustration shows the Customize Toolbar dialog box with Show text labels and Large icons selected.
Understanding Font-Size Changes
The following list identifies the factors that affect font size and describes how these factors are applied in Internet Explorer. The factors are listed in the order they are applied when the browser displays a page.
- The Internet Explorer display defaults (for example, P is size 3 and H1 is size 6).
- A user-specified style sheet (if one is provided) and whether Format documents using my style sheet is selected in the Accessibility dialog box.
- Style-sheet information in the document, unless Ignore font sizes specified on Web pages is selected in the Accessibility dialog box.
- FONT tags in the document, unless Ignore font sizes specified on Web pages is selected in the Accessibility dialog box. Selecting this option does not override relative sizes that are implied by structural tags. For example, a top-level heading (H1) will still be larger than body text, even when Ignore font sizes specified on Web pages is turned on.
- A scaling factor determined by the Text Size options accessible from the View menu, except in those cases where the font is specified in an absolute size, such as 12 point.
 To set the font-scaling factor
- For current and future sessions, click the Tools menu, click Internet Options, click the General tab, and then click the Fonts button.
- For the current session only, click the View menu, point to Text Size, and then click the option you want.
Users can specify font sizes in three ways:
- As an index value (1–7)
- As a relative value (+1, +5)
- Using an absolute size unit, such as point or pixel (for example, 12pt, 32px)
Font sizes that are set by using index or relative values are affected by the View menu font options, while fonts set in absolute size units are not.


