

If you aren't using multiple .ins or .isp files, and you need to build multiple custom packages, you can use certain strategies to avoid downloading files again or resetting options on every page of the wizard.
Here are three ways to build multiple custom packages more efficiently using the Customization wizard:
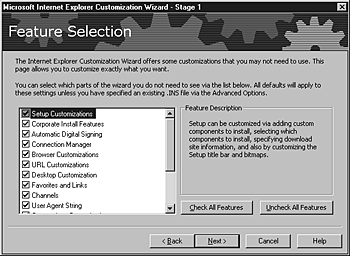
If you create multiple packages with the Customization wizard, you can use the Feature Selection screen in Stage 1 of the wizard to select which wizard screens you want to view.

If you don't plan to change any settings associated with a feature, you can clear the check box for that feature. The screens associated with that feature will not be displayed. Note, however, that a few screens are displayed every time you run the wizard because they are necessary to create the package.
By displaying only the screens necessary for your additional custom package, you can possibly save time, because you won't need to view or specify options for settings that don't change.
Note If your packages include custom graphics, verify that the graphics are still available in the specified locations. If you have moved or changed the name of any graphics since you last built a custom package, you'll need to display the screen associated with the graphics, and change the path.
The IEAK can check on the Internet for the latest versions of components when you create your custom package. This feature can help you detect whether new versions have become available since the last time you ran the Internet Explorer Customization wizard. It can also help you avoid downloading components a second time.
To use AVS, you'll need to specify the same Component Download folder that you used for a previous package, and keep the components that you downloaded earlier on your computer.
You specify the Component Download folder on the File Locations screen in Stage 1 of the wizard. To set the location, click Advanced Options, and then enter the path you want in the Component Download Folder box. If you have already run the wizard and downloaded the components you want, you do not need to change this path if you want to reuse the components that you've already downloaded.
To see if new versions of components are available from Microsoft, view the Automatic Version Synchronization screen in Stage 2 of the wizard. If you have the latest version of a component, the icon will be green; if a newer version is available, the icon will be yellow; and if you've never downloaded the component (or if you have changed the path since you downloaded a component), the icon will be red.
It is not necessary to download the latest version of a component, although this is recommended for most scenarios. To retain version consistency across your organization, you may not want to deploy a newer version of a component if several members of your organization already have an earlier version.
If you haven't planned to deploy an updated version of a component, don't click Synchronize or Synchronize All on the Automatic Version Synchronization screen. However, if you download a newer version of a component using Synchronize or Synchronize All, you will be prompted if you already have some of the files associated with the component. That way, you won't have to download files that aren't necessary to update your component.
If you have created a custom package or worked with automatic configuration before, and you want to build a new package with many of the same settings, you can import your .ins file when you run the Customization wizard.
The settings from the .ins file can serve as a starting point for your new package. You won't have to reset the options that you want to retain; you'll only need to set options that you want to change and options that are new to this version of the Customization wizard.
When importing an .ins file, verify that the .ins file applies to the package type you are creating. For example, if you create a corporate administrator package, you would not want to import an .ins file from a package created for Internet service providers.
To import a pre-existing .ins file, use the following procedure.