Migrating a Web Server to IIS 5.0 |
Once you’ve acquired and set up the necessary hardware, you need to take several steps to prepare the destination server for migration, including installing Windows 2000 Server and IIS 5.0, configuring directories, and installing tools and utilities.
Note The destination server (sometimes called the target server) is running Windows 2000 Server with IIS 5.0, and the source server is running the Web server software you plan to migrate. While source and destination servers could exist on the same physical computer, carrying out a migration on a single computer is not recommended. (The issues involved are described in the previous topic, Assessing Hardware Requirements.) Therefore, in this discussion, source and destination servers are assumed to exist on separate computers.
It’s always good policy to have a backup of the server even when you are migrating to a separate computer. This step is critical if you plan to perform the migration on the actual production Web server (which, again, is not recommended). If anything goes wrong, you can then restore the original system and content.
During setup you create disk partitions and specify the file format for the primary, or system, partition onto which Windows 2000 Server will be installed. Be sure to allocate sufficient space in each partition for the content or system files it will hold. The following are some other issues to consider when creating disk partitions and specifying file format:
For security reasons, it is also a good idea to install the Windows 2000 Server and IIS 5.0 system software on a separate partition from the Web and FTP site content and applications. A good configuration might be as follows:
Drive C: Allocate 1.5 to 2 GB of disk space for Windows 2000 Server and IIS 5.0 executables.
Drive D: Allocate 1 to 2 GB of disk space for the IIS root and Web site directories.
Drive E: Allocate sufficient disk space to contain remaining software and content for your server.
Likewise the SAMBA shareware application suite allows UNIX clients to access Windows-based file systems. It also allows Windows-based clients to access files and printers on UNIX, NetWare, OS/2, or VMS servers that support the Server Message Block (SMB) protocol. For more information about SAMBA, see http://samba.anu.edu.au/samba/.
For more information about creating and configuring Windows 2000 operating system partitions and directories, see the Windows 2000 Server online product documentation.
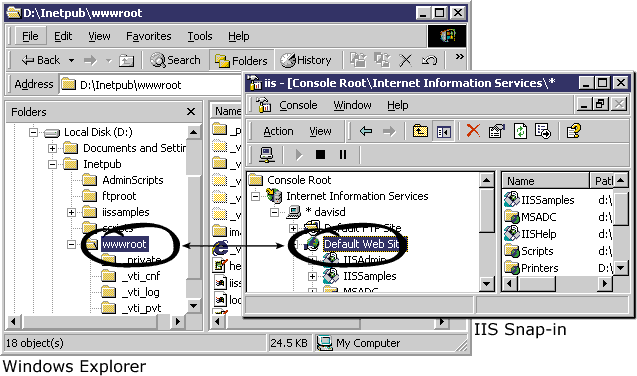
The following figure shows the Wwwroot directory in Windows Explorer and its associated Web site (in this case, the Default Web Site) in the IIS snap-in.

You might be able to use the default directory structure as it is, or you might want to make some modifications to preserve paths (also called pathnames) within your content and application files. As much as possible, try to replicate the directory structure and names used on the source server. This minimizes broken links and the need to update URLs and pathnames within files following migration.
Note The Default Web Site in the IIS snap-in points to the IIS 5.0 online product documentation, supporting code, and application samples (accessible from the IIS snap-in Help menu, or by typing http://localhost/ in the address bar of your browser). If you delete the Default Web Site, you will no longer be able to open these items. Also, be aware that the Default Web Site is assigned port 80 by default. When you create a new Web site in the IIS snap-in, it also will be assigned port 80 by default. In order to continue accessing the documentation, you must change the port number of any new Web site you create to something besides 80 so that it doesn’t conflict with the Default Web Site. To avoid these problems, it is best to use the Default Web Site to manage your Web site, rather than creating a new one. For more information, see the “Adding Sites” topic in the IIS 5.0 online product documentation.
| Storing Content outside the Web Server Root Directory
The Virtual Directory feature of the IIS 5.0 snap-in allows you to publish content to your Web and FTP sites that is stored outside of the Web server root directory tree (c:\Inetpub\wwwroot) in Windows Explorer. Content—HTML files, scripts, images, and other files—can be stored in any Microsoft® Windows® directory on the local computer or another computer on your network. The only restriction is that the network drive containing the directory must be in the same Windows 2000 Server Domain as the computer running IIS 5.0. For more information about virtual directories, see the “Creating Virtual Directories” topic in the IIS 5.0 online product documentation. |
You’ll also want to obtain and install the appropriate script interpreters (also called scripting engines) to run applications written as scripts. IIS supports any scripting language for which you have installed a script interpreter that follows the Active Scripting standard. For ASP applications, IIS natively supports Microsoft® Visual Basic® Scripting Edition (VBScript) and Microsoft® JScript®, so you don’t need to install their interpreters. Active Scripting interpreters for Perl 5.0 and Regina REXX are included on the Resource Kit companion CD and are also available through third-party developers. TCL/Tk, Python, and REXX script interpreters that are compatible with Microsoft® Win32® are available from third-party sources. In most cases, you should install the script interpreter in the Web server root directory (c:\Inetpub\wwwroot) and set appropriate NTFS and IIS 5.0 permissions. For more information, see Configuring a Script Interpreter and Additional Resources later in this section.