Administering an ISP Installation


Administering an ISP Installation |
|
The following series of procedures show you how to set up a full-domain site, which will have an address in this format: http://domain.com. You will learn how to configure the site so that anonymous users will be able to read the content, and so the owner will be able to transfer content to the site through File Transfer Protocol (FTP) or FrontPage Server Extensions. If there will be more than one owner authoring the site, create user accounts for the additional authors and add them to the user group corresponding to the Web site’s domain.
To begin setting up your site
| Top-Level Domain | Registry |
| .com, .edu, .net, .org | http://www.networksolutions.com/internic/internic.html |
| .us | http://www.isi.edu/in-notes/usdnr/ |
| .gov (U.S. government) | http://www.registration.fed.gov/ |
| .mil (U.S. military) | http://www.nic.mil/ |
| .ca (Canada) | http://www.cdnnet.ca/ |
| .mx (Mexico) | http://www.nic.mx/ |
| Europe | http://www.ripe.net/ |
| Asia/Pacific | http://www.apnic.net/ |
After you have registered a domain name, you can assign an IP address to the domain. If clients will be able to access your site only through HTTP, but not through FTP you can assign a host-header name in IIS 5.0 in order to associate multiple domain names with the same IP address. For details, see the “Naming Web Sites” topic in the IIS 5.0 online product documentation.
For information about how to use this tool, see the Microsoft® Windows® 2000 Server online product documentation.
Note You may need to restart your computer in order to activate the IP address.
Next, you need to create and configure an anonymous user account. This is accomplished through the Microsoft® Windows® 2000 Computer Management tool.
To create an anonymous user account
This step allows you to set unique discretionary access control lists (DACLs) for the home directory of the Web site domain. For detailed information about NTFS DACLs, see the “About Access Control” topic in the IIS 5.0 online product documentation.
Choose this option as a minor security precaution to prevent the user from changing the password on the proxy server.
Choose this option unless you want to periodically dispose of the password and create a new one.
In order to more easily identify which domain the group belongs to, create the group name so that it is similar to the domain name.
For detailed instructions about the Computer Management tool, see the Windows 2000 Server online documentation.
Next, set the file system and IIS 5.0 permissions.
To set permissions
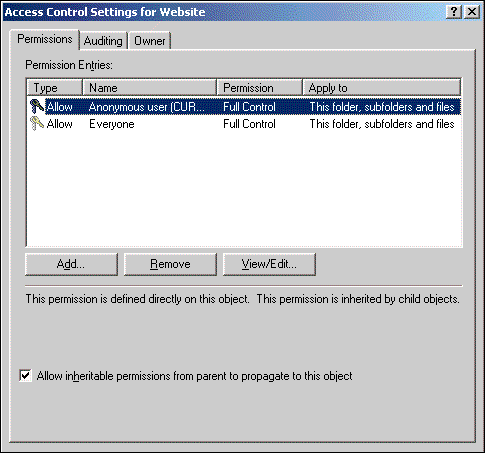
The DACL should grant members of this group Full Control over the home directory and its contents. The following figure shows the Windows 2000 Server dialog box in which you set Full Control permission for a user or group.
If you’ve installed FrontPage Server Extensions, you will need to create a home page (file), set up the Web site administrator, and configure the virtual server in order to publish information on the site.
To set up publishing
You can indicate in this file that the site is under construction.
Note You can only do this if you have a dedicated IP address for the Internet domain. For information about uploading through FTP, see Uploading Content through FTP.
Do this only if you want to allow the additional user to control the IIS 5.0 configuration settings for the domain.
For more information, see Configuring FrontPage Server Extensions.
If you want to allow a user to dial in from a remote computer, you can grant Dial-in permission.
To grant Dial-in permission
See also: Troubleshooting