Design Specifications and Guidelines - Working with OLE Embedded and Linked Objects
Embedded and linked objects are the result of transferring existing objects or creating new objects of a particular type directly in the container document.
Transferring objects into a document follows basic command and direct manipulation interaction methods. The following sections provide additional guidelines for these commands when you use them to create embedded or linked objects.
![]() More Information
More Information
For more information about command transfer and direct manipulation transfer methods, see Chapter 6, "General Interaction Techniques."
Generally, when the user clicks the Paste command, the pasted object should be inserted as an embedded object. However, if the destination container can handle the native format of the pasted object, the container can optionally embed the object as native data instead of embedding it as a separate object. The destination container can also optionally transform the object to a form that it supports or transfer only the salient aspects of the object, such as the object's properties.
Use the format of the Paste command to indicate to the user how a transferred object will be incorporated by a container.
Several different things can happen when a user copies a file object:
Figure 12.2 The Paste command with short type name
![]() More Information
More Information
For more information about type names and the system registry, see Chapter 11, "Integrating with the System," and the OLE documentation included in the Microsoft Platform SDK on the MSDN Online Web site at http://msdn.microsoft.com/ui/guide/sdk.asp.
To give the user explicit control over pasting in the data as native information, an embedded object, or a linked object, include the Paste Special command. The Paste Special dialog box, as shown in Figure 12.3, includes a list box showing the possible formats that the data can assume in the destination container.
![]() More Information
More Information
For more information about the Paste Special dialog box and other OLE-related dialog boxes that are described in this chapter, see the Microsoft Platform SDK on the MSDN Online Web site at http://msdn.microsoft.com/ui/guide/sdk.asp.
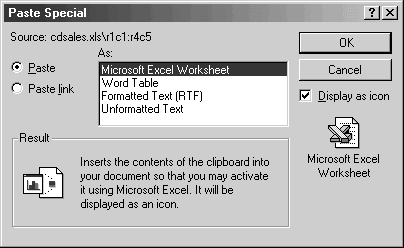
Figure 12.3 The Paste Special dialog box
In the formats listed in the Paste Special dialog box, include the object's full type name first, followed by other appropriate native data forms. When a linked object has been cut or copied, precede its object type by the word "Linked" in the format list. For example, if the user copies a linked Microsoft Excel worksheet, the Paste Special dialog box shows "Linked Microsoft Excel Worksheet" in the list of format options because it inserts a copy of the link; that is, a link to the original linked worksheet. For native data formats, begin with the destination application's name and express the format in the same terms the destination identifies in its own menus. Set the format initially selected in the list to correspond to the default format that the Paste command uses. For example, if the Paste command is displayed as Paste Object File Name or Paste Short Type Name because the data to be embedded is a file or portion of a file, set the same format in the Paste Special list box.
To support creating a linked object, the Paste Special dialog box includes a Paste link option, as shown in Figure 12.4.
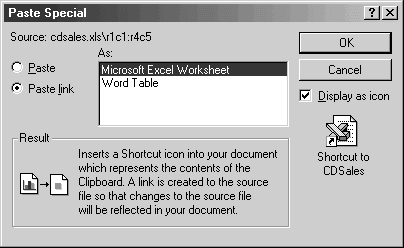
Figure 12.4 The Paste Special dialog box with the Paste link option set
If users want to display the embedded or linked object as an icon, they can select the Display as icon check box. The text and pictures at the bottom of the dialog box describe the result of the operation. The following table lists the descriptive text to use in the Paste Special dialog box.
| Text for Paste Special Dialog Box | ||
|---|---|---|
| Function | Resulting text | |
| Paste as an embedded object | "Inserts the contents of the Clipboard into your document so that you can activate it using CompanyName ApplicationName." | |
| Paste as an embedded object | "Inserts the contents of the Clipboard so that it appears as an icon into your document so that you can activate it using CompanyName ApplicationName. It will be displayed as an icon." | |
| Paste as native data | "Inserts the contents of the Clipboard into your document as Native Type Name. [Optional additional Help sentence.]" | |
| Paste as a linked object | "Inserts a picture of the contents of the Clipboard into your document. The picture is linked to the source file so that changes to the file will be reflected in your document." | |
| Paste as a linked object | "Inserts a shortcut icon into your document so that it appears as a shortcut which represents the contents of the Clipboard. The shortcut created is linked to the source file so that changes to the file will be reflected in your document." | |
| Paste as linked native data | "Inserts the contents of the Clipboard into your document as Native Type Name. A link is created to the source file so that changes to the source file will be reflected in your document." | |
If linking is a common function in your application, you can optionally include a command that optimizes this process. Use a Paste Link command to support creating a linked object or linked native data. When the user chooses to create a linked object, the command should include the name of the object preceded by the word "to" — for example, "Paste Link to Latest Sales." Omitting the name implies that the operation results in linked native data.
Use a Paste Shortcut command to support creation of a linked object that appears as a shortcut icon. You can also include a Create Shortcut command that creates a shortcut icon in the container. Apply these commands to containers where icons are commonly used.
You should also support direct manipulation interaction techniques, such as drag-and-drop transfers, for creating embedded or linked objects. When the user drags a selection into a container, the container application interprets the operation using information supplied by both the source (such as the selection's type and format) and the container's own context (such as the container's type and its default transfer operation). For example, dragging a spreadsheet cell selection into a word-processing document can result in an embedded table object. Dragging the same cell selection within the spreadsheet, however, would probably result in simply transferring the data in the cells. Similarly, the container in which the user drops the selection can also determine whether the dragging operation results in a linked object.
![]() More Information
More Information
For more information about using direct manipulation for moving, copying, and linking objects, see Chapter 6, "General Interaction Techniques."
In a nondefault drag-and-drop transfer, the container application displays a shortcut menu with appropriate transfer commands at the end of the drag. The choices may include multiple commands that transfer the data in a different format or presentation. For example, as shown in Figure 12.5, a container application could offer the following choices for creating links:
The choices depend on what the container can support.
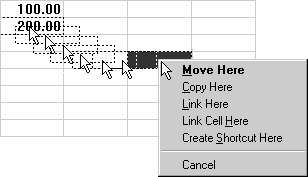
Figure 12.5 A container with different link options
The default appearance of a transferred object also depends on the destination container application. For most types of documents, make the default command one that results in the object being presented as data or content rather than as an icon. If the user clicks Create Shortcut Here as the transfer operation, display the transferred object as an icon. If the object cannot be displayed as content — for example, because it does not support OLE — always display the object as an icon.
If the application supports the transfer protocol, the system allows the user to transfer selected data within a file to the desktop or to a folder. For move or copy operations — using the Cut, Copy, and Paste commands or direct manipulation — the transfer operation results in a file icon called a scrap. A link operation also results in a shortcut icon that represents a link to data in a document.
When the user transfers a scrap into a container supported by your application, integrate it as if it were being transferred from its original source. For example, if the user transfers a selected range of cells from a spreadsheet to the desktop, it becomes a scrap. If the user transfers the resulting scrap into a word-processing document, the document should incorporate the scrap as if the cells were transferred directly from the spreadsheet. Similarly, if the user transfers the scrap back into the spreadsheet, the spreadsheet should integrate the cells as if they had been transferred within that spreadsheet. Typically, internal transfers of native data within a container result in repositioning the data rather than transforming it.
In addition to transferring objects, you can support user creation of new embedded or linked objects in a container document.
Include an Insert Object command on your application's menu that contains the commands for creating or importing new objects into a container, such as an Insert menu. If no such menu exists, use the Edit menu. When the user selects the Insert Object command, display the Insert Object dialog box, as shown in Figure 12.6. This dialog box allows the user to generate new objects based on their object type or the format of an existing file.
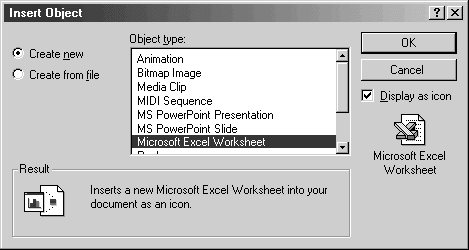
Figure 12.6 The Insert Object dialog box
The type list is composed of the names of registered object types. When the user selects a type from the list box and clicks OK, an object of the selected type is created and embedded.
![]() More Information
More Information
For more information about type names and the registry, see Chapter 11, "Integrating with the System."
The user can also create an embedded or linked object from an existing file by using the Create from file and Link options. When the user chooses these options and clicks OK, the result is the same as directly copying or linking the selected file.
When the user chooses the Create from file option, the Object type list is removed, and a text box and Browse button appear in its place, as shown in Figure 12.7. Ignore any selection formerly displayed in the Object type list box.
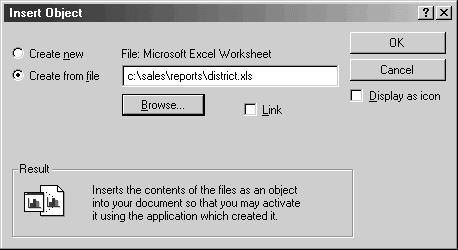
Figure 12.7 Creating an embedded object from an existing file
The text box initially includes the current folder as the selection. The user can edit the current folder path when specifying a file. As an alternative, the Browse button displays an Open dialog box that allows the user to navigate through the file system to select a file. Use the file's type to determine the type of the resulting object.
Use the Link check box to support the creation of a link to the file specified. The Insert Object dialog box displays this option only when the user chooses the Create from file option. This means that a user cannot insert a linked object when choosing the Create new option, because linked objects can be created only from existing files.
The Display as icon check box in the Insert Object dialog box enables the user to specify whether to display the object as an icon. When the user chooses this option, the icon appears below the check box. A linked object displayed as an icon is the equivalent of a shortcut icon. It should appear with the link symbol over the icon.
![]() Note
Note
If the user chooses to insert a non-OLE file, it can be inserted only as an icon. The result is a package. A package is an encapsulation of a file so that it can be embedded in a container. Because packages support limited editing and viewing capabilities, support OLE for all your object types so they will not be converted into packages.
At the bottom of the Insert Object dialog box, text and pictures describe how the object will be inserted. The following table outlines the syntax of descriptive text to use in the Insert Object dialog box.
| Text for Insert Object Dialog Box | ||
|---|---|---|
| Function | Resulting text | |
| Create a new embedded object based on the selected type. | "Inserts a new Type Name into your document." | |
| Create a new embedded object based on the selected type and display it as an icon. | "Inserts a new Type Name into your document as an icon." | |
| Create a new embedded object based on a selected file. | "Inserts the contents of the file as an object into your document so that you can activate it using the application that created it." | |
| Create a new embedded object based on a selected file (copies the file) and display it as an icon. | "Inserts the contents of the file as an object into your document so that you can activate it using the application that created it. It will be displayed as an icon." | |
| Create a linked object that is linked to a selected file. | "Inserts a picture of the file contents into your document. The picture will be linked to the file so that changes to the file will be reflected in your document." | |
| Create a linked object that is linked to a selected file and display it as a shortcut icon. | "Inserts a shortcut icon into your document that represents the file. The shortcut icon will be linked to the original file, so that you can quickly open the original from inside your document." | |
You can also use the context of the current selection in the container to determine the format of the newly created object and the effect of its being inserted into the container. For example, if the user selects data in a table and then inserts a graph, you could use the selected data to format the graph. Use the following guidelines to support predictable insertion:
![]() More Information
More Information
For more information about the guidelines for inserting an object with a Paste command, see Chapter 6, "General Interaction Techniques."
After inserting an embedded object, activate it for editing. However, if the user inserts a linked object, do not activate the object.
The Insert Object command provides support for inserting all registered objects. You can include additional commands tailored to provide access to common or frequently used object types. You can implement these as additional menu commands or as toolbar buttons or other controls. These buttons provide the same functionality as the Insert Object dialog box, but perform more efficiently. Figure 12.8 illustrates two examples. The user clicks the drawing button to insert a new blank drawing object; the user clicks the graph button to create a new graph that uses the data values from a currently selected table.
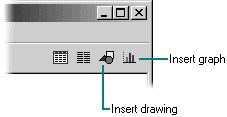
Figure 12.8 Using toolbar buttons to create new objects
Fundamentals of Designing User Interaction
Design Specifications and Guidelines