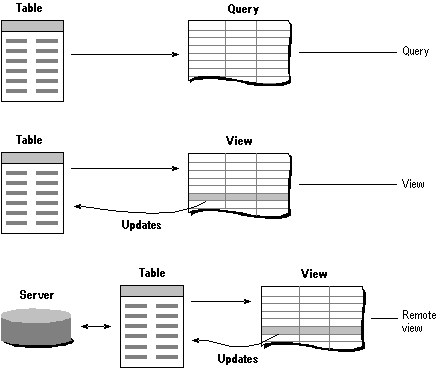
To extract a set of records from a table, make changes to those records, and send the updates to the source tables, you can use a view. You can create views from local tables, from other views, from tables stored on a server, or from remote data sources, such as Microsoft® SQL Server, via ODBC. You can even have Visual FoxPro send updates to the source table when you update or change the set of records in the view.
This chapter covers creating simple, single-table local and remote views. For information about creating complex views and combining local and remote data in a single view, see Chapter 6, Querying and Updating Multiple Tables.
This chapter discusses:
Creating queries and views are similar processes. The main difference is that views can be updatable, while queries are not. Use queries when you want to display a set of records that are read-only. Queries are a SQL - SELECT statement saved as text in a .qpr file; use views when you want to extract an updatable set of data from local or remote tables.
Queries, views, and remote views

For example, you can display, but not update, the records retrieved by a query. But when you edit the records in a view, you can have the changes sent to the source table, updating it.
Views are a feature of Visual FoxPro databases. You can only use views when their parent database is open.
You can create local and remote views with a view wizard. To set up an updatable view using tables on an ODBC data source, use the Remote View Wizard.
To create a view with a wizard
To create a view of a local table, use the View Designer. Local tables can include native Visual FoxPro tables, any tables in a .dbf format, and tables stored on local servers.
To use the View Designer, first create or open a database. When you expand the plus sign next to the name of a database in the Project Manager, the Data tab shows you the components of the database.
Local views are stored in the database.
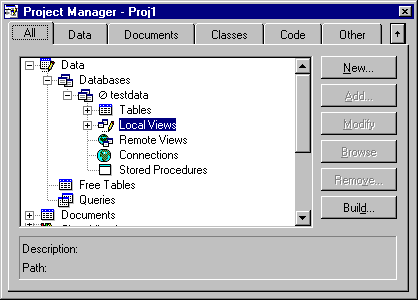
To create a local view
The View Designer appears, showing the table or view you selected.
You can also start a view by choosing New from the File menu and choosing View.
View Designer for a local view
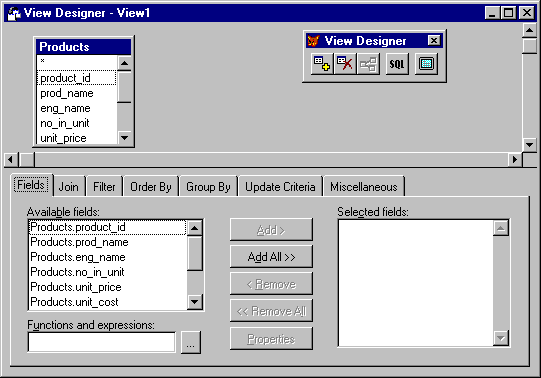
Using the View Designer is essentially the same as using the Query Designer. However, the View Designer has an extra tab — the Update Criteria tab — where you can control how updates are made. For more information about using the Update Criteria tab, see Updating Data later in this chapter. For more information about using the Query Designer, see Chapter 4, Retrieving Data.
With remote views, you can extract a subset of the data on a remote ODBC server without having to download all the records to your local computer. You can work on the selected records locally, then send the changes or additions you make back to the remote data source.
You can connect to a remote data source in one of two ways. You can directly access any ODBC data sources registered on your computer or you can design custom connection using the Connection Designer.
ODBC is installed on your system when you choose the Complete or Custom installation option of Visual FoxPro. For more information about registering ODBC data sources, see Chapter 1, Installing Visual FoxPro, in the Installation Guide.
If you want to create a customized connection for a server, use the Connection Designer to create or customize a connection. The connections you create are saved as part of the database and contain information about how to access a specific data source.
Connection Designer
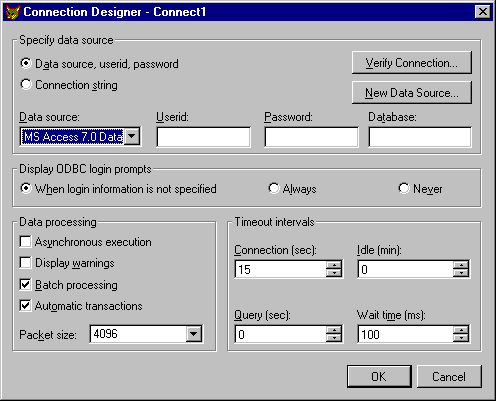
You can set connection options to save and name the connection for future use. You might have to consult your system administrator or server documentation to find the right settings for connecting to your particular server. Connection Designer settings are described in more detail in Chapter 8, Creating Views, in the Programmer’s Guide.
Note Before you can create a connection, you must have a database open.
To create a new connection
You can also create a connection by choosing New from the File menu and selecting the Connection option.
To gain access to your remote data in a view, you can use an existing connection or create a connection to use with your new view.
To create a new remote view
-or-
If you have previously defined and saved a connection, select the Connections option.
You can also choose New from the File menu and select the Remote View option.
Once the connection is established, the Open dialog box appears so you can select a table on the remote server.
Tables on a remote server
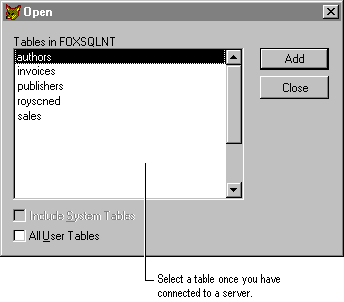
After you select a table, the View Designer appears.
View Designer for a remote view
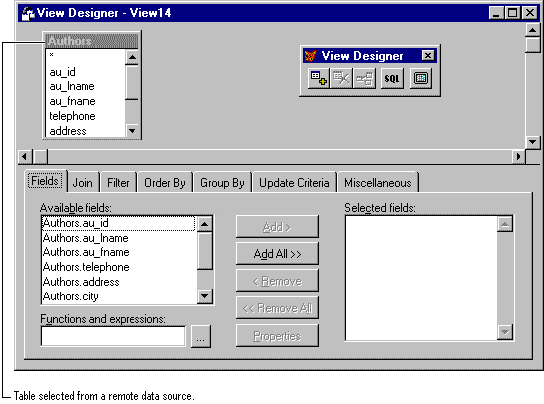
To continue creating your remote view, you can select output fields and set filters just as you would a local view.
You can use either local or remote views to update your tables.
In the View Designer, the Update Criteria tab allows you to control how the changes you make to remote data (updates, deletes, and inserts) are sent back to the remote data source. You can also enable and disable updating for specific fields in the tables and set the SQL update method appropriate to your server.
If you want to have the changes you make to the local version of a table sent back to the source table, you need to set the Send SQL Updates option. You must set at least one key field to use this option. If the table you select has a primary key field defined and you have selected it in the Fields tab, the View Designer automatically uses the primary key field for the table as a key field for the view.
To enable updating of source tables
When you first open a table in the View Designer, the Update Criteria tab shows which fields in the table are defined as key fields. Visual FoxPro uses key fields to uniquely identify the update records in remote tables that you have modified locally.
To set a key field
Setting key fields in the Update Criteria tab
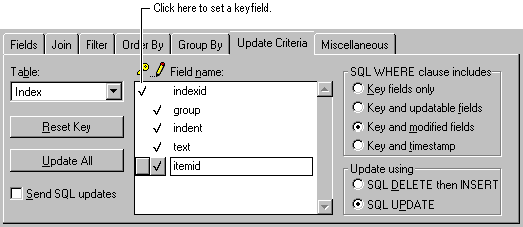
If you have changed the key fields and want to restore them to the original setting in the source table, choose Reset Key. Visual FoxPro will check the remote tables and use the key fields from those tables.
You can specify that only certain fields in any given table are updatable. You must have a key field defined for a table in order to make any fields in that table updatable. If fields are not marked as updatable, users can make changes to the field in a form or Browse window, but these changes are not sent to the remote table.
To make a field updatable
Making a field updatable in the Update Criteria tab
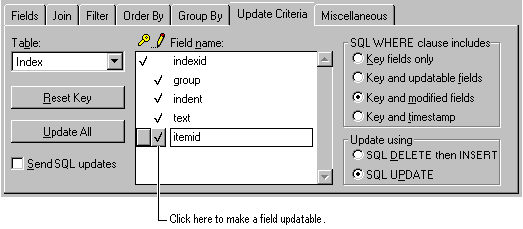
If you want to be able to make changes to all the fields in a table, you can set all the fields in a table as updatable.
To make all fields updatable
Note You must have a key field defined in a table in order to use Update All. Key fields are not affected by Update All.
If you are working in a multiuser environment and using data accessible to others on a server, it is possible that others are attempting to make changes to the records on the remote server at the same time you are. To have Visual FoxPro check if data you are working with in a view has been changed by another user before you attempt to update it, use the options in the Update Criteria tab.
The options in the SQL WHERE Clause Includes box in the Update Criteria tab help you manage how records will be updated when multiple users might be accessing the same data. Before an update is allowed, Visual FoxPro checks specified fields in the remote data source table to see if they have changed since the record was retrieved into the view. If the records in the data source have changed, the update is not allowed.
Setting the SQL WHERE clause in the Update Criteria tab

These options determine which fields are included in the WHERE clause in the UPDATE or DELETE statement that Visual FoxPro sends to the remote data source or source table when you make changes to or delete records in the view. The WHERE clause serves to check if the data on the server has changed since you retrieved the record for use in your view.
| To… | Choose this SQL WHERE option… |
| Have the update fail if a key field has been changed in the source table | Key fields only |
| Have the update fail if any of the fields marked as updatable have been changed on the remote table | Key and updatable fields |
| Have the update fail if any fields you change locally have been changed on the source table | Key and modified fields |
| Have the update fail if the timestamp of the record on the remote table has changed since you first retrieved it (only available if the remote table has a timestamp column) | Key and timestamp |
For more information about detecting and resolving update conflicts, see Chapter 17, Programming for Shared Access, in the Programmer’s Guide.
You can customize views by defining how a field in a view displays, by controlling field display and data entry, by using expressions in views, by setting views up to prompt for values, and by setting advanced options to fine tune how data is exchanged with a server.
Because your view is part of a database, you can take advantage of some of the same properties that a database provides for fields in a table. For example, you can assign captions, enter comments, or set validation rules to control data entry.
To control field display and data entry
View Field Properties dialog box
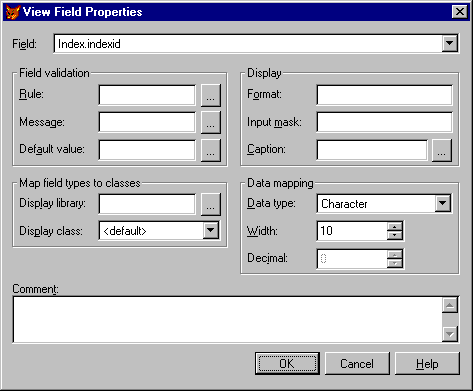
For more information about field validation, display, and mapping, see Chapter 7, Working with Tables, in the Programmer’s Guide.
To control how information in key fields is actually updated on the server, use the options in the Update Using option group. These options determine what SQL command is used in the update statement sent to the server or source tables when key fields in records are updated.
Update settings in the Update Criteria tab

You can specify that records be deleted and then replaced with the new values entered in the view (SQL DELETE then INSERT), or that server records be changed via the SQL UPDATE function supported by the server.
As with queries, you can include functions and expressions as filters in views.
To add an expression to a view
If you are basing a view on a remote data source, the functions shown in the Expression Builder reflect the functions supported by that server. Check your server documentation for a listing of the functions your server supports. Visual FoxPro does not attempt to parse the expressions you build; instead, it passes them on to the remote server.
You can set up views that prompt for the entry of a value to complete the query. For example, suppose you want to create a query to find customers located in a specific country. To do this, you need to define a filter on the country field and specify a parameter as the example in the filter. Parameter names can be any combination of alphabetic characters, numbers, and single quotes.
To set up a parameter for a view
Parameter value entered as part of a filter for a view
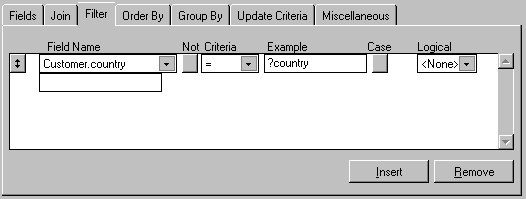
When you use the view, a message box appears prompting for a value to include in the filter.
If you need to adjust how Visual FoxPro interacts with your server, you can set timing options.
To set timeout intervals
For more information on setting timing options, see Connection Designer.
You can optimize your views by setting data fetching and performance options. Use the Advanced Options dialog box to fine tune how records are retrieved in a view or how updates are made to the server or source tables.
Advanced Options dialog box
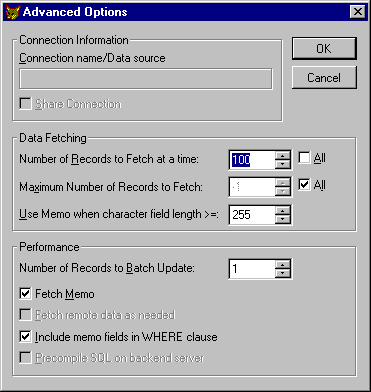
To set advanced options
For more information about optimizing your views, see Chapter 8, Creating Views, in the Programmer’s Guide.