You can easily create event-driven, object-oriented applications one piece at a time. This modular approach allows you to verify the functionality of each component as you create it. After you've created all the functional components, you can compile them into an application, which assembles the executable components of your project — forms, reports, menus, programs, and so on — into a single file that you can distribute to your users along with your data.
To quickly create a complete project with Application Framework, you can use the Application Wizard. After the project is created, the new Application Builder opens so you can add a database, tables, reports, and forms.
This chapter describes how to build a typical Visual FoxPro application. For more information about the process of developing Visual FoxPro applications, see Chapter 2, Developing an Application, and Chapter 14, Testing and Debugging Applications. If you want to distribute your application, see Part 8, Distributing Applications.
The application building process requires:
A typical database application consists of data structures, a user interface, query options, and reporting capabilities. To design the structure of your application, carefully consider the function each component provides and its relationship to other components.
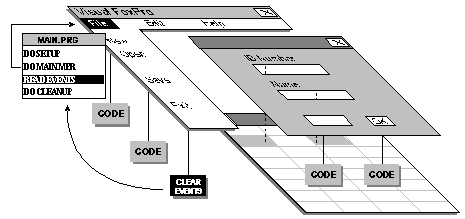
An assembled Visual FoxPro application typically presents a user with a menu and one or more forms for entering or displaying data. You provide functionality and maintain data integrity and security by attaching code to certain events. Queries and reports allow your users to extract information from the database.
Structure of a typical Visual FoxPro application

When structuring your application, you need to consider the following tasks:
The following sections provide details about each of these tasks. Typically you would create an application object to complete these tasks; see the Tasmanian Traders sample application located in the Visual Studio …\Samples\Vfp98\Tastrade directory for an example of this technique. Also, if you use the Application Wizard to compile your application, it creates an application object. Or, if you want, you can use a program as the main file that handles these tasks. For more information, see “Structuring a Program as a Main File”.
You link each component together and set a starting point for your application with a main file. The main file serves as the execution starting point for your application, and can consist of a program or form. When users run your application, Visual FoxPro launches the main file for your application, which in turn runs all other components as needed. All applications must have a main file. Usually, the best choice is to create a main program in your application. However, you can combine the functionality of the main program and the initial user interface by using a form as the main program.
If you use the Application Wizard to create your application, you can allow the wizard to create a main file program for you. You don't need to specify a main file yourself unless you want to change the main file after the wizard is done.
To set the starting point for an application
Note The file that you set as the application’s main file is automatically marked as included so that it is treated as read-only after you compile the application.
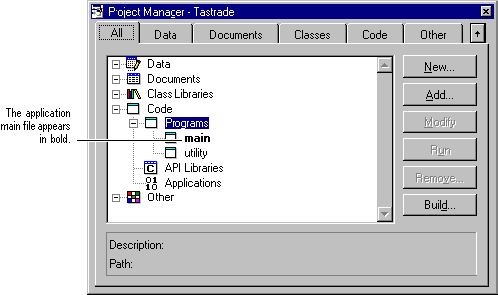
Only one file in the project can be set as the main file. The main file is displayed in bold type, as shown in the following illustration.
Setting a main file in the Project Manager

The first task that a main file or application object must accomplish is to set up your application’s environment. The default Visual FoxPro development environment establishes certain values of SET commands and system variables when Visual FoxPro opens. However, these settings might not be the best environment for your application.
Tip To see the default values of the Visual FoxPro development environment, start Visual FoxPro without a configuration file by typing VFP -C and then issue the DISPLAY STATUS command.
It is always a good idea to save the initial environment settings and set up a specific environment for your application in your setup code.
To capture commands for the current environment
In an environment specific to your application, you might want to include code to:
For example, if you wanted to test the default value of the SET TALK command, store the value, and set TALK to OFF for your application, you could place the following code in your setup procedure:
IF SET('TALK') = "ON"
   SET TALK OFF
   cTalkVal = "ON"
ELSE
   cTalkVal = "OFF"
ENDIF
It is usually a good idea to save default settings in public variables, in a custom class, or as properties of an application object so that you can restore these values when quitting the application.
SET TALK &cTalkVal
The initial user interface can be a menu, form, or any other user component. Often, an application will display a sign-on screen or logon dialog box before displaying the opening menu or form.
You can initiate the user interface in the main program by using a DO command to run a menu or a DO FORM command to run a form.
Once the environment is set up and you've displayed the initial user interface, you're ready to establish an event loop to wait for user interaction.
To control the event loop
It is important to place the READ EVENTS command correctly in your main file, because all processing in the main file is suspended from the time the READ EVENTS command is executed until a subsequent CLEAR EVENTS command is issued. For example, you might issue a READ EVENTS command as the last command in an initialization procedure, executed after the environment has been initialized and the user interface displayed. If you don't include the READ EVENTS command, your application will return to the operating system after running.
After the event loop has been started, the application is under the control of the user interface element that was last displayed. For example, if the following two commands are issued in the main file, the application displays the form Startup.scx:
DO FORM STARTUP.SCX
READ EVENTS
If you don't include a READ EVENTS command or its equivalent in your main file, your application will run properly from the Command window within the development environment. However, when you run it from your menu or main screen, the application will appear briefly, then quit.
Your application must also provide a way to end the event loop.
To terminate the event loop
Typically, you issue the CLEAR EVENTS command from a menu or a button in a form. The CLEAR EVENTS command suspends the event processing for Visual FoxPro and returns control to the program that issued the READ EVENTS command that started the event loop.
For a simple program example, see Structuring a Program as a Main File later in this chapter.
Caution You need to establish a way to exit the event loop before you start it. Make sure your interface has a mechanism (such as an Exit button or menu command) to issue the CLEAR EVENTS command.
To restore the original value of saved variables, you can macrosubstitute them into the original SET commands. For example, if you saved the SET TALK setting into the public variable cTalkVal, issue the following command:
SET TALK &cTalkval
Note Variable names used with macro substitution shouldn't contain the “m.” prefix because the period assumes a variable concatenation and will produce a syntax error.
If you initialized the environment in a different program than the one in which you are restoring it — for example, if you initialize by calling one procedure, but restore the environment by calling another — be sure you can access the values you stored. For example, store the values to restore in public variables, custom classes, or as properties of an application object.
If you use a program (.prg) file as the main file in your application, you must be sure that it includes commands to handle the tasks associated with major application tasks. The main file doesn't have to issue commands directly to accomplish all the tasks. For example, it is common to call procedures or functions to handle tasks such as initializing the environment and cleaning up.
Note If you used the Application Wizard and allowed it to create the program Main.prg, you can modify the program the wizard created instead of creating a new one. The wizards uses a special class to define an object for the application. The main program includes sections to instantiate and configure the object.
To build a simple main program
For example, your main program might look like this:
| Code | Comments |
|
Call program to set up environment (store values in public variables) |
|
Display menu as initial interface |
|
Establish event loop. A different program (such as Mainmenu.mpr must issue a CLEAR EVENTS command) |
|
Restore environment before quitting |
A Visual FoxPro project consists of separate components that are stored as individual files. For example, a simple project might consist of forms (.scx files), reports (.frx files), and programs (.prg and .fxp files). In addition, a project usually has one or more databases (.dbc files), tables (stored in .dbf and .fpt files) and indexes (.cdx and .idx files). To be included in an application, a file has to be added to your project. That way, when you compile your application, Visual FoxPro can include the files for that component in the finished product.
You can easily add files to a project in a number of ways:
If you’ve used the Application Wizard or Project Manager to create the files, you usually don’t need to do anything else — the file is automatically included in the project. One exception, however, is if your application includes a file that will be modified by the user. Because included files are read-only, you must mark the file as excluded. For details, see Referencing Modifiable Files later in this chapter.
Tip For a list of file types and extensions used in Visual FoxPro, see File Extensions and File Types.
If an existing file is not already part of your project, you can add it manually.
To add a file to a project manually
Visual FoxPro also adds files to your project if you reference them in a program or form. For example, if a program in your project includes the following line, Visual FoxPro adds the file Orders.scx to your project:
DO FORM ORDERS.SCX
If a file is referenced in this way, it is not immediately included in a project. Later, when you build the project, Visual FoxPro resolves references to all files and automatically includes implicit files in the project. Additionally, if any other file is referenced through user-defined code within the new file, building the project will also resolve that reference and include the file. The referenced files appear in the Project Manager the next time you view the project.
Important Visual FoxPro might not be able to resolve references to picture (.bmp and .msk) files, depending on how they are used in code. Therefore, add pictures to your files manually. In addition, Visual FoxPro cannot automatically include files that are referenced using macro substitution, because the name of the file is not known until the application is running. If your application references files using macro substitution, include the referenced files manually.
When you compile a project into an application, files included in the project are assembled into a single application file. After the project is built, files in the project that are marked “included” become read-only.
Often, files that are part of your project, such as tables, are intended to be modified by users. In those cases, you should add the files to your project but mark them as excluded. Excluded files are still part of your application, so Visual FoxPro still tracks them as part of your project, but they are not compiled in the application file, so users can update them.
Note Tables are marked as excluded by default, because Visual FoxPro assumes that tables will be modifiable in an application.
As a general rule, files containing executable programs (forms, reports, queries, menus, and programs) should be included in the application file, and data files should be excluded. However, you should determine whether to include or exclude files based on your application requirements. For example, a table that contains sensitive system information or information used only for lookup can be included in the application file to protect it from inadvertent change. Conversely, you might exclude a report (.frx) file if your application allows users to change it dynamically.
If you exclude a file, you must make sure that Visual FoxPro can find the excluded file when the application runs. For example, when a form references a visual class library, the form stores a relative path to that library. If you include the library in the project, it is made part of the application file, and the form will always be able to locate the library. However, if you exclude the library, the form must search for the library using the relative path or the Visual FoxPro search path (as set using the SET PATH command). If the library is not in the expected locations — for example, if you have moved the library since creating the form — Visual FoxPro displays a dialog box asking the user to locate the library. You might not want users to see this dialog box. To be safe, include all files that don't need to be updated by users.
Note You cannot include application (.app) files, and you should choose to exclude library files (.ocx, .fll, and .dll).
To exclude modifiable files
If the file is already excluded, the Exclude command is not available; the Include command appears in its place.
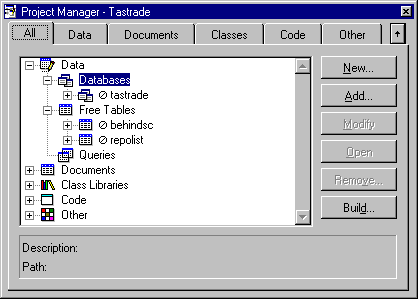
Excluded files have the Æ symbol to the left of their names.
Note Files marked as main files cannot be marked as excluded. For details about main files, see Setting the Starting Point earlier in this chapter.
Tables marked as excluded in a project

Tip To view all project files at once, choose Project Info from the Project menu and select the Files tab.
The final step in compiling a project is to build it. The end result of this process is a single file that includes all the files referenced in your project into a single application file (except those marked as excluded). You can distribute the application file along with the data files (and any other files you’ve excluded from the project) to your users, who can then launch the file to run your application.
The steps involved in creating an application from your project are:
To verify references and check that all components are available, you can test the project. To do so, you rebuild the project, which forces Visual FoxPro to resolve file references and to recompile files that are out of date.
To test a project
-or-
For example, to build a project named Myproj.pjx, type:
BUILD PROJECT myproj
If errors occur during the build process, they are collected into a file in your current directory with the name of your project and an .err extension. The compilation error count is displayed on the status bar. You can also see the error file immediately.
To display the error file immediately
After the project has been built successfully, you should try to run it before creating an application.
To run the application
-or-
DO MAINPROG.PRG
If the program runs properly, you're ready to build an application file that will contain all the files included in the project.
You should repeat the steps of rebuilding and running your project as you add components to your project. Unless you choose Recompile All Files in the Build Options dialog box, only files that have been modified since the last build are recompiled.
To create a finished file from your application, you build it into an application file. An application file has an extension of .app. To run the application, users first start Visual FoxPro, then load the .app file.
You can choose to build either an application (.app) or an executable (.exe) file from your project. Users can run an .app file if they already have a copy of Visual FoxPro. Alternatively, you can create an .exe file. The .exe file works in conjunction with two Visual FoxPro dynamic link libraries (Vfp6r.dll and Vfp6enu.dll) that you ship with your application to provide a complete run-time environment for Visual FoxPro. The second file is specific to the region of the world your application targets. For more information, see Part 8, Distributing Applications.
To build an application
-or-
For example, to build an application called Myapp.app from a project named Myproj.pjx, you can type:
BUILD APP myapp FROM myproj
To create an application called Myapp.exe from a project named Myproj.pjx, you can type:
BUILD EXE myapp FROM myproj
Note You can also use the Build dialog box to create an Automation server from your Visual FoxPro application. For more information, see Creating Automation Servers in Chapter 16, “Adding OLE.”
After you've created a finished application file for your project, you and your users can run it.
To run an application as an .app file
-or-
For example, to run an application called MYAPP, type:
DO myapp.app
If you have created an .exe file from your application, users can run it in a variety of ways.
To run an application as an .exe file
For example, to run an .exe file called Myapp.exe, type:
DO myapp.exe
-or-
Note You can use the Setup Wizard to create an installation routine that installs the appropriate files.