Click to return to the Microsoft FrontPage home page    
Automatic Spelling Checks     Creating a Photo Album    
Web Workshop  |  Languages & Development Tools  |  Microsoft FrontPage

Lesson 1: Building a New Web Site


Designing a Page

The Background page will inherit its formatting from a graphical theme that you will apply to the Millennium Celebration Web later, in Lesson 2. The Destinations page, however, requires some more design work.

To help the reader differentiate the paragraph headings, list of travel destinations, and event details that the text on this page talks about, you will add some pictures, format paragraph styles, and create a bulleted list.

To create a bulleted list

FrontPage Tip In the Answer Wizard, type:
How do I make a list?
  1. With the Destinations page still displayed in Page view, find the words "Times Square in New York."
  2. Use the scroll bar to bring the entire list of destinations into view, beginning with "Times Square in New York" and ending with "The Acropolis in Greece."
  3. Click just to the left of the letter T in "Times Square," hold down SHIFT, click just after the word "Greece," and then release SHIFT.
    Bullets button Bullets button
  4. On the toolbar, click the Bullets button.

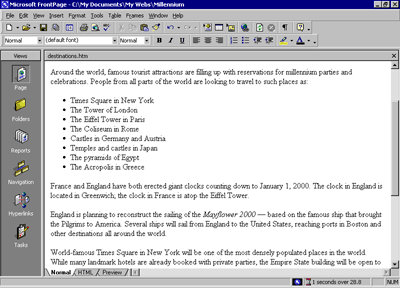
    FrontPage converts the selected text to a bulleted list.

  5. Click anywhere on the page to deselect the list.

Your page should now look like this:
Constructing the Destinations page

You can also create numbered lists with FrontPage. When you add new items to a numbered list, FrontPage automatically numbers them sequentially. You can add to bulleted and numbered lists by pressing ENTER after an item in the list. To end a list, press ENTER twice after typing the last list item.

Next, you will place four pictures on the current page and use positioning features in FrontPage to align the pictures with the paragraphs they are associated with. This will create a more interesting page layout.

To position pictures with text

  1. With the Destinations page still displayed in Page view, scroll down to the words "France and England" in the paragraph just following the list.
    Insert Picture from File button Insert Picture From File button
  2. Click just to the left of the letter F in "France," press HOME, and then click the Insert Picture From File button on the toolbar.

    When you last inserted a picture, you did not have a Web site open, and FrontPage automatically displayed the Select File dialog box. Now that a Web site is open, FrontPage assumes you want to work with pictures that are already part of your Web site, and therefore displays the Picture dialog box.

    Select File button Select File button
  3. Because you haven't yet added the picture you want to the current Web site, click the Select File button in the Picture dialog box.

    FrontPage displays the Select File dialog box.

  4. Click the file named paris, and then click OK.

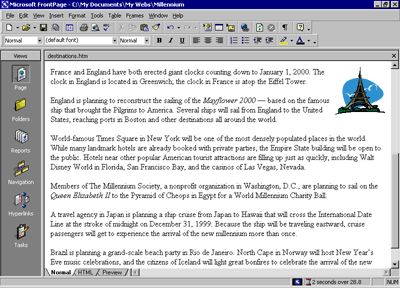
    FrontPage inserts a picture of the Eiffel Tower in Paris just before the current paragraph.

  5. Next, click the picture of the Eiffel Tower to select it.
    FrontPage Tip In the Answer Wizard, type:
    How can I position objects on a page?
  6. On the Format menu, click Position.

    FrontPage displays the Position dialog box.

  7. Under Wrapping style, click Right, and then click OK.

    The picture is aligned with the right margin of the current page and the text now flows around it.

  8. On the toolbar, click the Save button to save changes to the Destinations page.
  9. In the Save Embedded Files dialog box, click OK.

Your page should now look like this:

Constructing the Destinations page

You can either place pictures one by one in this way, or you can import all the pictures you will use on your pages all at once. While importing single files is done in Page view, inserting a group of files or entire folders is done in Folders view.

To add a group of files to the current Web site

Folders icon Folders icon
  1. Click the Folders icon on the Views bar to switch to Folders view.

    Folders view is an expanded view of the Folders List that you have seen in Navigation and Page view. Similar to the way you look at files in Windows Explorer, here you can view details about the files and folders in your Web site, and perform such file management tasks as adding, deleting, moving, copying, and renaming files.

    FrontPage Tip In the Answer Wizard, type:
    How can I add files to my Web site?
  2. On the File menu, click Import.

    FrontPage displays the Import dialog box. Here, you can add files and folders from your local file system, a local area network, a company file server, or a resource on the Internet or World Wide Web, such as an FTP server.

  3. In the Import dialog box, click Add File.
  4. In the Add File to Import List dialog box, navigate to the folder named Program Files\Microsoft Office\Office\Tutorial by double-clicking each folder in this path until the Look in box displays the Tutorial folder.
  5. Next, click the Files of type list, and then click GIF and JPEG (*.gif, *.jpg) to display all picture files in the Tutorial folder.
  6. Click the file named firewks1 in the list to select it.
  7. Next, hold down CTRL, and while doing so, click to select the files named firewks2, firewks3, firewks4, japan, london, and sanfran.

    FrontPage supports standard Windows file selection methods.

  8. When the files are selected in the Add File to Import List dialog box, release CTRL, and then click Open.

    FrontPage adds the pictures you selected to the list in the Import dialog box.

  9. Click OK to import the listed files to the current Web site.

Now that the remaining pictures are added to your Web site, it's time to finish the layout of the Destinations page.

To finish the page layout

  1. Click the Page icon on the Views bar to return to Page view.
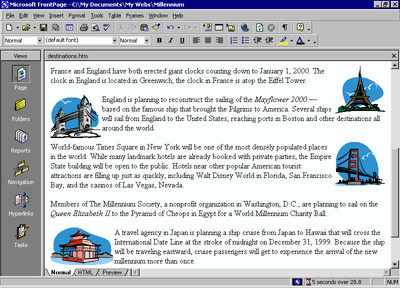
  2. Locate the sentence beginning with "England is planning to reconstruct . . .," click just to the left of the letter E in "England," and then click the Insert Picture From File button on the toolbar.
  3. In the Picture dialog box, note that your previously imported pictures are now available, and then select the file london.gif from the list.

    When you click a single picture file in the Picture dialog box, FrontPage displays a preview of the picture, so you can make sure it's the one you want to insert. This is one of the benefits of adding all your pictures to the Web site before inserting them on your pages.

    The Picture dialog box also links to the clip art gallery that is included with FrontPage. And if you have a scanner or a digital camera, you can click the Scan button in this dialog box to acquire original pictures from those sources.

  4. Click OK to insert the picture
    Align Left button Align Left button
  5. Click the picture of the Tower of London you just inserted, and then click the Align Left button on the toolbar to position the picture in the left margin and make the text wrap around it.
  6. Next, scroll down to the sentence beginning with "World-famous Times Square . . .," click just to the left of the letter W in "World-famous," and then click the Insert Picture From File button on the toolbar.
  7. Select the file sanfran.gif from the list, and then click OK.
    Align Right button Align Right button
  8. Click the picture of the Golden Gate Bridge, and then click the Align Right button on the toolbar to position the picture in the right margin and make the text wrap around it.
  9. Finally, scroll down to the sentence beginning with "A travel agency in Japan . . .," click just to the left of the letter A at the beginning of the sentence, and then click the Insert Picture From File button on the toolbar.
  10. Double-click the file japan.gif on the list.
  11. Click the picture of the Japanese temple, and then click the Align Left button on the toolbar to position the image in the left margin and make the text wrap around it.

Your page should now look like this:
Constructing the Destinations page

Positioning pictures and other page elements around text on your page makes for a more interesting design, much like pages in a magazine or newspaper. By positioning pictures in the margin, your page layout will be preserved even when the page is viewed at a different screen size and resolution in a Web browser.

To finish the Destinations page, you will create a feedback form so that you can interact with site visitors who want to participate. A feedback form can be used to collect comments and information from people visiting your Web site.

To create a feedback form

  1. In Page view, press CTRL+END to quickly jump to the bottom of the current page, or scroll all the way down using the scroll bar.
  2. On the new, blank line, type Tell Us Where You'll Be! and then press ENTER.
  3. On the next line, type Do you have great travel plans for a millennium party? Then tell us about them below!
  4. Press ENTER to create a new line.
    FrontPage Tip In the Answer Wizard, type:
    How do I design a form?
  5. On the Insert menu, point to Form, and then click Form.

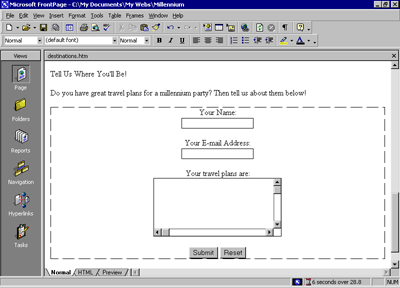
FrontPage inserts a new form on the current page. The dashed lines indicate the form's boundary. By default, a new form contains Submit and Reset push buttons.

Next, you will customize the default form by adding form-fields and form-field labels, to let site visitors know what kind of information you want them to enter into the form.

To customize the form

Center button Center button
  1. With the cursor still positioned to the left of the Submit button, click the Center button on the toolbar, and then press ENTER to add some space to the form.
  2. Press the UP ARROW key on your keyboard to return the cursor to the beginning of the form.

    FrontPage moves the cursor to the middle of the first line of the form.

  3. On the first line, type Your Name: and then press SHIFT+ENTER.

    Holding SHIFT while pressing ENTER creates a line break. Line breaks are useful for spacing lines of text more closely together than standard paragraph spacing.

  4. On the Insert menu, point to Form, click One-Line Text Box, and then press ENTER.

    FrontPage inserts a one-line text input field into the form.

  5. On the next line, type Your E-mail Address: and then press SHIFT+ENTER.
  6. On the Insert menu, point to Form, click One-Line Text Box once more, and then press ENTER.
  7. On the next line, type Your travel plans are: and then press SHIFT+ENTER.
  8. On the Insert menu, point to Form, and then click Scrolling Text Box.

    FrontPage inserts a scrolling text input field into the form.

  9. Double-click the scrolling text box you just inserted.

    FrontPage displays the Scrolling Text Box Properties dialog box. Here, you can change the appearance of the text box.

  10. In the Scrolling Text Box Properties dialog box, change the Width in characters to 30 and the Number of lines to 5, and then click OK.

    The scrolling text box has increased in size, which will encourage site visitors to write a little more than just a brief line of text about their New Year's plans.

    Now that your form and the Destinations page are finished, it's a good idea to save your work.

  11. On the toolbar, click the Save button to save changes to the Destinations page.

Your page should now look like this:

Constructing the Destinations page

Good work! The feedback form is finished and so is the Destinations page. In the next part of the lesson, we'll add the last two pages -- an online photo album and a list of links to your favorite sites on the World Wide Web.


Back to topBack to top

Did you find this material useful? Gripes? Compliments? Suggestions for other articles? Write us!

© 1999 Microsoft Corporation. All rights reserved. Terms of use.