![]()
This article assumes you're familiar with Active Server Pages and Microsoft Access 97
Download the code (75KB)
|
This article may contain URLs that were valid when originally published, but now link to sites or pages that no longer exist. To maintain the flow of the article, we've left these URLs in the text, but disabled the links.
|
|
Developing Workflow Apps for the Web
Alan Saldanha |
| Web-based workflow apps allow users from all over to collaborate on projects. See how you can use one to streamline a company's recruitment process using ASP and Microsoft Access 97. |
|
Workflow is any group of tasks performed in a series by two or more members of a workgroup to reach a common goal. You see it in all forms in offices—from the process of designing, developing, and testing
software to submitting expense reports to the accounting department through your supervisor. I'll show how you can use Active Server Pages (ASP) to develop workflow Web applications. I'll create an app that will streamline the process of recruitment within a company. It enables a hiring manager to create a job request through a browser interface, then forward it to a human resources manager, a recruiter, and a Web manager. When the process reaches the Web manager, he or she then selects a template file for the request's appearance and the location where the request needs to be posted (Internet, intranet, or both). The application will also track the progress of the request as it moves from one department to the next. At any time during the process, job request status can be verified by anybody in the company with access rights. It also keeps the job request editing process secure—only the person who is currently the owner of the process can edit it. The other parties involved in the process who are not current owners of the process can only view the job request. Here and in a future article, I will implement this job request app using two closely aligned Microsoft® Web application technologies. This article deals with the implementation using ASP and Microsoft Access 97. A future article will implement the job request app using Site Server Commerce Edition 3.0. In the Site Server implementation, I'll explain some of the issues I faced while migrating the application from ASP.
Application Overview
|
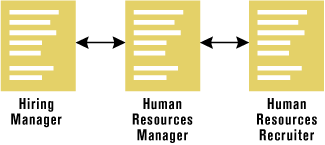 |
| Figure 1: Typical Recruiting Process |
|
Even if the process of paper form submission is supplemented or replaced by an email-based system, there are still drawbacks: the whole process is not managed efficiently, and at no point can a hiring manager (or anyone else) determine the status of a particular request without contacting other people involved in the process. The ASP-based workflow application automates the hiring process. The system builds on the simplicity of email, yet uses a database back end to act as a central repository of information. In this way, people not involved in the actual process (like the assistant to the VP of human resources) can get a snapshot of the process without having to contact anyone. The workflow application also facilitates the exchange of messages between the involved parties. For example, the human resources manager (who has no idea what "ASP" even stands for) could send the request back to the hiring manager with a note asking what "ASP" means. The messages exchanged between people involved in the process will be reflected in the tracking interface of the application, which also reflects the ownership of the process as it is transferred from one person to another. Access to job request information needs to be controlled. A single login ID/password authentication scheme would not work because only the person who currently owns the process should have access to update the job request record. For example, after a hiring manager submits a request successfully to a specific human resources manager, the ownership of the process is transferred there. At that point, the hiring manager should be able to view the request, but not edit it. I used a relatively simple scheme of generating random passwords for each person involved in the workflow process—the hiring manager, HR manager, recruiter, and Webmaster. Each person in the process only knew his or her password. If a valid ID and password are entered to access a job request, the record is displayed with a line at the top of the form to indicate who currently owns the process. For example, if the application request was with the Webmaster and the hiring manager wanted to view the information, the form displayed would include the line "A Webmaster has ownership of the process currently." Since at different stages of the process additional information is needed, the fields displayed in the HTML form depend on the current stage of the process. For example, when a Web manager edits a request he or she will have to select a template. As the process is transferred from one person to another, email is used to notify a person that a job request awaits his or her review. This can be generated with the Collaboration Data Objects (CDO). The HR manager can either send it back to the hiring manager with a note or forward the process to a specific human resources recruiter. The recruiter can then either send the process back to the human resources manager with a note or forward it to a person who manages the company's Web: the Webmaster or Web manager. The Webmaster can in turn send it back to the recruiter or have the job posted at the company's Web site or intranet, using a template to specify the appearance of the job posting.
Application Features
|
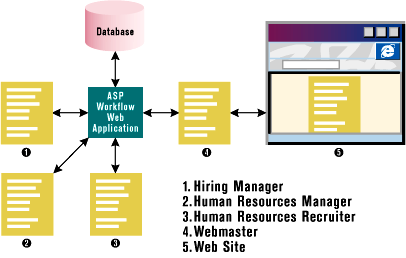 |
| Figure 2: Workflow Schematic |
|
A more detailed explanation of this process can be found in Figure 3. It shows who is involved at each stage, what the person needs to do at each stage, and what happens following the person's action. |
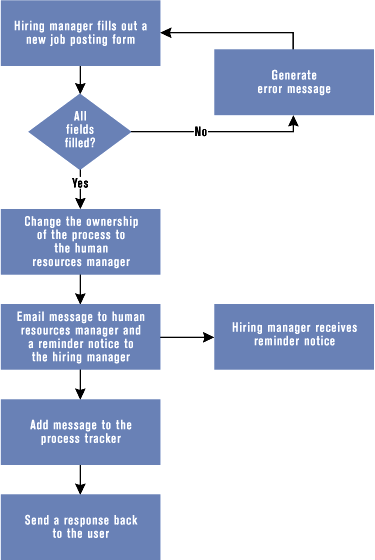 |
| Figure 4: Hiring Manager Places a Request |
|
Figure 4 illustrates the process that takes place at the first stage from the hiring manager to the human resources manager. Figure 5 illustrates what happens when the HR manager processes it.
Under the Hood
|
|
|
Three variables are used throughout the application, especially in Job_add_update.asp: mode, Stage, and OnlyView. Mode is left blank to denote that the user is adding a new record or set to "E" if the user is updating an existing record. Stage is used to denote the current stage of the application. The different stages are defined in the file utility.asp as indicated in Figure 7. The function SetFlowStatus (in WorkFlowFunction.asp) is used to change the ownership of the process by modifying the field WorkFlowStage in table TblWorkFlow. The variable OnlyView determines whether the data should be displayed in an HTML form (which can be used to update the information). Before I can use OnlyView in the rest of Job_add_update.asp, it needs to be set. The script in Figure 8, which appears close to the top of Job_add_update.asp, is used to get OnlyView. Depending on the parameters sent in—either by clicking on the link enclosed in the email message or using Job_Update.asp (which needs a job ID and password)—a SQL statement is developed and sent to the database. If the information finds no match (invalid job ID and password), the user is redirected to Error.asp. If the job ID and password are OK, a comparison is made with the WorkFlowStage value to set OnlyView as true or false. The value of OnlyView is then used to decide whether to display a form input element in Job_add_update.asp (see Figure 9). The same logic is used throughout Job_add_update.asp. The value of the HTML Submit button plays a very important role. It is only when a form is submitted by clicking a Submit button that x_job_add_update.asp is included in the execution of the script. Depending on the stage of the process, the button values could be any of those declared in utility.asp. |
|
| These values are treated like events, with a different section of the scripts run depending upon the event as indicated in the following code from x_job_add_update.asp: |
|
|
Error Checking
|
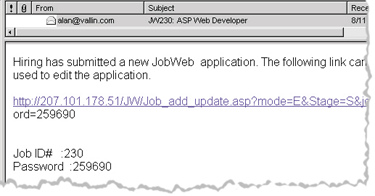 |
| Figure 10: Email Link to JobWeb Record |
|
How does a person go about editing or updating a job request? The human resources manager could access the record by clicking on a link provided in an email message. Since not all email clients support this, and the link line may not be continuous within the email (I could not figure out how to get over the limitation with the CDO component), the job ID and password are provided on separate lines (see Figure 10). The job ID and password can be entered in the Job Update form, which can be reached by clicking the Update Job Info button. Figure 8 covers the process involved when the email link is clicked, which in turn invokes Job_add_update.asp. However, when Job_Update.asp is used to edit or update the information, an additional twist is involved. When you click on the Update Job Info button, Job_Update.asp can only tell you whether the access is valid. It does not provide specific information about the role the person plays in the process relative to the current stage of the record. However, since the job ID/password pair is unique for each stage, it is easy to write the logic to determine is accessing the record, and then determine whether the person can edit the record or just view it. For example, if the hiring manager tries to access the record using a valid job ID and password (which is emailed to the hiring manager after a successful job request submission), the record would be displayed in a view mode (OnlyView set to true), as indicated in Figure 11. |
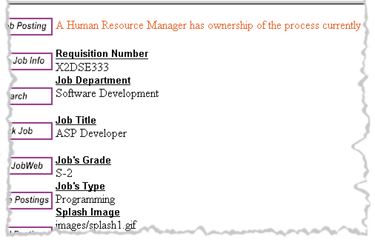 |
| Figure 11: View Mode |
|
The app also has to make sure that all the fields in the HTML form are filled out. This process could be carried out more efficiently with client-side scripting with either VBScript or JScript®. However, since I wanted to see how it could be done on the server with the Site Server package (especially within the pipeline), I opted to do the checking at the server. The general checking was done in the function CheckError (see Figure 12) in ErrorChecks.asp, with the resulting error message sent back to the user in Job_add_update.asp as indicated in the following code: |
|
|
Note that the form fields that need to be filled out will vary according to the stage of the process. For example, in the first stage of the process (hiring manager adding a new request), the name and email address need to be filled out for the hiring manager and human resources manager. This is done in CheckHiringInfo in ErrorChecks.asp.
Finishing the Process
|
|
|
As the process moves from one person to another, this record is updated using UpdateWorkFlowStage, with the fields being updated depending upon the stage in the process. The tracking information keeps track of not only who is sending information to whom, but when. It also saves the notes that are sent from one party to another during the process. The tracking information gives anybody within the company a snapshot of the process for a certain job request (see Figure 15). The function that adds the tracking information to TblTrack is AddToTrack in TrackFunctions.asp. It consists of a simple SQL INSERT statement. |
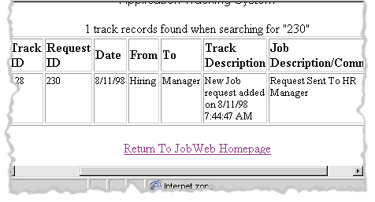 |
| Figure 15: Tracking Information |
|
After someone completes his or her step in the process, email is sent to the next owner in the chain. For example, when the Webmaster posts the application at the Web site, email is sent to the hiring manager, human resources manager, and human resources recruiter. All the email functions that are called from x_job_add_ update.asp can be found in EmailMessages.asp. I could have used general messages throughout for different stages, but I didn't. This was based on practical experience, after finding that users always want customized messages.
Response Message
|
| From the >November 1998 issue of Microsoft Interactive Developer. |