![]()
|
This article may contain URLs that were valid when originally published, but now link to sites or pages that no longer exist. To maintain the flow of the article, we've left these URLs in the text, but disabled the links.
|
|
Download the code (10KB) |
|
Enable Email in Your Web Application
Johnny Papa and Eric Wilson |
| With a few lines of ASP code, you can let users send email directly from your Web site, survey their interests, and track people who want to be on your mailing lists. |
|
So you want to know who's been visiting your Web site, do you? We'll not only show you how to track who came to your site, we'll also show you how to track why they came and what brought them there. We'll do this by demonstrating how to email-enable a Web site to send comments, questions, and survey information from a site's visitors to the Web administrator. We'll even track which users want to be on our email distribution list so we can contact them with periodic promotional offers and other information.
The Visitor Tracking application is a simple but powerful tool that we employ on our Web sites to allow visitors to better interact with us. It can also allow you to closely track specific areas of interest by asking visitors to fill out a very short but useful survey. There are some key pieces of functionality that you must master before you can implement such a site, including sending email across the Internet. Introducing CDONTS If you're looking for an easy way to send email over the Internet from your Web pages, look no further. Collaboration Data Objects for Windows NT® Server (CDONTS) and Simple Mail Transfer Protocol (SMTP) provide the interface and the means to send email from Active Server Pages (ASP) with only a few lines of code. The objects that comprise CDONTS are actually packaged with SMTP, so when installing the Windows NT Option Pack for Windows NT Server, you'll have to choose to install SMTP to get CDONTS. If you have had any experience with writing an email-enabled application, or even just trying to send email from a program, it probably hasn't been a good one. MAPI, the earlier standard, isn't exactly straightforward, so you won't be surprised that we are going to lead you away from that interface and steer you toward CDONTS.
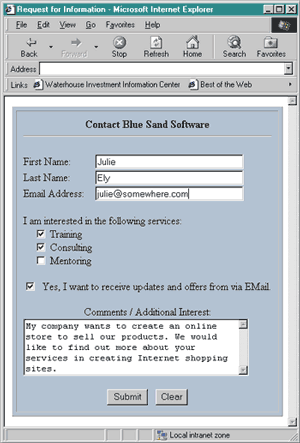
The Visitor Survey We set up a survey page that captures each visitor's information in a database (see Figure 1). This information is sent to an administrator, and a confirmation email is sent to the visitor. We can track any information gathered on this page, but we'll keep it simple here. |
 |
| Figure 1: Web Survey Page |
|
As you can see in Figure 1, the visitor is interested in finding out more about our training classes and consulting services. She has also specified that she is interested in how we could help her develop an online shopping cart application for her company. Once the visitor clicks the Send button, this information is stored in a database for the Web administrator to review. Email containing the information is sent to the Web administrator, and the user is also sent email, confirming the successful submission of the survey.
|
 |
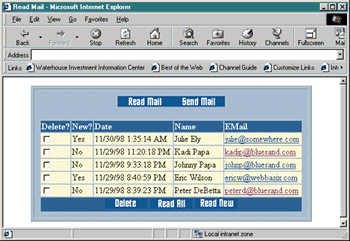
| Figure 2: Viewing Survey Results |
|
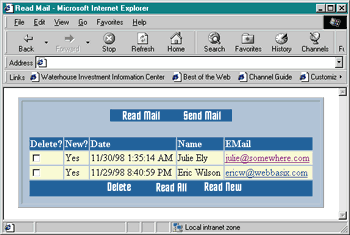
We decided to store the user's survey information in a database so we could keep the information in a more permanent form than email. This choice also allowed us to track the visitors that come to our site, how often they come, when they come, what they have to say, and so on. Figure 2 shows how you can view the results of the visitors' surveys. We set up several options to view the results. Read Mail lists the chosen surveys, Read All lists all the surveys, Read New lists only the new surveys, and Send Mail sends email to all visitors who have joined the distribution list. If we click on the Read New button, we will only see the new surveys that haven't been reviewed (see Figure 3). If we want to see a survey's details, we can simply click on the visitor's email address. We could also delete the surveys by checking the Delete checkbox and clicking the Delete button. |
 |
| Figure 3: Read New |
|
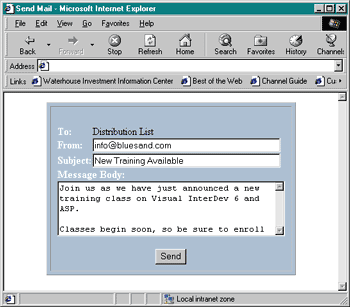
From this interface, we're able to send a message to our entire distribution list of willing visitors. Remember that the visitors were allowed to specify whether they'd like to receive any email when they were on the survey page. If we click on the Send Mail button, we go to the mass email page. Here
we can enter a subject, the from address to be used on the email message, and, of course, the message body itself (see Figure 4). |
 |
| Figure 4: Mass Email Page |
|
This application relies on email to communicate, but it also takes advantage of a database to store the surveys in persistent form. In fact, we could easily query the database on how many visitors inquired about our training services. Of course, the more extensive the survey, the more powerful the Visitor Tracking application becomes. Now that you've seen the application, let's take a look at the code. Go to the Code
We think you will be impressed by the simplicity of the code (this ain't brain surgery) and the scalability of the application. Once you see the code, you'll be thinking of how you can morph it to fit into your applications. Let's dig in by looking at the code for the Survey page. |
|
|
First, we create an instance of the CDONTS.NewMail object using the Server.CreateObject method. Then we set the To, From, Subject, and Body properties to their appropriate values. Finally, we issue the Send method to send email to the recipients, and then destroy the instance of the object. Here is where it gets a little tricky. The CDONTS.NewMail object's properties are designed to be write-only, single use. You can't read their values, and you can't overwrite them after you use them once. For these reasons, we can only use the object for a single email message. This is why we create a brand spankin' new NewMail object to send to the administrator. Don't get us wrong—you can send email to more than one recipient at once, but you can't reuse a NewMail object by putting it in a loop and changing the To property each time. To send mail to multiple recipients, you need to create and destroy the object each time. This is actually how we handled mass emailings, such as distribution lists—but now we're getting ahead of ourselves. We'll get to this topic a little further on. At this point, it is important to understand the basic properties and methods of the NewMail object. There are two pages that send the mass email messages to visitors on our distribution list. MakeMassEmail.htm (see Figure 4) submits its form data to SendMassEmail.asp (see Figure 8). Again, we create our ADO objects and connect to the database. Then we loop through the list of visitors that are on our distribution list. It is within this loop that we create the CDONTS.NewMail object, set its properties, send the email, and destroy it before we do it all over again for each visitor. We could have used some other properties of the NewMail object to get the job done without continually creating and destroying the NewMail objects. Instead, we could use the BCC property to specify the email addresses of the visitors, separated by semicolons, as shown in the following excerpt: |
|
|
This code is much more efficient in that it does not have to continually create and destroy the NewMail object. It does have some side effects. First, the recipients will not see an email address in the To field of their email. Also, you can't personalize email when you send the same message to everyone. These are minor setbacks that are usually acceptable. Keep in mind that we would probably not want to set the To property to specify all of the recipients. If we did, all of the recipients would see the other recipients' email addresses. Most people consider that an invasion of privacy. In large mailings, it also inflates the email's size drastically—what would have been a 1KB message can inflate to several hundred KB per person depending on how many names are listed on the To line. Most people really don't appreciate getting 500KB mail with only a few lines of content. Summing it Up
Using the CDONTS.NewMail object is an easy and powerful technique to solve the problem of email-enabling your Web applications. You can even attach files to messages using the AttachFile method. This is a quirky solution because developers using Windows® 95, Windows 98, and Windows NT Workstation cannot utilize these features on their workstations. To access AttachFile, you must have access to a Windows NT Server because CDONTS relies on the SMTP service to do its duty. This is usually an OK, but annoying situation. See the sidebar: SMPT |
From the February 1999 issue of Microsoft Internet Developer