![]()
This article assumes you're familiar with Active Server Pages and
VBScript
Download the code (439KB)
|
This article may contain URLs that were valid when originally published, but now link to sites or pages that no longer exist. To maintain the flow of the article, we've left these URLs in the text, but disabled the links.
|
|
Build a Better Web with Microsoft Exchange Server
Tom Rizzo |
| Build a custom Web solution with Microsoft Exchange Server and Outlook? It may sound impossible, but a suite of development tools makes it a great way to move your form-based workflow applications to your intranet. |
|
Can you name the Microsoft® product that allows you to build dynamic Web sites that include workflow, a rich user interface for Web forms, and a programming library to customize all of the functionality on your sites? Your first guess was probably not the answer you'll find in this article. Most people don't know that Microsoft Exchange Server is a very powerful Web tool for both intranet and Internet applications. Exchange Server, part of the BackOffice family of Windows® DNA server applications, provides an infrastructure and a programming environment that allows you to quickly build advanced functionality into your Web site. Let's look at some of the capabilities you can add to your site by using Microsoft Exchange Server.
The Solution: Job Candidate Tracking To help demonstrate some of the Web functionality of Microsoft Exchange Server, I've put together a quick Web solution that allows people to post and track job candidates. Through a Web interface, a user can enter information about a job candidate and her work history, and post the candidate's resume (see Figure 1). |
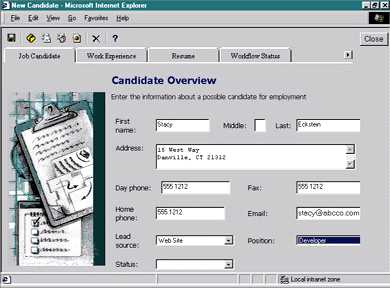 |
| Figure 1: Job Candidate Information Page |
After the user enters the candidate's information into the system, it's introduced into a predefined workflow, where human resources managers receive email on the candidate and can approve or reject them based on the available information. The user interface for the email received by a human resources manager is shown in Figure 2. If all of the managers approve the candidate, the candidate's information is forwarded to a recruiter who begins the hiring process. During the workflow process, human resources personnel or the user who entered the candidate information can track the status of who has approved or rejected the candidate, as shown in Figure 3.
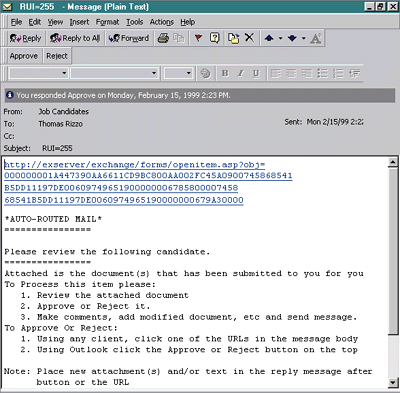 |
| Figure 2: Email Received by Human Resources Manager |
In order to let human resources personnel view the candidates, I built a Web interface for the job candidate system (see Figure 4). The interface lets a user sort and group candidates based on a number of criteria like position applied for, first name, or last name.
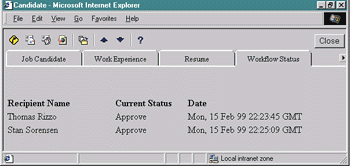 |
| Figure 3: Workflow Status |
Granted, this is not a very complex solution, but you'll still be amazed at how little time it took to build. In approximately two hours I had a working prototype, and within six hours the application was complete. Most of the solution was provided out of the box with Exchange Server. All I had to do was tweak and customize certain features to meet the needs of the application. Let's explore which Exchange Server technologies provided the basis for the solution and how to use these technologies in your own applications.
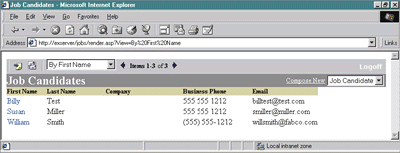 |
| Figure 4: Job Candidates Web Interface |
HTML Form Converter
When I built the job candidate application, I made a conscious decision that it should not be a pure Web-based solution, instead opting to make it a hybrid solution with the Web and Outlook®. I wanted to provide the same forms and functionality to Outlook users as to my Web users. The only difference is that if you're using Outlook, you can stay in the messaging client and still take advantage of the job candidate application.
With this plan in mind, I used an existing Job Candidates Outlook form as the basis for my application. The Outlook form provided a very good user interface as well as automatic data binding from the form to the underlying Exchange Server database, which holds the contact information for the job candidates (see Figure 5).
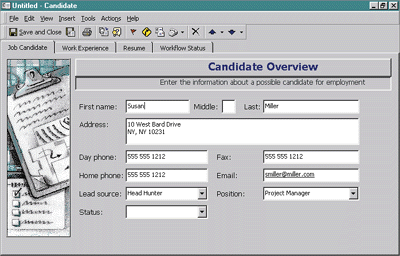 |
| Figure 5: Job Candidates Outlook Form |
The only problem with the Outlook form was, in fact, that it was an Outlook form and not a Web form. However, a new Microsoft technology, the Outlook HTML Form Converter, made it easy to convert the Outlook form to an identical Web form. The Outlook HTML Form Converter is a wizard that allows you to convert existing Outlook forms, either from templates or form libraries in Exchange, to Active Server Page (ASP)-based applications. The interface for the converter is shown in Figure 6. The form converter scans the Outlook form, recreates the user interface and data binding on the form, and produces and publishes its HTML version. The conversion produces HTML 3.2-compatible code. This means that the forms should work in browsers that support frames and JScript®. ActiveX® controls, Dynamic HTML (DHTML), and Java-language applets are not included in the converted form.
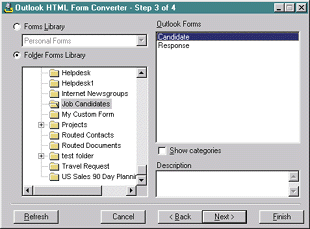 |
| Figure 6: Outlook HTML Form Converter |
There are some things to watch out for when using the converter. For example, overlapping controls and adding pictures to buttons in your Outlook form may make your Outlook interface look much better, but these features do not translate well to the Web environment, especially the non-DHTML environments that the form converter targets. For this reason, you should look at the documentation for the form converter for more information on how to safely design your Outlook form for complete conversion.
One other gotcha I'll point out (even though it's not part of my sample application) is ActiveX control support. The form converter does support converting an ActiveX control to your Web application. However, the support is limited to adding the <OBJECT> tag for the control automatically to your HTML. It is your responsibility to package up the control and add in the necessary information to download the control to the user's machine through their browser.
You can view the results of the converted form by browsing through the Custom Forms Library in Microsoft Outlook Web Access. The form converter automatically publishes your new form and associated files to this Forms Library. If you have multiple pages or tabs in your forms, a file with the .asp extension is created to represent each page. For example, if you have a custom second page in your form, the converted file for this page will be called page_2.asp. If you separate the compose form from the read form in your Outlook-based application, there will be two files for each page: page_x.asp and page_x-Read.asp.
All of the pages are a mixture of server-side ASP code that calls the Exchange Server Collaboration Data Objects (CDO) library (discussed later) and client-side JScript. Since looking at most of the code behind these files is beyond the scope of this article, you should browse through the sample application (downloadable from the link at the top of this page) to learn more about how these files are structured and programmed. In the sample, one of the tabs in the app is customized so that status tracking for the workflow can be enabled in the Web interface.
Providing a Web Interface through CDO
Now that the forms have been converted to HTML, I need a way for users to add new job candidates and to look at the current job candidates. To do this, I'll add a Web interface to the Exchange Server Public Folder where the job can-didates are stored. To provide this Web interface to the application, I'll use the CDO and CDO Rendering libraries.
The CDO and CDO Rendering libraries are provided with Microsoft Exchange Server 5.5. They encapsulate the collaborative functionality that you want to build on Exchange Server, such as messaging, calendar scheduling, contact building, and discussion functionality. The CDO library is a hierarchy of objects that are easy to use and navigate.
The Session object sits at the top level of the CDO library. It corresponds to any valid MAPI session. An example of a MAPI session is when a user logs into their Microsoft Exchange Server mailbox from an email client. The main children of the Session object are the InfoStores and AddressList collections. The InfoStores collection contains the various places where users can store information. Typical InfoStore objects include mailboxes stored on a server by Microsoft Exchange, messages stored in a file on the user's computer, and mail messages synchronized from the server mailbox to the client's offline information store. A specific InfoStore object, such as a server mailbox, contains a Folders collection, which in turn contains a Messages collection. All Message objects have properties associated with them. In the case of a typical email message, these properties are the subject of the message, date/time sent, and the text of the message. Figure 7 should help you visualize the CDO object model and the relationships among its objects.
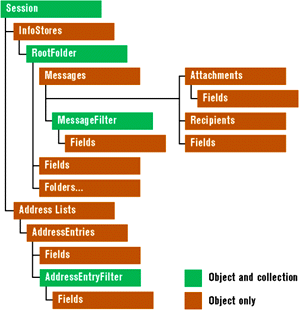 |
| Figure 7: The CDO Object Model |
The most important piece of information about the Message object is the message type. This property tells applications what type of information and properties may be associated with the message. The typical email message is assigned the IPM.Note message class. (IPM stands for Interpersonal Message.) A message class is very similar to a C++ class. Message classes have specific properties and functionality. Just as you wouldn't try to use integer functions to compare two CString objects in C++, you wouldn't expect an object of type IPM.Task to support the same functionality as an object of the IPM.Appointment class.
While the job tracking application does not explicitly create new items through its CDO code, you should look at the code from the converted Outlook form. It contains a section of code that uses the CDO library to write out a new job candidate (see Figure 8). As you can see, it's straightforward to program the CDO library. If you want more information about the collaboration/messaging functionality of the CDO library, please refer to the online documentation mentioned at the end of this article.
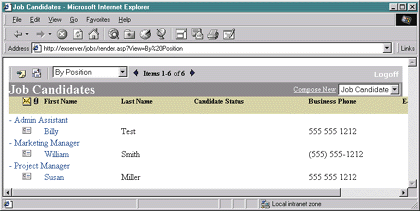 |
| Figure 9: Candidates Rendered by Position |
Instead of focusing on creating new candidates, I'm going to dive into displaying the current job candidates. To do this, the application uses the CDO Rendering library. This library takes information from an object container, such as a folder or the directory in Exchange Server, and automatically generates the HTML to render that container to a Web interface. Not only does this automatic rendering save time for the developer, its functionality is driven by the CDO Rendering library. This means that you can customize the format of the automatic rendering by setting properties on the objects in the library. Figure 9 and 10 show two examples of automatic rendering using the CDO Rendering objects. As you can see in Figure 9, the candidates are grouped by the position they are applying for. In Figure 10, the same candidates are shown sorted by last name. The entire HTML output for the columns and the data in those columns were generated by the CDO Rendering library.
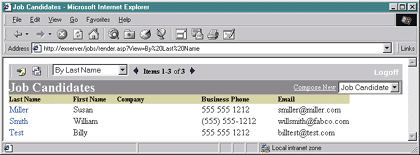 |
| Figure 10: Candidates Shown by Last Name |
Customizing the CDO Rendering library is easy. Like the core CDO library, the CDO Rendering library is hierarchical in nature. Figure 11 shows the objects in the CDO Rendering library and their relationships. At the top of the object library is the Ren-der-ing-Ap-pli-cation object. From there, you can create the other objects in the library.
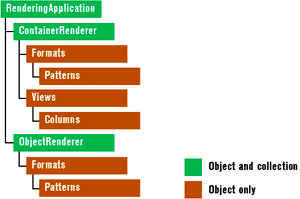 |
| Figure 11: CDO Rendering Objects |
The code in Figure 12 shows an example of how to use the CDO Rendering library. As you can see, the first thing you need to do is create a RenderingApplication object. In the global.asa code for the application, this step is already complete, so the code just pulls that object from an Application-scope variable named RenderApplication.
Once you have the RenderingApplication object, you can use its CreateRenderer method to create a rendering object. The CreateRenderer method takes as a parameter the class of rendering object you want to create. The class parameter has two possible values: CdoClassContainerRenderer (the value 3) or CdoClassObjectRenderer (the value 2). Since I'm going to render a folder containing items instead of an individual item in a folder, I need to create a container renderer.
You must set two primary properties on the container renderer before you can use it: DataSource and CurrentStore. The DataSource property should point to the CDO object you want the renderer to use as the source for its generated HTML. In this application, I set the DataSource property to be the CDO Messages collection for the folder. The Cur-rent-Store property should point to the CDO InfoStore object, which contains the object you set in the DataSource property. Since I'm using an Exchange Server Public Folder, the code sets this property to be the CDO InfoStore object, which is the Public Folder InfoStore object.
Now that your renderer is set, all you need to do is customize its properties and child objects to set up the interface you want to appear when the container is rendered to HTML. In the code, the LinkPattern property is set to a specific HTML tag. This causes the renderer to automatically create links on your items so users can open them. The renderer will use a default pattern for this, so if you want to actually open up the item using your custom form, the code will set this property to a custom HTML tag.
The renderer only needs a bit more customization to adjust some of the formatting on the object. You do this by using the Formats and Patterns collection objects. The Formats collection contains objects that describe how a particular property in Exchange Server should be rendered. For example, one of the Format objects describes how the icon for the item should be rendered. This Format object represents the message class of the item.
Under each Format object, a Patterns collection contains Pattern objects that describe how a particular value for the property in the Format object should be rendered. For example, if an item has a particular message class, such as IPM.Contact, then the icon that you want to be displayed by the renderer for that message class might be different than the icon for an IPM.Post item. Using the Pattern object, you can easily modify the renderer to use different icons for these different situations.
In Figure 12, you can see how some Format objects are customized to meet the needs of the job candidates application. The CDO Rendering library will fill the Format and Pattern objects in the library with default values if you do not specify your own. This saves time, since you only need to tweak your custom formats and not the formats for all the objects in the library.
Now that formatting is complete, you need to tell the renderer which columns you want to show, as well as how to group, sort, and filter items in those columns. One of the best features in the library is that any custom table views you create in Outlook will automatically translate to the CDO Rendering library Views collection. You can then set the CurrentView property on your ContainerRenderer object and the CDO Rendering library will show all the columns you specified in the Outlook view with the grouping, sorting, and filtering that you wanted. There's no need to code on your part; CDO does all the hard work for you. Furthermore, since Outlook provides a very easy view creation interface, you can quickly create and customize your views through Outlook and have those views available in your Web application.
Now you need to tell the renderer to start rendering out the information to HTML using your formats and view. You do this through your renderer's Render method. You have to specify to the Render method the style to render—which can be CdoFolderContents (the value 1) or CdoFolderHierarchy (the value 2)—the page number to render (just in case you want to break the results into multiple pages), and the ASP Response object that should receive the rendered content. Notice the third parameter in the code. It always takes a value of 0 because it's reserved for internal use only.
That's it. You have now created a rich Web view of the items in a folder with minimal coding.
Exchange Server Routing Objects and Library
Exchange Server 5.5 Service Pack 1 (released in September 1998) included a number of developer enhancements. One was the Outlook HTML Form Converter described earlier. Another was the addition of routing/workflow technologies and developer tools to Exchange Server. In the service pack, you will find a Visual Basic®-based application called the Routing Wizard. It allows you to set up parallel or serial workflow routes and the parameters for those routes. The service pack also includes a routing engine and object library to process and program the routes. The Routing Wizard interface is shown in Figure 13; a diagram of the Routing Objects library is shown in Figure 14.
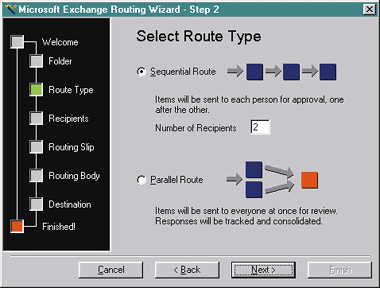 |
| Figure 13: The Routing Wizard |
The architecture for the Routing Objects is based on a wizard-generated process map that's placed in the folder where you want the routing to occur. Then, every object placed in that folder will have the map attached to it and will be routed by the engine. You can also do one-off routes. By adding a custom map to an item before placing it in the folder, the engine will execute the map attached to the item rather than adding the folder map to it.
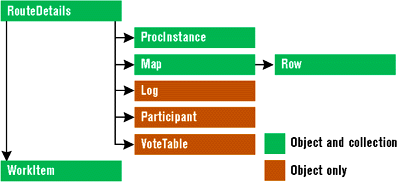 |
| Figure 14: Routing Objects Library |
The easiest way to understand what these maps look like is to see one. Figure 15 shows a routing map for a folder. The program showing the map is a custom Visual Basic program called AgentInstall that I wrote. This program allows you to easily view maps and programmatically create custom agents in your Exchange Server folders.
As you can see in Figure 15, the routing map consists of line numbers and actions on those line numbers. Some of the actions, such as Goto or Terminate, are built into the engine. Others are custom actions such as IsTimeout or IsApprovalMsg. The Routing Objects library allows you to customize the actions for each step by writing VBScript code that is contained in the default script for the folder. From your VBScript code, you can call objects in the Routing Objects library or other object libraries such as CDO or ADO. The Routing Objects library is very approachable. Some objects can be created independently of others, unlike the CDO object library, where all other objects are created from the Session object.
To help you understand the basics of the Routing Objects library's functionality, the Job Candidate form has a simple workflow tracking page that allows users to see the status of the candidate in the approval process. This page uses the Routing Objects library to show the responses received from users during the routing. Figure 16 shows the code that implements this. It creates the VoteTable object in the Routing Objects library and assigns the PIMessage property to be the CDO Message that contains the job candidate you want. The code then scrolls through and sees if there are any responses in the Recipient structure on the VoteTable object. If there are no responses, the form shows that there is no status. If there are responses, the form shows the name of the person, how they responded (Approve/Reject), and when they responded.
Since I can't cover all the functionality contained in the Routing Objects library and engine here, see the Platform SDK for further documentation. The Routing Objects library does provide advanced functionality for workflow applications, such as support for workflow roles, status tracking, timeouts, and multiple routes/processes.
If you are interested in learning more about Exchange Server, Outlook, or any of the object libraries I mentioned, please visit http://www.microsoft.com/exchange/developers. This Web site is a portal to the wealth of Exchange Server and Outlook developer information.
|
From the May 1999 issue of Microsoft Internet Developer.
|