Fitch & Mather Corporation: Sample Setup
Scott Stanfield
Vertigo Software, Inc.
September 1998
Summary: Provides the sample files and describes how to install the FMCorp database, components, and Web site. (10 printed pages) Covers system requirements, automatic setup, and manual setup.
Click to copy the Fitch & Mather sample executable file.
Run this file (fmcorp.exe) to setup the Fitch & Mather sample application. This program will also place the source-code files and Microsoft Word versions of all the associated Fitch & Mather articles on your local drive.
Requirements
The database server requires Microsoft® SQL Server™ 6.5 or 7.0. The Web server must be running Microsoft Internet Information Server (IIS) 4.0. The Web server should also have the Microsoft Windows NT® Option Pack installed with the SMTP (for e-mail) and Site Server Express options (for posting acceptor).
The development machine needs the Microsoft Visual Studio® 6.0 development system (or just Microsoft ® Visual Basic 6.0 and the Microsoft Visual InterDev™ 6.0 development system).
Automatic Setup
If you want to set up the site automatically, run the setup.vbs script in the Setup folder.
The FMCorp Setup script (setup.vbs) can be broken down into three main parts:
- Database creation
- Web site creation
- Component registration
Each of these three areas uncovered some unique problems we encountered while creating an automatic Setup program.
Database Creation
The Setup script automatically creates a database device. The documentation is not clear on how to do this straight from SQL. We used the SQL Trace tool to see how SQL Enterprise Manager does its job and then copied the script for our own use.
The Setup script allows you to skip the device creation process. This is necessary if you are using SQL Server 7.0.
Apart from the database device creation, the entire database schema is contained in a single file called scripts\FMCorpSchema.sql. The Setup program uses ISQL.exe to run this script.
Web Site Creation
Earlier versions of the Setup program simply copied the Web files to the appropriate Inetpub folder on the Web server. The major drawback to this approach is that it completely bypasses the Microsoft FrontPage® server extensions that allow the project to be browsable from Visual InterDev.
- After the site has been created, right-mouse click the global.asa file, and choose Add Data Connection.
Follow the dialog boxes to create a file-based data source name (DSN) called "FMCorp" that points to your new SQL Server database FMCorp. When finished, you should have access to the Data View tab.
Hacking Microsoft Visual InterDev and FrontPage server extensions
Copying a Web site using this approach is acceptable if you are deploying a site, but not if you are distributing one that will be used as a teaching tool in Visual InterDev.
After many hours of searching for a better way, we figured out how to programmatically create a FrontPage-enabled Web site.
Using a real-time registry-spying tool called Regmon from System Internals, we analyzed the globally unique identifiers (GUIDs) Visual InterDev used when creating a Web site. We found the GUIDs in the registry and tracked them down to a file called vidwoj.dll (in the Program Files\Common Files\Microsoft Shared\Wizards98 folder).
We created a simple Visual Basic test program that referenced the type library in this DLL. After a few hours of trial and error, along with the nifty Object Browser (F2), we figured out how to connect to Web server, enumerate the Web sites, and create new ones.
We converted this code to Visual Basic Scripting Edition (VBScript) by modifying the DIM statements' type declarations and replacing "new" with CreateObject calls. The resulting VBScript code will programmatically create a FrontPage-enabled Web site that is easily browsable from Visual InterDev.
Setting IIS permissions
Simply moving the files to Internet Information Server was only part of the challenge. We had to configure individual folder and file permissions programmatically. The special cases include:
- Securing the post folder to allow only write access and no scripting support.
- Adding execute privilege to the cpshost.dll.
- Removing anonymous access to LoginNT.asp.
Creating a File DSN
The FMCorp Web application needs a data source name in order to connect the Web pages to the database. The Setup program automatically creates the DSN called "FMCorp."
Component Registration
If we were not using Microsoft Transaction Server (MTS) to manage our components, we could simply run regsvr32.exe on FMCorp.dll and be done with it. Instead, we needed to programmatically create a transaction package and add the FMCorp interfaces to that package.
Working from a sample script in the IIS Resource Kit, we were able to open the MTS package collection and add an item called FMCorp. Next, we added the DLL to the new package.
The transaction requirements for each component were also configured in the Setup script.
Why Is It Script?
The Setup script gradually evolved from a much simpler process. Earlier versions ran the schema script through ISQL and copied the files to the Web server.
More features started creeping into the Setup script. After it was too late, we realized we probably should have written a stand-alone program with Visual Basic. We'd have the benefit of a better debugging environment and compiler support.
Testing and debugging Windows Scripting Host (WSH) scripts has come a long way with Visual Studio 6.0. Visual InterDev supports remote debugging of WSH scripts.
One More Thing…
After running the automatic Setup, you must create a Visual InterDev 6.0 project based on the new Web site. Open the global.asa file, and follow these instructions:
- Right-click the global.asa file, and choose Add Data Connection.
- Follow the dialog boxes to open the file-based DSN called "FMCorp" that points to your new SQL Server database FMCorp. When finished, you should have access to the Data View tab.
Manual Setup
For the following manual steps, my database server, Web server, and development workstation are all on the same machine, called "Ahi." My SQL Server 6.5 is installed on d:\mssql65, so you might need to change some of the paths to suit your needs.
Create the FMCorp Database
- Use ISQL/W to connect to a SQL Server 6.5 or 7.0 database server where you have administrative privileges. Execute the following commands on the master database:
/* Choose the next suitable virtual device number */
declare @vdevno integer
select @vdevno = min(low / 0x01000000)+1
from master..sysdevices

/* Create a 12 MB database device called FMCorpDevice */
/* Change the physical path PHYSNAME to match your data directory */
DISK INIT NAME = 'FMCorpDevice', PHYSNAME = 'd:\mssql65\data\fmcorp.dat', VDEVNO=@vdevno, SIZE=6144

/* Add a database called FMCorp to the device (4 MB for the log) */
create database FMCorp on FMCorpDevice=8 log on FMCorpDevice=4
(Look in Scripts\dbdevice.sql for this code.)
The preceding commands create a new 12-megabyte (MB) database called "FMCorp." We'll populate the schema in the next step.
Note I would normally execute these commands through the SQL Enterprise graphical user interface (GUI), but this way you can see exactly what is happening behind the scenes.
Reference To learn more about virtual device numbers for database devices and why you calculate them this way, refer to the SQL Server documentation under "DISK INIT" or "sp_helpdevice."
- Use ISQL to load the FMCorpSchema.sql script located in the Scripts folder. This will build and configure the FMCorp database. After building the schema, it will add four default FMCorp employees and build a few sample expense reports.
Install the Components
- Launch the Microsoft Management Console (MMC) or the Transaction Server Explorer. You can find a link to this icon under the Windows NT 4.0 Option Pack.
- Expand the left-side tree control to Microsoft Transaction Server\Computers\My Computer\Packages Installed, as shown in Figure 1. Right-click Packages Installed, and choose New Package. Click the Create an empty package button, and call this package FMCorp.
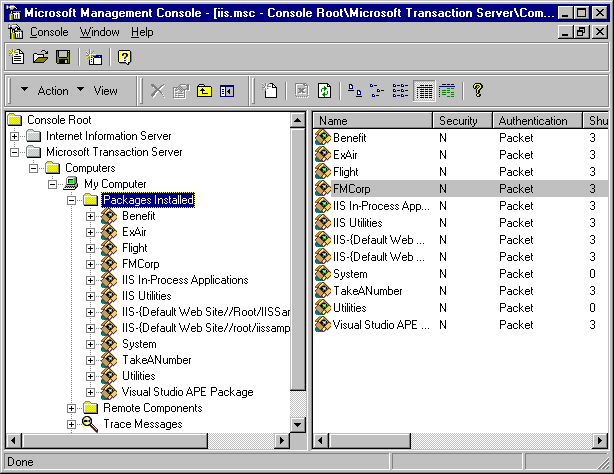
Figure 1. Transaction Server Explorer
- Expand the FMCorp package to show the Components folder (it should be empty). Using the Windows Explorer, locate the FMCorp.dll file (objects\FMCorp.dll), and drag the file into the window. The right Explorer window should look similar to Figure 2.
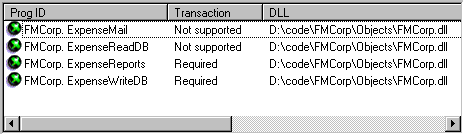
Figure 2. Component list
- You can now test the component and database connection using the FMCorpTest.exe program. Launch the program from the Objects\FMCorpTest folder. The FMCorp test program looks like the image shown in Figure 3.
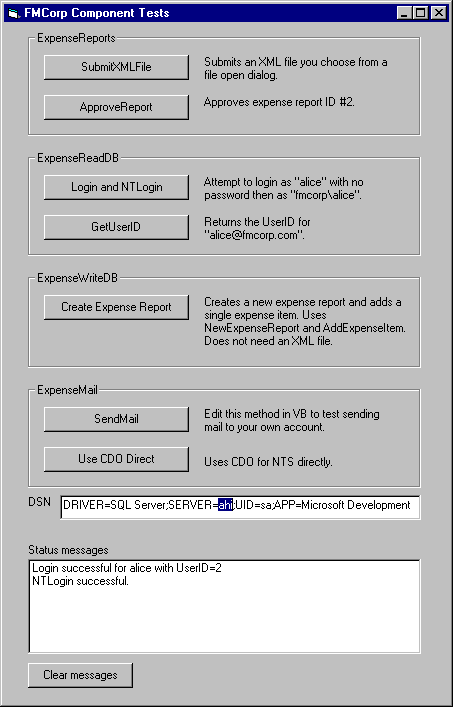
Figure 3. FMCorpTest program
The DSN is hard-coded for my computer, so you'll have to change it by hand. Change the server name "Ahi" to your SQL Server name in the SERVER=Ahi section.
Next, click the Login button. You should see a message similar to the one shown in the Status messages area in Figure 3.
Create the FMCorp Web Site
- Launch Visual InterDev 6.0. Choose New Project from the New menu, and select the Sample App Wizard. Choose the local path and Web site name in the Name and Location window. The Name should be FMCorp, because there are a few hard-coded paths in the Web site. Figure 4 shows the New Project dialog box.
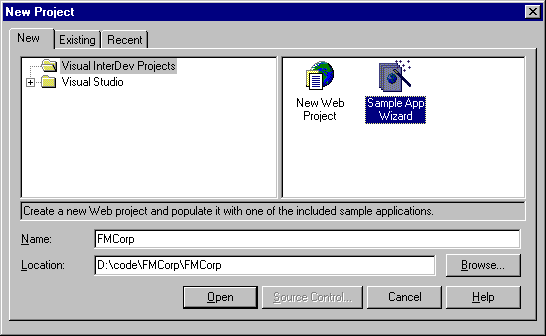
Figure 4. New Project dialog box
- In Step 1 of the Sample Application Wizard, locate the FMCorp.inf file from the distribution files. Click the Next button. Figure 5 shows the dialog box.
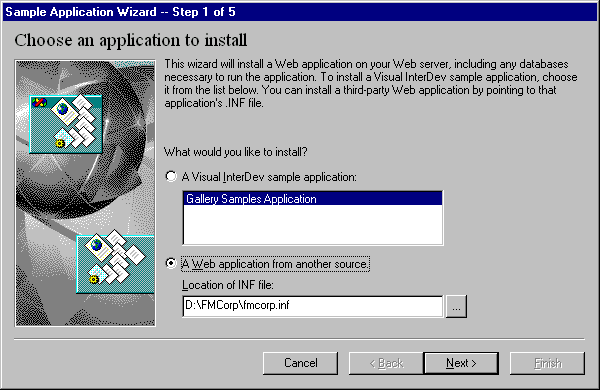
Figure 5. FMCorp.inf file
- In Step 2, enter the server name and the name of the Web site. Again, the Web site should be called FMCorp.
- Choose the defaults for the remainder of the steps.
- After the site has been created, right-click the global.asa file, and choose Add Data Connection.
Follow the dialog boxes to create a file-based DSN called "FMCorp" that points to your new SQL Server database FMCorp. When finished, you should have access to the Data View tab.
Change Web Site Options
Using the Internet Service Manager (aka MMC), locate the FMCorp Web project. Right-click the POST folder to display its properties. Change the access permissions to allow Write access. Write access is necessary in order to upload the XML files. Change the application settings to allow Execute privileges. We need Execute in order to run the posting acceptor DLL in this folder. Figure 7 shows the new settings.
Right-click the NTLogin.asp folder to display its properties. Click the File Security tab, and then click the Edit button. Turn off Anonymous access to this file. Only Windows NT-authenticated users will have access to this file. Figure 6 shows the new settings.
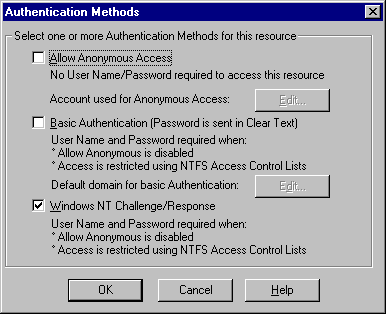
Figure 6. NTLogin authentication options
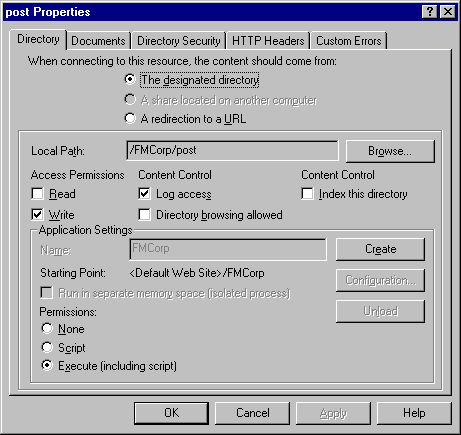
Figure 7. Post folder properties
Conclusion
Although it is faster to install FMCorp using the Setup script, we think it is important to know how to configure and install the site by hand. The Setup script includes valuable information on how to control IIS through the OLE Automation and the metabase.
The script allows fine-grain tuning of permissions on an individual file basis—something you can't do with the MMC.
About the Author
Scott Stanfield is the president of Vertigo Software, Inc. Vertigo Software is a San Francisco Bay Area-based consulting firm that specializes in the design and development of Windows DNA applications and components. He can be reached at scott@vertigosoftware.com or on the Web at http://www.vertigosoftware.com/.
For More Information